Search
The Renewable Energy site for Do-It-Yourselfers
Tank Updates
| The EPDM lined tank on our $1K solar water
heating system has been in operation for about 10 months.
I decided to spend a little time on the tank to accomplish the
following items:
Bottom line is that everything looks fine, and is holding up well --
I expect it to live longer than I do :) |
|
How does it
look after 10 months?
I took the lid off, and removed the
HDPE (black poly) heat exchanger pipe coil. This gives a good look at the
full liner, the edge sill pieces, and everything inside the tank. It all
looked fine to me. The liner showed no signs of distress or brittleness.
The plastic deck wood pieces that go around the top edge of the tank, and
provide a place for the lid to seal down to looked fine. I was a bit
concerned about whether these would hold up to the tank temperature, but they
are doing fine.
The EPDM padded concrete blocks that
are put in the tank bottom to support the pipe coil heat exchanger were not
disintegrating.
click on pictures for full size
|
The tank water has a very light yellowish
cast. The picture does not show it well,
but the bottom is very clearly visible with
only a small amount of sediment on the bottom. |

The sill pieces that the lid seals down
to are made from plastic deck wood.
They show a little mineral staining from
the water, but not signs of deterioration
or swelling. |
Water Condition and
pH
As the picture above shows, the water
was relatively clear. There is nothing growing in it that I can see.
There is a slight yellow tinge that might be some dissolved material from the
EPDM liner, or who knows what. There is a little sediment at the bottom,
and a few things I managed to drop into the tank and did not recover. The
tank water tastes awful.
I did not add anything to the water
when I initially filled the tank. It is water straight from our cold water
tap. We do have a water softener, so some of the dissolved Mg and Ca
minerals are replaced with Na by the softener. None of the pipes that I
could examine showed any sign of mineral deposits.
I checked the water pH, and it is
8.4. I was prepared to add some baking soda if the pH was acid, but this
is slightly alkaline. As near as I can tell from asking a few people, the
8.4 is OK, and no action is needed.
So, I'd say that this is some
tentative evidence that you can just put plain water in the tank, and it will
probably be OK. In any case, I'd stay away from putting anything toxic in
the tank, as the heat exchanger is a single wall type.
Changes to reduce heat loss, and provide better lid
sealing
I did this test on
tank heat loss last month. It shows somewhat
more heat loss than I would like. So, since I was working on the tank
anyway, I did a few things that might help reduce heat loss, including:
-
Worked out a better way to seal
the lid down tightly to the tank (see picture)
-
Insulated all the pipes leading
too and from the tank -- both the collector circuit and the heat exchanger
circuit.
-
Sealed up all the small gaps I
could find between and around insulation boards with the "Great Stuff"
polyurethane foam in a can.
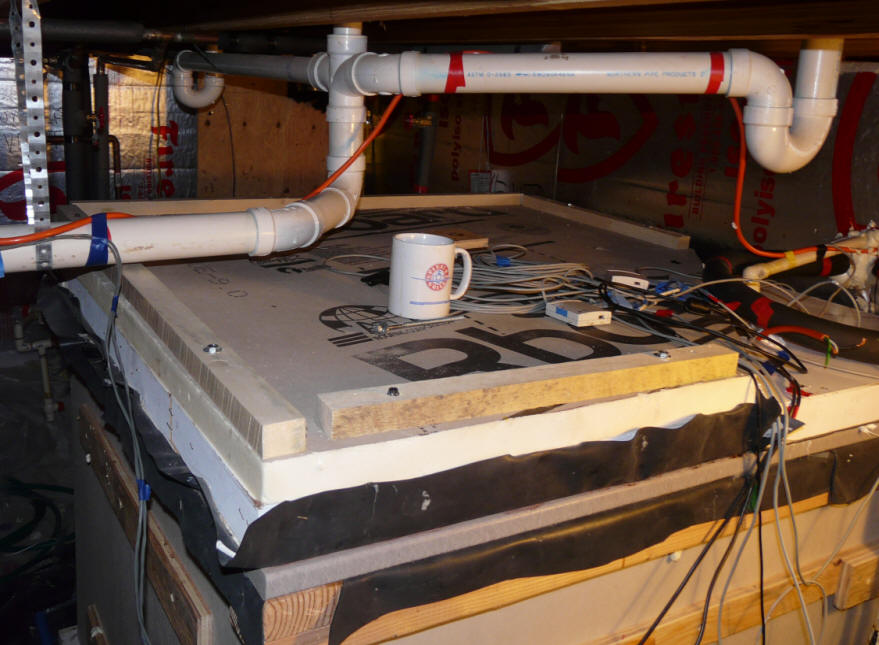
The wood strips on
top of the top of the lid clamp the lid down tightly to the grey plastic deck
lumber sills.
6 inch long lag screws go through both layers of foam and into the sills -- one
of the lag screws
is visible in front of the coffee cup.
The part of the lid to the right is fixed to the tank, while the large part to
the left comes off for access to the tank.
There is a half inch CPVC pipe that goes through the tank lid (hidden by the
coffee cup) -- a dipstick can be inserted
in this pipe to measure the water depth, or test the pH. The same pipe can
be used to add water if needed -- to date the
evaporation rate has been quite low.
The construction of the lid from the
bottom to top is:
-
A layer of EPDM
-
A layer of 2 inch polyiso
insulation board with wooden edging (the wooden edging is probably
unnecessary, but the edged panel was left over from a previous project)
-
A layer of 1/8 inch hardboard to
add some stiffness
-
A layer of 1.5 inch polyiso rigid
foam board (I would have used 2 inch, but I had the 1.5 inch on hand)
-
The wooden clamp strips that are
lag screwed through the insulation board and into the grey deckboard sills.
All of the layers are glued together
with Great Stuff polyurethane foam or silicone seal.
I did not add anymore insulation at
this point, so that I could test the effect of the steps above.
I added a dipstick that allows any
drop in the tank water level to be measured more precisely. The pipe the
dipstick goes through is sealed up with silicone to the EPDM and insulation
board. I leave a very small part of the pipe that the dipstick goes down
through open to vent the tank and prevent any pressure difference between inside
and outside, although I would guess that it is not so pressure tight that this
is needed.
Replace the HDPE plastic pipe coil heat exchanger with a PEX
pipe coil
I've been recommending for some time
that people building the system now use a coil of PEX pipe for the heat
exchanger rather than the coil of HDPE (black poly) pipe that I used in the
initial build. There are two main reasons for this:
- With the HDPE pipe, I could
sometimes get a slight smell of poly pipe when taking a shower. This
was not really that objectionable, but using the PEX pipe coil heat
exchanger eliminates this slight smell.
- When used as a heat exchanger,
the HDPE pipe is at, or a bit beyond its design specifications. When I
got the HDPE coil, I intentionally got the lowest pressure rating they had
(80 psi) to make sure that if the exposure to 140F and house water pressure
were going to result in a failure of the HDPE it would show up on the
prototype. After 10 months, the HDPE pipe coil showed no signs at all
of distress, and seemed to be holding up fine to our up to 50 psi water
pressure.
But, using the PEX instead of the
HDPE completely eliminates the pressure/temperature rating as a potential
source of failure or leaks. The PEX has temperature/pressure ratings
well over what it will ever see in this application. Based on its
track record in applications like radiant heating, I expect it to be going
strong 50 years from now.
The price difference between a
300 ft roll of 1 inch PEX and the same in HDPE is about $100 -- probably
money well spent -- this extra $100 is already included in the total cost
estimate for the system, and it still stays inside the $1K target.
Both the PEX and the HDPE coils were
installed as a single length with no fittings at all inside the tank.
Whatever pipe coil material you use, it must be NSF approved -- this will be
stamped on the outside of the pipe. I got my 300 ft coil of 1 inch PEX
from
BlueRidge Hydronics here for $167 with free shipping... While the this
300 ft coil of PEX heat exchanger has not yet stood the test of time, my feeling
is that it will be about as bomb proof and efficient a heat exchanger as you
will find.
In a nutshell, the advantage of using
a big coil of plastic pipe like this is that it actually stores about 9 gallons
of water right in the pipe coil. This water warms up to full tank
temperatures, so for most water draws there is no temperature loss due to the
heat exchanger at all -- its a 100% efficient heat exchanger. Test results
for the pipe coil heat exchanger here...
One sort of odd thing is that the PEX
1 inch pipe is smaller in diamter than the HDPE 1 inch pipe -- the PEX is 0.875
inch ID, while the HDPE is right around 1 inch. The result is that the PEX
coil holds 9 gallons of water, and the HDPE holds around 12 gallons of water.
Not really enough to make much difference.
If you want to think about a cheaper
solution, a 200 ft roll of 3/4 inch PEX costs about $95, and holds about 3.8
gallons of water -- this will probably work well -- if you go this
way, I would take more care to separate the layers in the pipe coil well so that
tank water can flow through the pipe coil easily and improve its heat exchange
efficiency. At 3 gpm, 200 feet of 3/4 inch plastic pipe has about 2 psi of
pressure drop, so as long as you have descent water pressure, this should be OK.
Another option is to use a
heat
exchanger similar to the one Kevin used that uses a mix of copper and PEX --
this is more compact and will fit in a smaller tank.
For the connection of the 1 inch PEX
coil to the 3/4 inch copper house piping I used SharkBite reducing couplings.
This was basically the most straight forward way to go, and did not require
renting or buying a PEX connection crimper. These fittings are kind of
pricy at $12 each, but, they have the plus that they can be taken apart in the
future if need be. The valves that I put in two 3/4 inch copper lines to
the coil made it fast and easy to isolate the pipe coil from the house plumbing
for the change over. To drain the HDPE coil, I disconnected one end,
drilled a 3/8 inch hole in the other end, and used a compressed air hose
inserted into the 3/8 inch hole to force the water out the other end into a
couple 5 gallon buckets. It would have been very awkward to get out of the
tank without draining it first.
Note that both the PEX and the HDPE
coils when filled with water have essentially neutral buoyancy. They float
up to the top of the tank so that just a tiny bit of the top set of coils is
breaking the surface. They don't sit on top of the nice EPDM padded
concrete blocks that I put in the tank to give them a place to rest. So,
one might just leave out the concrete blocks, although they do provide a good
landing place in case you wanted to pump the water out of the tank for some
reason.
On the original HDPE coil
installation, I separated the coils from each other by pushing some short
lengths of half inch CPVC pipe horizontally between the pipe coils. The
idea was to separate the pipe coils enough to allow the tank water to flow
around them, and improve the heat exchange. Most of these CPVC pipes had
fallen out, so I only put a few of them back in for the PEX coil.
After thinking about this, I think
that the best way would have been to make some T shaped pieces from CPVC such
that one leg of the T could be pushed between the coils from the top -- the
other legs of the T would rest on the top of the pipe coil and keep it from
falling out. This would make for vertical flow channels through the PEX
coil, which is probably better for heat exchange than the horizontal channels.
click on pictures for full size
|
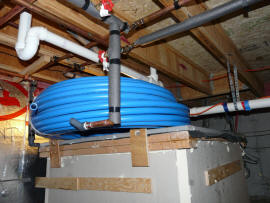
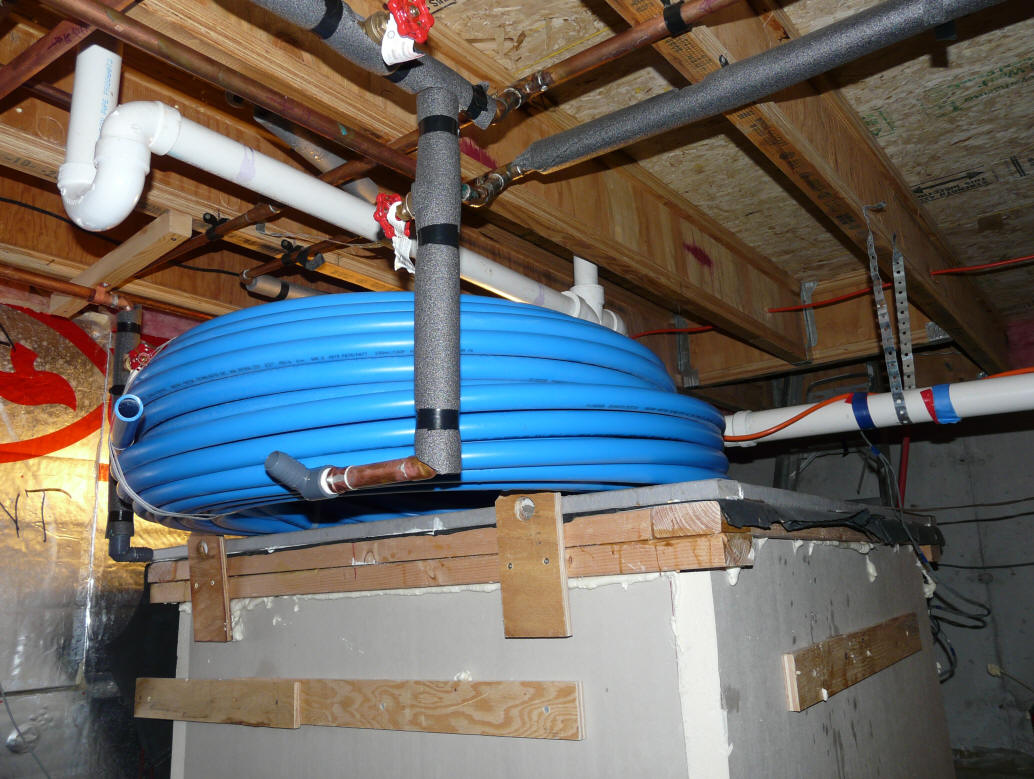
The 300 ft by 1 inch NSF PEX coil
ready to go into the tank. |

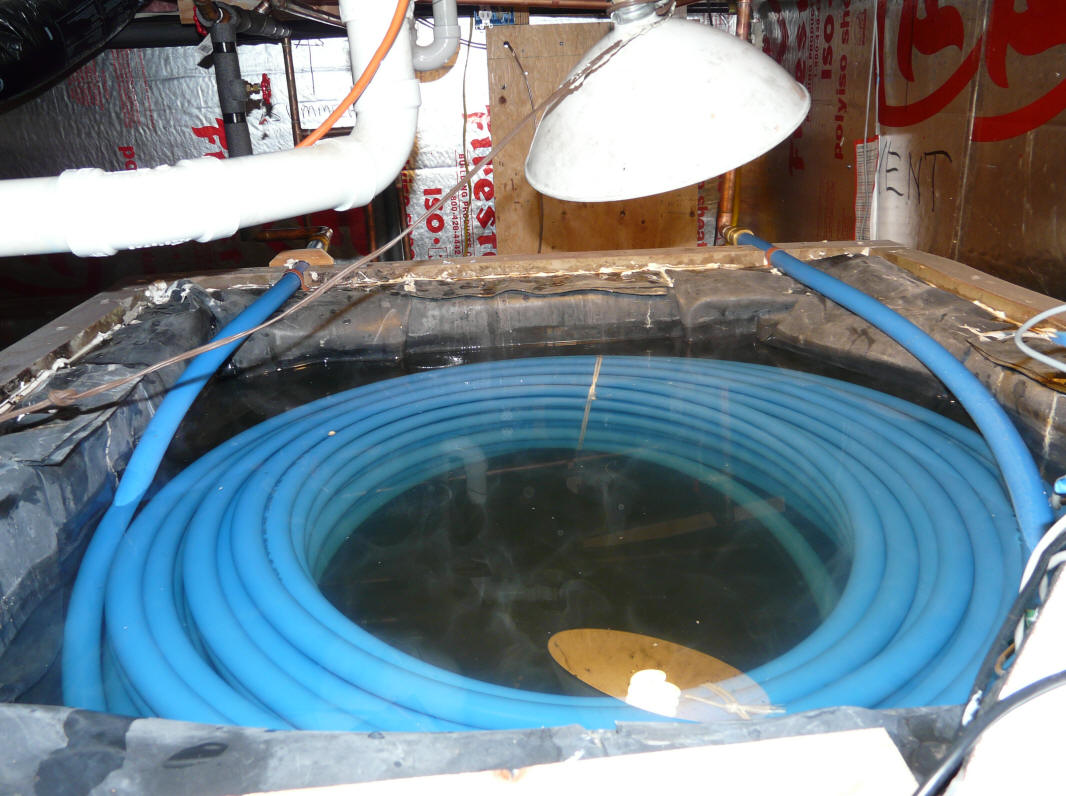
The PEX coil in the tank and hooked
up to the copper house plumbing.
Note how it stays just barely
submerged right at the top of
the tank. |
|

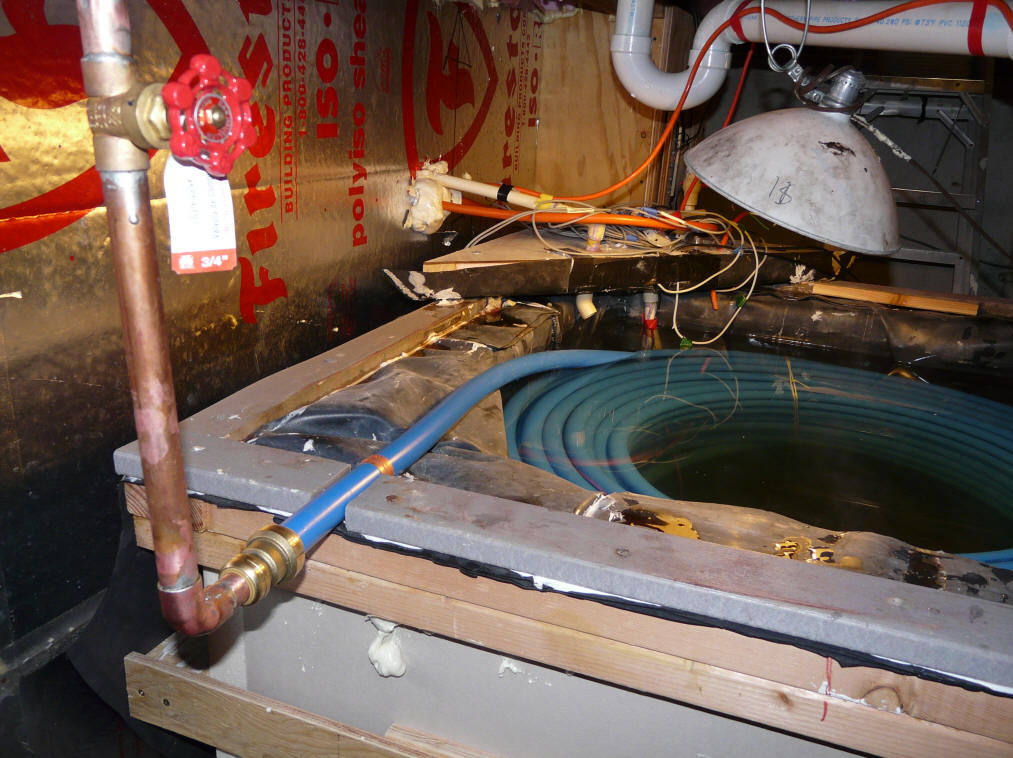
The PEX comes out through the sill
board, so that no penetration of the
EPDM liner is needed.
The slot in the sill board is sealed up
with silicone to keep vapor from
leaking out.
Note the SharkBite fitting that connects the
house copper pipe to the PEX. |
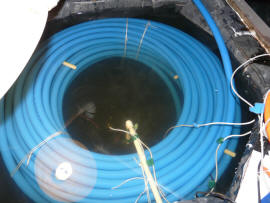
PEX coil in place. Between the
temperature loggers and
the differential controller, there
are 4 temperature sensors in the tank --
this is what all the wires are. |
The PEX pipe must be secured well where it goes
through slots in the sill board. I used a copper pipe clamp on the inside,
and a plywood support on the outside to keep it in position. Be sure to
seal around the penetration and the pipe clamp with silicone.
When you fill the tank, its very important to make
sure there is an air gap between the collector return pipe and the water
surface. Air must be able to go up the return pipe to replace the water in
he collectors as the collectors drain down. Not allowing this air space
will result in the collector not draining, and freeze damage to the collector
piping.
I guess that had I been thinking about this more carefully, I would have done
the CPVC pipe coil separators with a T shaped CPVC pipes placed vertically
between the coils (as described above), and would have cut the polypropylene
ties that I used to keep the coil together when placing it in the tank.
Both of these would result in more tank water circulation around the coil and
faster heat exchange. I'll do this next time I open the tank in 10 or 20
years :)
Gary June 11, 2009