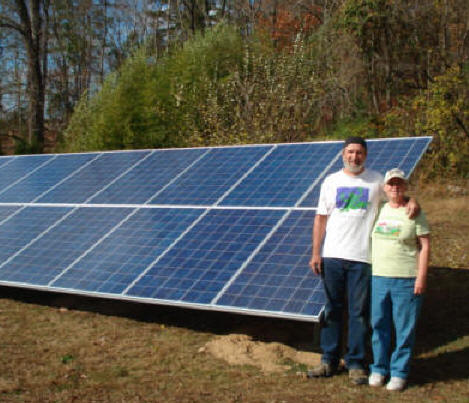
Doug has added a 4600 watt PV to his passive solar home.
The project has a unique mount system, which is durable, has a very
clean and simple look, and saves substantial money over commercial
mounts.
The system uses the Enphase micro inverters which improve efficiency
and simplify wiring. The end result is a very high quality system
for an amazing $2.29 per peak watt.
Thanks again to Doug for taking the time to document the project!
My Solar Electric Installation
Having experimented and lived with solar thermal most of my adult life,
building a passive solar home with solar water heating and using solar cooking,
I knew the power of sunlight. Since panel prices recently fell considerably, it
seemed the time was right for solar electricity. Having done all that was
reasonably possible to reduce electrical usage through conservation and
efficiency, my wife and I had our usage down to where we could afford the
photovoltaics to create about the same amount of electricity we use on an annual
basis.
Planning
In my state, homeowners are allowed to do any electrical work on their
own home as long as it gets inspected. This brought me to the decision to do the
installation myself of 4.6 kilowatts of grid tied solar.
For those who have access to the electrical grid, a grid tied system is
the least expensive way to go solar. It is also the most efficient, as batteries
used in the other standalone or grid tie with battery backup systems lose 10 to
20 percent of the energy put into them. The batteries also have to be replaced
periodically and that can be hazardous and expensive.
Grid tied systems are simple with no moving parts and no maintenance
required from the homeowner except possibly an occasional panel cleaning. The
grid functions as your backup generator and batteries.
Here in Tennessee, my electrical
provider TVA has a program called Generation Partners
http://www.tva.com/greenpowerswitch/partners/
which guarantees all Green energy producers $.12 a KWH over their base rate for
the next 10 years, as well as a $1000 incentive upon connection. This is better
than many other areas of the country where the utility pays you the same as
retail or less. This means I could have installed a system that produced half
the power we currently use and still zero out my bill. By putting in a system
that would produce as much electricity as we use annually, our payback period
will be shorter. Only after the acceptance call came, did I
start buying materials. The contract gave me six months to get the system
completed and inspected.
After much online research, it seemed to me that Enphase micro
inverters were the best way to go. These are small inverters that are usually
used one to a panel. They have several advantages-they are more efficient than
central inverters, they allow for easier future expansion, they come with a
great free online monitoring system, maximum power point tracking, and
simplified wiring. They also have the ability to tolerate shading or varying
roof orientations and tilts, and they can tolerate module mismatch and module
soiling, as well as minimizing impact from passing clouds. They put out
240 volts AC, which I was already familiar with, and they simply plug into the
panel and connecting cable.
An internet search found a company that was offering a
short-term sale on 230 watt Canadian solar panels combined with the M215 Enphase
micro inverters, so I bought 20 of each. Having had just put on an energy
conserving white metal roof, and having my solar hot water collector in the
middle of my semi-shaded south facing roof, a ground mount was the logical
choice. The best place was about 65 feet on the southwest side of my home.
Mounts and Rails
I briefly considering using wood for the rack, the 25-year warranty on
panels and inverters and projected life of possibly 50 years made me want to
build for long-term. As I can weld, I decided to use inch and a half (2”OD)
schedule 40 galvanized steel pipes. I could buy the five lengths of pipe I
needed locally for about $55 for a 21-foot length.
The website-
http://rredc.nrel.gov/solar/calculators/PVWATTS/version1/
makes it easy to determine the best angle for year-round production, which was
30 degrees for my location. The only tool that was not already owned by me and
needed for this job was a low-cost pipe notcher, which I found on sale for $24
from-
http://www.harborfreight.com/catalogsearch/result?q=pipe+notcher It uses a
drill press mounted hole saw to cut the proper angle in the pipe. Using the
notcher to cut each 21-foot length of pipe into three sections went well. They
were then welded together so there was a leg front and back connected by the 30
degree angled support piece.
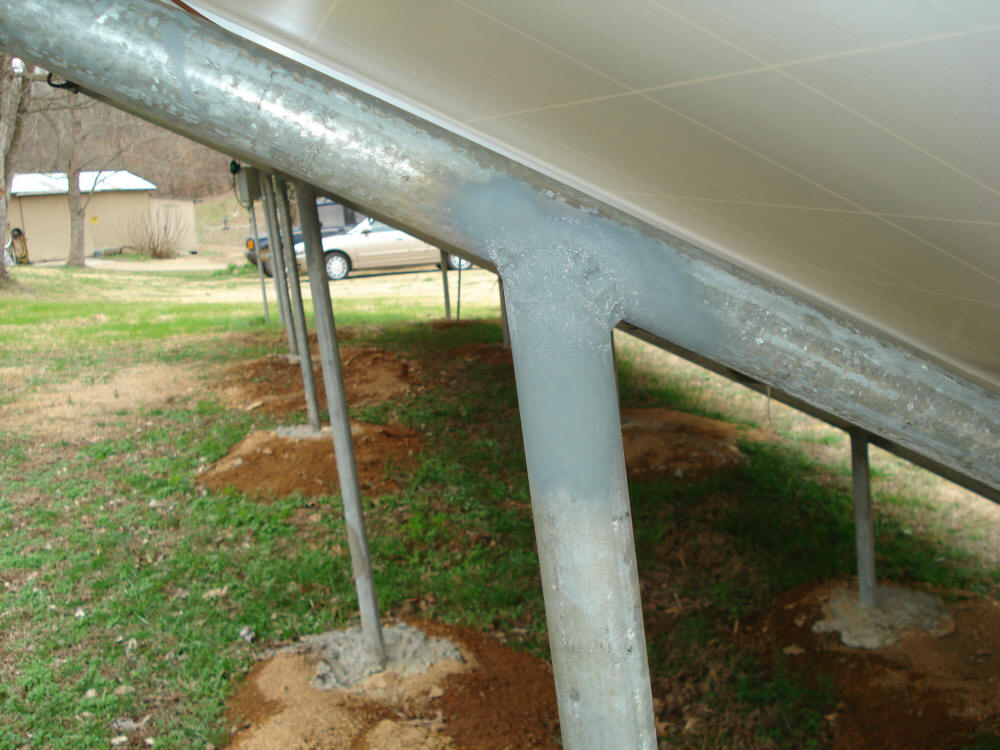
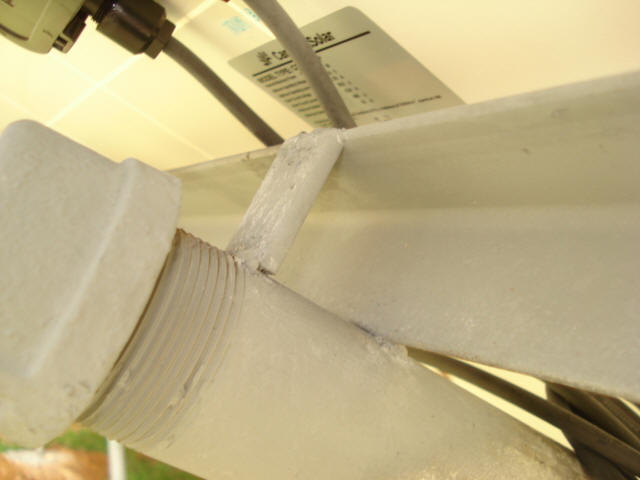
1.5 inch galvanized pipe mounts with concrete footings.
Verticals are welded to the angled module support beams.
Detail of vertical welded to the angled module
support beam.
Attachment of angles that support PV modules
to the mount pipes.
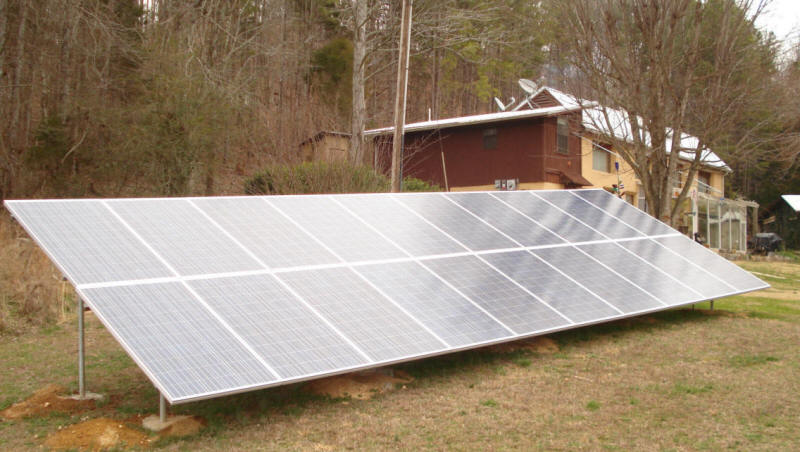
My array is arranged in what is called a portrait configuration
with the long sides of the panels going up and down, two rows of 10 each. This
uses a shorter and less expensive special connection cable for the Enphase micro
inverters, creating an array about 11 feet by 32 feet. There was no reason not
to allow the array to follow the western slope of the ground.
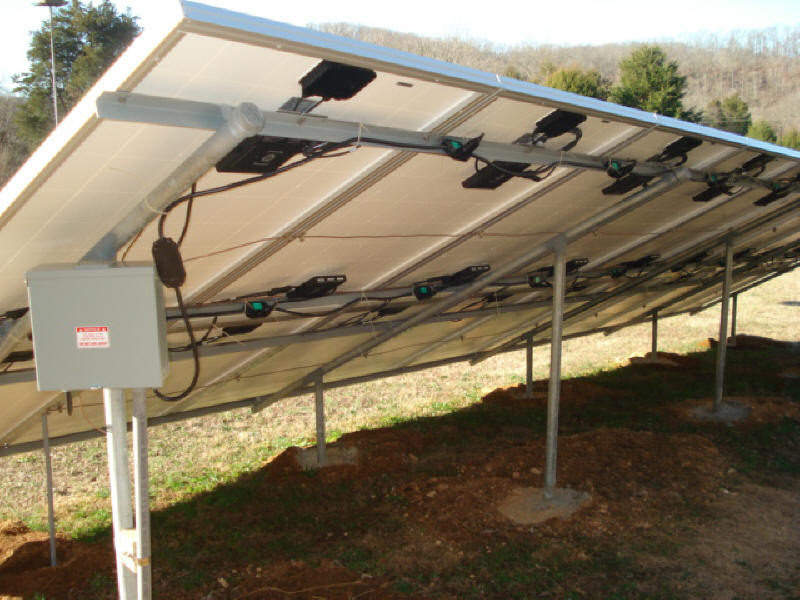
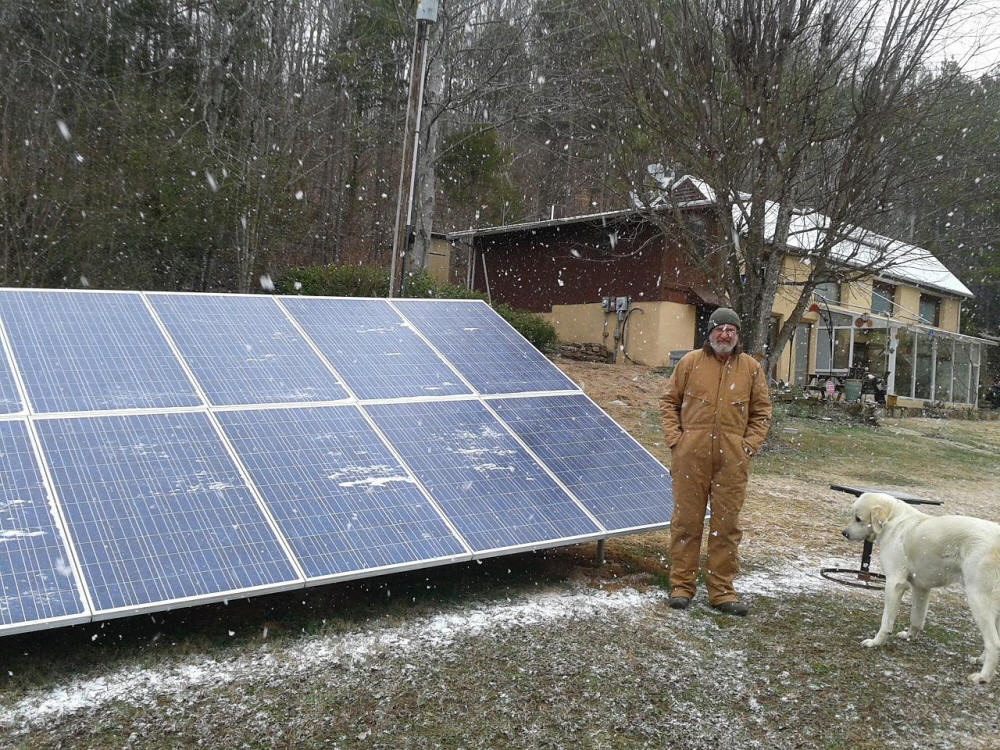
Mounts and rails with PV modules attached.
The three point hitch posthole auger on my tractor made it fairly easy
to bore 10 holes in the ground about 2 1/2 feet deep. Welding a small horizontal
section of steel onto each vertical post halfway down the hole added stability.
Once the concrete is poured around this piece, it makes it impossible for the
pole to slip up or down, and it increases its footprint.
Looking at the aluminum rails that PV panels are commonly mounted to,
they seemed rather expensive and difficult to attach to the galvanized pipe. The
ones I found online were about six dollars a foot plus shipping. That gets even
more expensive because longer lengths need to be truck shipped. Instead, sold
locally is inch and a half steel angle iron for a little over a dollar a foot. I
picked up seven 20-foot lengths. They were cut and welded to make four 32-foot
lengths, and then measured and drilled for the holes that the panels would bolt
to before welding them to the uprights. I amazed myself when all the holes lined
up!
Note the angle iron PV module support rails that are
welded to the 1.5 inch pipe mounts.
Closer view of the PV module angle iron support rails.
Note the stainless steel attachment of PV modules to the
angle iron rails.
Array Side Wiring
After bolting the panels to the angle iron using stainless steel
hardware, I mounted a single inverter behind each panel and simply plugged the
panels into the inverters, and the inverters into the two connecting cables,
which ran the length of the array. The Enphase inverters cannot have more than
17 in a string. So my system with 20 panels required two Enphase cables having
special terminals at each dead-end, while the ends closest to the house went
into a small breaker box- a combining load center, in solar speak. Each cable
back feeds to a two pole 20-amp breaker. The power then gets combined before
entering the conduit to the house. Each panel and inverter got connected
in series to each other with a number six solid copper ground wire. One end went
to an eight-foot ground rod under the array and the other to the ground in the
combiner box. The steel rack and rails are also tied to the ground system.
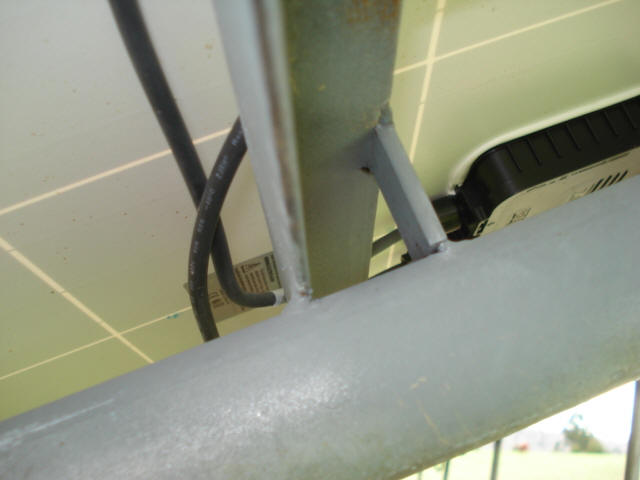
PV modules just plug into the micro inverters, and the
micro inverters plug into the cable that daisy chains
all the inverters together. Note the terminator on the
daisy chain cable as this is the last inverter in the row.
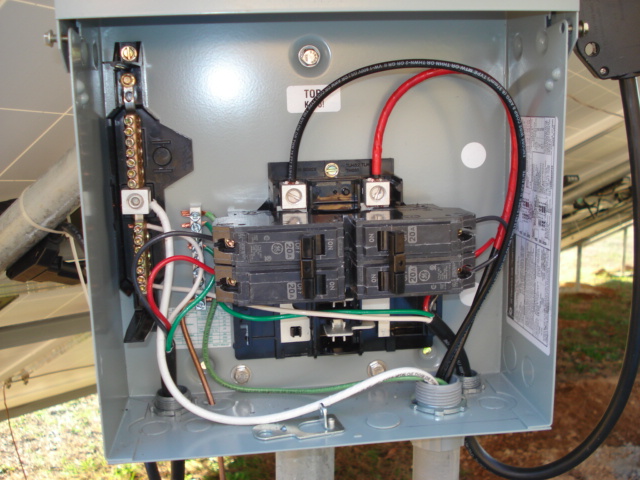
The load center at the PV array.
The 240VAC daisy chain cable from each line
of inverters gets a pair of 20 amp circuit breakers.
The red and black wires coming off the two terminals at
the top center is the feed to house.
This shows how the micro inverter daisy chain cables
go to the PV array load center.
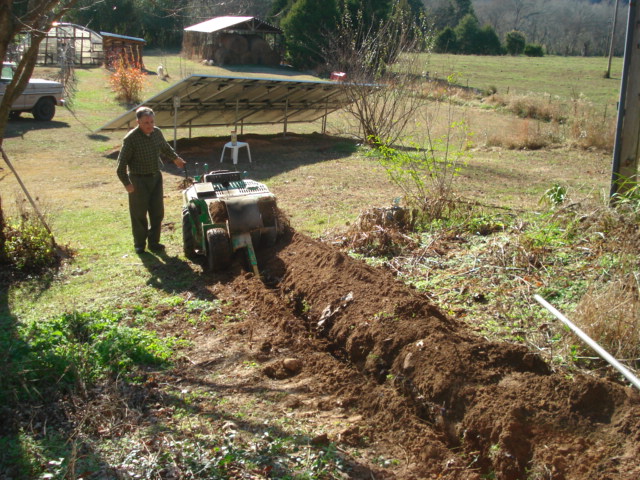
Code requires the top of the conduit to be buried at least 18 inches
below grade, and I had tree roots and rocks to deal with so I called in my
neighbor with his trencher. The trencher cut through my phone wire to the house
as well as the phone wire, power and temperature alarm wires from the house to
the greenhouse, and my low-voltage path lighting wiring. I strongly suggest
mapping where all your underground wires go, and calling the phone company
before you dig.
Trenching for the wire from PV array to the house.
House Side Wiring
The TVA requires what is referred to as a line or supply side
connection, which means that the solar feed connects to the grid at their usage
meter. Many parts of the country use what is called a load side connection. This
would require running the cables from the solar array into the house breaker
panel. Line side was much easier for me. I had to buy a meter base for the solar
supply meter, and a manual disconnect switch. The wiring from the array runs
through the buried conduit into the solar supply meter; into the manual
disconnect switch, and then over to the usage meter. All boxes were connected
with grounds and to a ground rod.
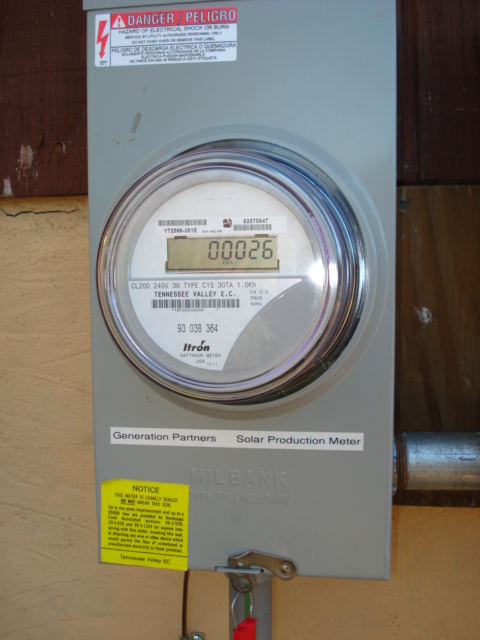
left to right: New meter to meter PV array, PV
array disconnect, and the original
meter for the house.
With boxes open.
Closeup of the new meter.
After mounting the boxes and pulling the wires through the conduit,
then wiring up to the usage meter, my wiring job stopped temporarily as I
couldn't get in the sealed meter base until TVA came to cut off the power. First
I had to have the electrical inspector come out to do an inspection. All was
well and I got the stickers and the go-ahead to connect.
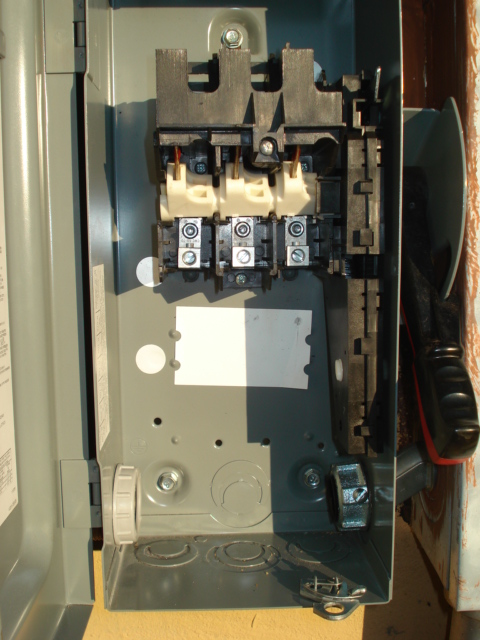
The PV array disconnect at the house.
This completely disconnects the PV array from the utility power.
Inside the PV array disconnect.
Two weeks later, I had an appointment to get connected - it was
exciting to finally get to the point where my system could start producing solar
electricity. TVA sent a technician with a meter to make sure that if the grid
power goes off, my solar array will not back feed into the grid possibly
endangering a lineman. This is a feature built into all grid tie inverters
called anti-islanding. From what I have read, there has never been a case of an
approved inverter putting power back into the grid when the grid is down.
However, on smaller systems like mine, TVA requires $100,000 of liability
insurance coverage, more on bigger systems.
When the connection day finally came, it was cold, snowing, windy and
completely overcast, yet the system put out enough power to successfully
complete the test.
With the Enphase Enlighten
monitoring system, anyone can go to
My Enphase Web Page
and see current and historical production. As of this writing, it's only been
connected for a month of short and often cloudy winter weather. Even so, it is
averaging just a little under our usage. I feel confident the longer sunny days
of summer will create more power than we are using.
Costs
This table breaks down the cost of the project:
Item
Qty
Cost
230 Watt Canadian Solar +
Enphase M215 Inverters
20
$9,154.00
Enphase Branch
Terminators
2
$28.94
Enphase AC Trunk Cable
$394.80
Square D Disconnect
1
$79.84
Shipping
$338.14
Enphase Envoy
1
$374.00
21 ft Lengths of 1.5 inch
Galvanized Pipe
5
$319.31
Pipe Caps
5
$12.15
#6 Solid
Ground Wire
$66.16
20 ft Lengths of 1.5 inch
Angle Iron
7
$167.39
Combiner Box and 2 Two Pole
Breakers
$54.54
Meter Base
1
$44.75
Conduit
$32.76
Ground Rod and Clamp
1
$16.10
#8 Copper Cables and
Ground, misc Hardware, Stickers
$239.83
Bolts, Nuts and Washers
$47.16
Concrete
$45.00
Trenching
$80.00
Permits
$64.00
Total Costs
$11,557.87
TVA Incentive
$1,000.00
Net Cost After
Incentives
$10,557.87
This works out to $2.29 per peak watt.
Final Thoughts
All in all, I'm happy with the choices I made to use top-quality
panels and the latest inverter technology. I'm also satisfied with my
decision to make a long-lasting galvanized steel rack solidly welded up. I was
very fortunate to have an experienced solar installer to consult. I really don't
think I could've done it without the advice and support he gave me as well as
the specialized solar items he sold me. There is a lot to know as the system
must be properly designed and code compliant. Friendly and cooperative utility
representatives, broadband Internet access and a good collection of tools to
work with also helped to make this possible.
Doing this was a worthwhile endeavor for economic reasons as well as
environmental ones. Grid tie installations are now the most common solar
electric installations in the US, they're the most economical, lowest
maintenance and the simplest to install also. I saved money by doing all the
labor myself, coming in at about $2.29 a watt. If you cannot do it yourself you
can find an installer at-
findsolar.com. Either way, I feel the time has come to make more
use of this free energy, especially here in the sunny southeast where we use
more electricity than any other part of the country, and more of it is
coal-fired. So, come on over to the clean, sunny side of electrical
production-go solar electric now!
Doug in TN
You can reach Doug at: dougkalmer AT gmail DOT com (replace
AT with @, and DOT with a period)
Doug's Other Projects
Doug has contributed a number of
projects to Build-It-Solar covering a wide range of solar and
renewable energy areas --
see them all...
Thanks very much to Doug for
providing this material!


Comments or Questions?