Search
The Renewable Energy site for Do-It-Yourselfers
A Cost Effective
Larsen Truss Design
|
The following description and
discussion of the Larsen Truss energy efficient wall design were taken
from a post by Robert Riversong on the Taunton Fine Homebuilding
Breaktime forum. This material is provided with the blessing of
Robert, who has reviewed it.
Thanks very much to Robert
for providing this detailed description of his variation on the Larsen
Truss design. It is obvious that a lot of thought and experience
have gone into developing it. If you are looking for a
combination of low cost, energy efficiency and sustainability, this
looks like a very good candidate.
|
 |
Robert teaches the following classes on sustainable construction:
Yestermorrow Design/Build School in Warren VT.
http://www.yestermorrow.org/
My principle class is the weekend "Efficiency By Design"
http://www.yestermorrow.org/courses/wbc/efficiency.htm
And, a new course this summer called "Thinking Like a Mountain:
Sustainability From the Ground Up", which will be a technical,
philosophical, and experiential exploration into the full spectrum of what
it means to build - and live - sustainably.
http://www.yestermorrow.org/courses/wbc/mountain.htm
This is the original post by Robert
explaining his Larsen Truss technique
Is anyone else building with a Larsen
Truss or modified Larsen Truss super-insulated wall system?
I've been using and modifying this system for 20 years and can build a 12" thick
wall (R-40+) with no more lumber than a conventional 2x6 house, in part because
I eliminate exterior wall sheathing and use t-braces and full 3/4" drop siding
over housewrap.
And, with the air-tight drywall system instead of vapor barrier and dense-pack
cellulose, there's almost no thermal bridging and a 3 bedroom house can be
heated with less than a cord of wood per year here in New England.
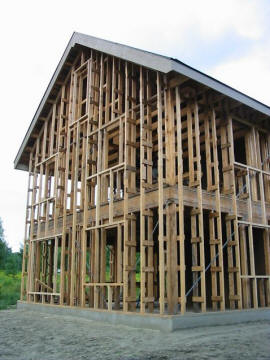
I also use native, rough-sawn green full-dimension lumber, rough-sawn subfloor
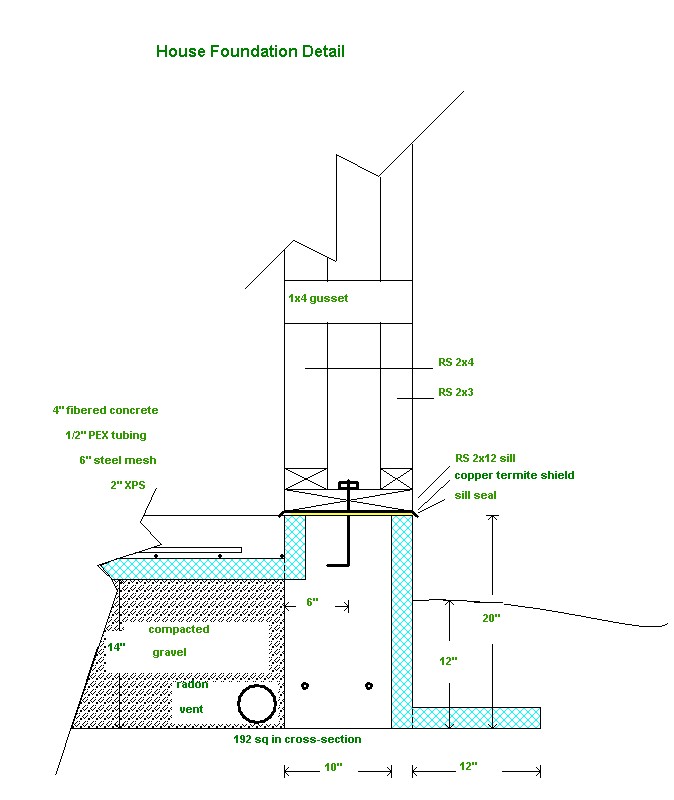
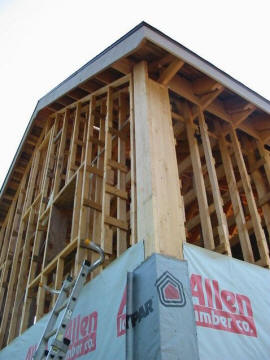
and roof deck, and rough-sawn exterior trim. The load-bearing wall is 2x4 24" oc
and the exterior chord of the parallel chord wall truss is a 2x3, extending from
sill to rafter tail and attached to studs with rough-sawn 1x4 gussets 24" oc.
This creates a balloon-framed outer wall (which is erected after the roof is on)
which bypasses the floor and ceiling assemblies and eliminates the problem of
insulating and sealing the band joist area.
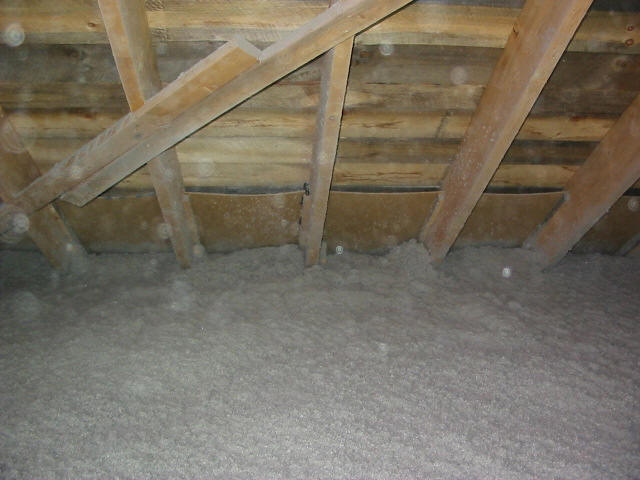
The second floor ceiling joists and roof rafters are supported by let-in rough
sawn 1x4
ledgers, with the beveled rafter ledger 18" above the ceiling ledger to maintain
full insulation depth of 16-18" (R-60+). The ceiling joists are cantilevered
outward to form the soffit and meet the rafter tails (ceiling joists and rafters
are lapped to opposite sides of each stud) with a 2" block in between to create
a thrust-resisting triangle.
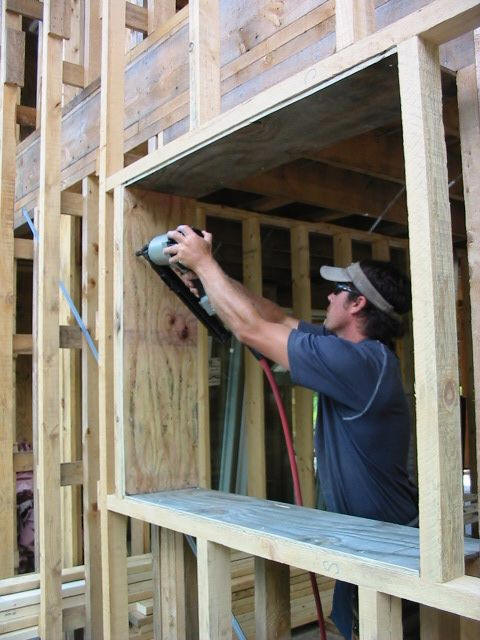
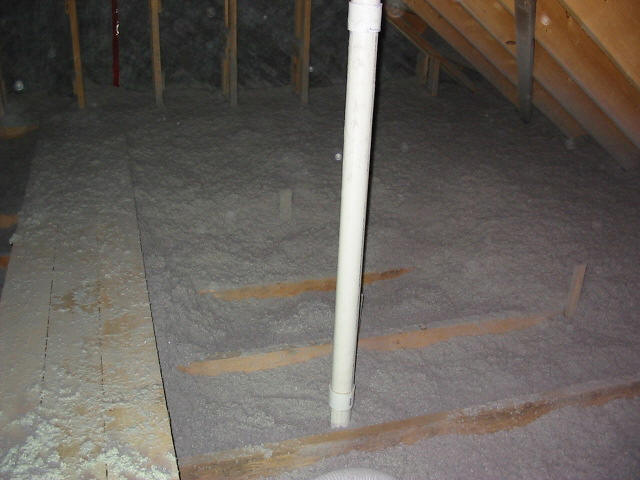
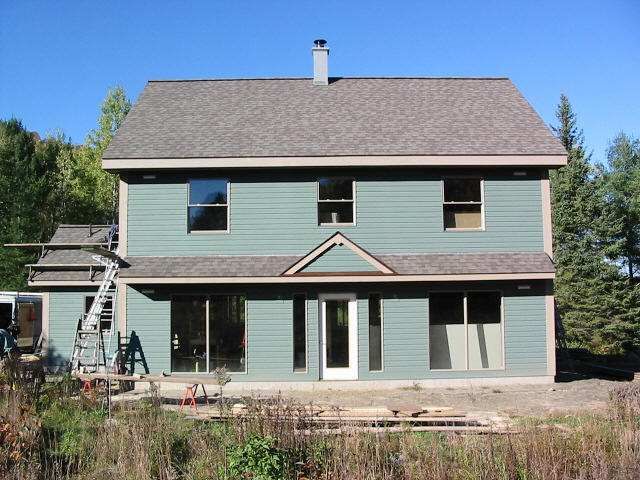
Framing
Click on pictures to enlarge |
 |
Framing Diagrams
|
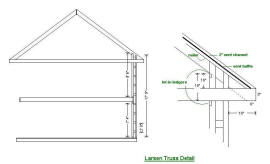
Click on diagrams to enlarge |
 |
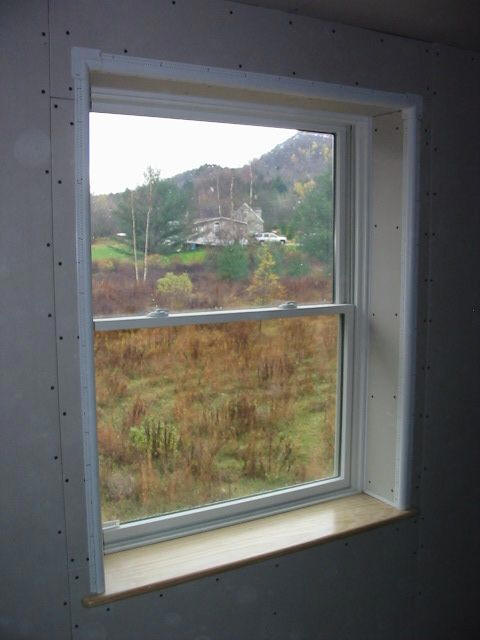
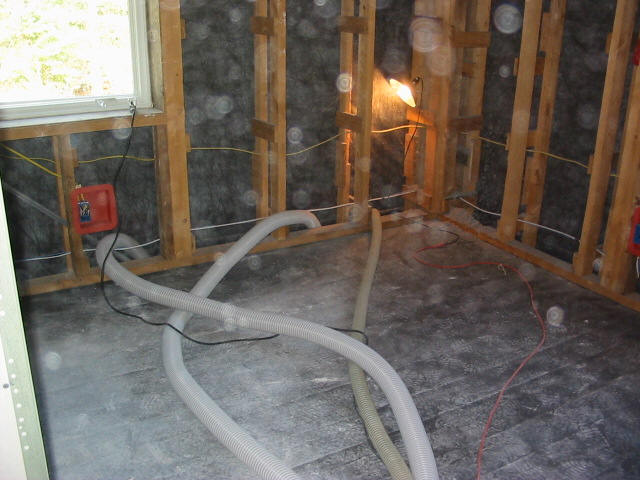
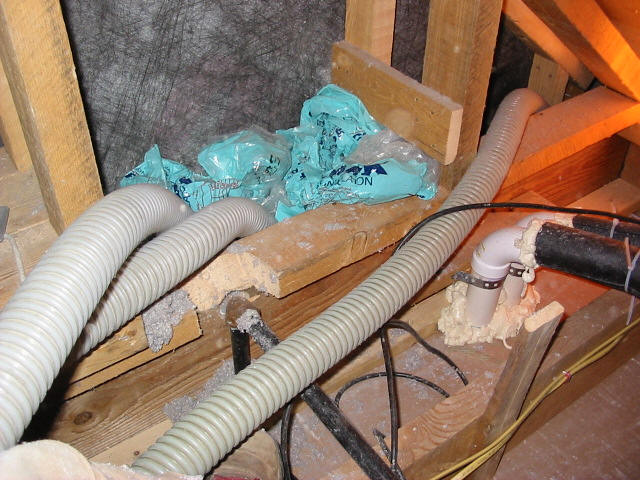
Windows
Insulating
|
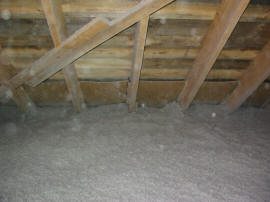
Click on pictures to enlarge |
 |
NEW!
Some additional construction detail pictures ...
I've used this
system in western MA and here in north-central VT. I began with a full Larsen
Truss applied to the outside of a diagonal board-sheathed load-bearing wall that
was first wrapped with stabilized 8 mil Swedish Tenoarm vapor barrier, for the
1/3-2/3 Canadian system (4" of insulation inside the vb and 8" outside in the
trusses).
My "modified Larsen Truss" system requires conventional platform framing of the
first floor walls, second floor deck, and then eastern balloon framing of the
second floor bearing walls (let-in ledgers to support ceiling joists and
rafters).
For the air-tight drywall system, I use Tremco acoustical sealant between each
framing unit (bottom plate to sill, band joist to top plate, subfloor to band
joist, bottom plate to subfloor, etc), and then apply Tremco on the inside edge
of the top and bottom plates as the drywall is applied, also using Lessco
polypans behind each electric box to allow sealing the drywall around those
penetrations.
Once the roof is framed and weathered in, I prefabricate lengths of 2x3 with 1x4
gussets gun-nailed to them 24" oc, stand them up on a bottom plate on the
extended sill and, using the 12" gussets as the depth gauge, nail them flush
with the inside of each wall stud to create a 12" cavity (2x4, 5" space, 2x3). I
then stack additional half-chords (gusseted 2x3s) on top of those until I can
tie them into the rafter tails on the eaves or outlookers on the gables.
This creates a continuous insulation cavity that bypasses floor and ceiling
assemblies (no troublesome band joist issues), continuous over the ceiling and
back down the other side. I install site-built MDF ventilation baffles between
rafters and to block off the soffits. The outer frame is then wrapped with Typar,
doors and windows installed (aluminum clad with nailing flanges), and 3/4"
shiplap (pattern 105) drop siding nailed to framing.
Once interior drywall is installed, I dry-blow dense-pack cellulose into the
cavities, using a "leap-frog" system of multiple hoses pre-positioned in truss
bays, because it takes special technique to get proper density in a cavity that
is open both laterally and vertically - and I do my own insulating.
The open wall cavities makes the installation of mechanicals simple, since there
is little drilling necessary. The three air barriers (drywall, dense pack,
housewrap) make the walls virtually impermeable to infiltration. The dense pack
cellulose makes the walls highly fire resistant and extremely quiet. Insects and
rodents don't like the boric acid used as fire retardant in the cellulose, so
these two universal problems are minimized or eliminated. The cellulose is more
hygroscopic than wood, so it not only can absorb and release any diffused
moisture that might get into the wall cavities but also draws any potential
moisture away from the wooden frame, thus protecting it (foam insulations will
do the opposite).
This wall system creates dramatically deep door and window returns, that I
typically finish in drywall for diffusion of light into the living spaces. And,
because the house has such a low heat loss, a moderate amount of passive solar
glazing can contribute as much as 50% of demand, reducing the supplemental heat
load to negligible amounts.
 |
Energy Star Rating
This house was rated 5+ stars by the Vermont Energy Star home
program with a HERS rating of 46. The HERS (home energy rating
system) Index is an energy efficiency range from 100 for a reference
home built to the International Energy Conservation Code to 0 for a
net zero energy home.
The Vermont Energy Code requires an index of 85 (15% more efficient
than an IECC house) and Energy Star requires an index of 80 for
northern climate zones 6-8.
So a HERS index of 46 means this modified Larsen truss home is
expected to consume 64% less energy than an IECC house, and 34% less
than a threshold Energy Star home.
According to the VT Energy Star administrator, this house tested in
the top 5% of Vermont's Energy Star homes.
|
----
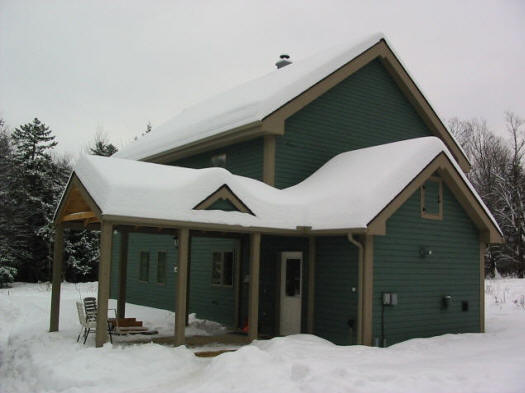
The 2000 sf house I
just completed required 311 bales of cellulose, but we heated it with a few
quartz worklights in zero degree weather. It has a design heat load of 16,500
btu/hr at -10°.
In addition to a 74% efficient woodstove with under-slab direct coupled
combustion air inlet, the house has a 94% efficient direct vent condensing
propane boiler which heats two zones of radiant tubing (in-slab 1st floor, and
suspended 2nd floor), and an indirect domestic hot water tank.
Fresh air supply is by exhaust-only ventilation, using the Panasonic bath fans
(one each floor) on 24-hour programmable timers as well as a kitchen hood, and
passive make-up air inlets in each bedroom and in living rooms (Airlet 100 by
Aldes). The propane dryer in the mudroom/utility room has its own make-up air
supply through a louvered 6" duct, and the door to the kitchen is
weather-stripped. This guarantees a minimum of 1/4 air change per hour, plus
additional venting when cooking or bathing to eliminate moisture at the source.
The only plywood in the house is for door and window boxes, as this makes a
better air-tight seal than boards, and for a couple of interior shear walls.
Let-in metal t-bracing in exterior and interior load-bearing walls and wooden
under-rafter diagonal bracing sufficiently stiffens the structure, particularly
once the sealed drywall is installed.
I was able to build this house for $105/sf, in part because of the designed-in
savings of no 1st finished floor (tinted concrete), no sheathing, no exterior
door and window trim (metal cladding only), and using band-sawn rough-sawn
boards for corner boards, rake, fascia, and soffit. All lumber, including trim,
was local hemlock.
The interior has a couple of rough-sawn exposed timber bents, with pegged
braces, from a mill just up the road. And the drywall window returns - some with
yellow pine sills - have bullnose corner bead for a softened transition.
I find that going from conventional
construction to superinsulation adds no more than 5% to the cost of a house and
the payback is enormous, both in energy savings and comfort. Some banks are
offering higher debt-to-income ratios to mortgagees who buy or build highly
efficient homes, since they need so much less income to operate it.
Follow on Questions and Discussion
of the Larsen Truss
Do you do anything to segregate the wall bays from each other? I find it
hard to get a good dense cellulose pack when the cavities have too much
crosstalk.?
No, I've considered stapling fiber mesh to the trusses, but that's a lot
of work and it would interfere with utilities.
Instead, I've developed techniques to make it work. For one-storey
walls, I might leave a 6" horizontal gap (first covered with mesh) between
upper and lower sheets of drywall. Through that, I can reach the hose and
my arm if necessary and direct the cellulose downward, laterally, and then
upward. I might also reblow with a smaller and stiffer hose (1-1/2") that I
can jamb down into the first blow to increase the density. Then I fill the
gap with 3/8 drywall for a flat seam.
For the 2-storey sections, I have hung the first floor drywall, then
blown the first floor walls from the second floor using the leap-frog method
of pre-positioning several 3" or 2" hoses into consecutive truss bays,
blowing into the first, then moving that hose to the next bay in line and
blowing into the second hose, the third, etc. This will increase the
density of the initial blow, and I've been able to achieve 3+ lbs/cf
density.
Then I will hang the second floor ceiling and walls, and blow down from
the attic (which is accessed through a hayloft door in the gable above the
insulated envelope - no penetrations in my ceilings, not even ceiling
lights). And finally I'll do an open blow in the attic, filling the space
at least twice as deep as the joists up to storey poles which indicate
proper and uniform depth.
How do you prevent settling of the cells in those 20'+ walls?"
The insulated wall cavity is actually 18' in total height, including the
attic insulation above it.
While it's tricky getting good density in an open wall system like mine,
I know I got approximately 3.1 lbs/cf (which is what my cellulose
manufacturer recommends) because I compared the calculated bales per wall
with the actual number used as I blew each wall. If I didn't use as many as
I had calculated, then I would insert a smaller diameter stiffer hose down
into the already-blown cellulose and compact it further.
The initial settled density (by gravity) of blown cellulose in an attic
is 1.4 lbs/cf. While it's difficult to get full dense pack density at the
top of a wall section (though I assist this by stuffing empty cellulose bags
into the wall cavity to create some backpressure), it will still be
considerably more than the gravity density of 1.4 lbs/cf and will always be
attempting to expand. Even if there were a small amount of settling in the
wall cavity, I have 20" of cellulose in the attic on top of the wall.
Dense pack is more than double the settled density of cellulose, so it
cannot settle unless it becomes totally saturated with water.
Have you looked into a wall after few months or a year to insure that no
settling has occurred?
I haven't had that opportunity, but I'm completely confident in the
ability of dense pack cellulose to resist settling and this has been
confirmed to me by the technical manager of Cell Tech, who is a friend and
fellow teacher of superinsulation.
I was impressed with cellulose nearly thirty years ago when I saw a
demonstration wall (about 4'x8' with Plexiglas walls) that had been moved
around the northeast on a utility trailer from one home show to another and
showed zero settling.
Soon after, I did a gut renovation on a duplex in Boston and blew
cellulose into the walls. One piece of drywall popped a few screws, so I
had to remove it and the cellulose had to be clawed out of the wall - it was
dense enough to stand up with the drywall removed.
The only thing that can change the physical properties of cellulose is
significant wetting (greater than 30% of its weight in water). Placing it
in a wall at twice its settled density is like compressing a sponge to half
its size and placing it in a confined space.
It's one of the prevailing myths about cellulose that it may settle over
time. That can happen only with improper installation, most commonly in
retrofits where it's not possible to know where all the wall cavities are
because of embedded bracing, or irregularly-spaced framing, etc. But a good
installer will check the job with an infra-red camera to make sure there are
no voids.
So, no sheathing? That is one thing that would take some getting used to
(for me). Seems like you would need to be careful installing the housewrap. Can
other siding types be used with your system? How do your windows go on with no
sheathing? No casing?
Yeah, it takes a little care and a ladder with a reversed stand-off, but
you can also reach the housewrap from inside the house as it's being
applied.
Since I frame on 2' centers, I wouldn't use anything less than full 3/4
horizontal siding. If a customer insisted on clapboards, then I would
sheath with diagonal rough-sawn boards and skip the metal t-bracing. I did
one house with vertical shiplap siding and had to nail horizontal 2x2 girts
over the trusses.
All siding is back-primed and stained, not painted, with cut ends getting
stained as the boards are installed and the second coat of stain applied as
each lift of siding goes on so scaffolding has to be set up only once.
Aluminum-clad windows with nailing flanges are installed after housewrap
and, if the customer wants window trim, then wider nailers would have been
installed in the truss system to frame the window openings.
Do you use a vapor barrier on the warm-in-winter side of the wall when you
insulate with cellulose?.
I haven't used vapor barriers for 20 years. On new construction, there's
really no need and they can even be counterproductive by concentrating
moisture problems at weaknesses in the VB.
Full-scale season-long tests at the Univ. of Ill. Building Science
Department have demonstrated that of the total winter-season moisture
accumulation in a typical wall section, 99% comes from exfiltration of moist
air and 1% is due to diffusion through building materials.
If a house can breath (absorb and release moisture daily or seasonally),
then vapor diffusion is not the problem as long as indoor moisture remains
within normal limits.
To create an effective vapor barrier with 6 mil poly or equivalent is, as
many of you know, nearly impossible and a lot of trouble. I've done it,
with caulked or French-folded seams, sealed at top and bottom plates and
around electric outlets and at each door and window opening.
In addition, there is some evidence that wrapping the walls with plastic
creates a static charge which draws negative ions (the ones that make us
feel good at beaches and waterfalls and contribute to health) out
of the indoor environment.
I have no interest in building a hermetically-sealed house, which means
no plastic vapor barrier and no plastic foam. A house envelope is a third
skin - after our biological skin and our clothing - and like the other two,
it must breath to maintain a healthy and livable indoor environment. All
building materials used in the last 10,000 years met this criterion, until
the last few decades.
What I DO use, to meet codes or Energy Star standards, is the
Air-tight Drywall System, and a latex VB primer.
No firestops?
As far as firestops, I've used
this system for three homes in Massachusetts where codes are strict and
strictly enforced, but three different building inspectors had no problem
with a "balloon-framed" wall system that was full of dense-pack cellulose,
which is a better firestop than solid wood blocking.
What are you blowing for attic depth?"
I place 18"- 20" of cellulose in the attic, for an actual R-value of 61.2
to 68 (assuming R-3.4 per inch at 1.4 lbs/cf settled density).
You don't use an HRV (Heat Recovery Ventilator)?
I don't use them, because I try to keep my houses as low-tech as
possible to reduce initial and operating costs and long-term maintenance.
Since code and Energy Star requires bath and kitchen exhaust fans, why
not use those as the central exhaust system with no additional ducting?
The heat load of my homes is so low that the small amount of recoverable
heat from an HRV system seems hardly worth the initial and long-term cost.
In addition, because my homes include a woodstove, which is an exhaust
fan, they will ventilate even during a power outage - in other words, they
don't require "artificial respiration".
How do you deal with green lumber (which I'm assuming is the rough sawn stuff )
shrinking? Ring shank nails?
I use 20d galvanized common nails for framing - great
holding power, but it means hand nailing.
Dripping green, it is. I keep the lumber closely stacked on site - no
stickering - to keep it as green as possible. It spits at you when you nail
it!
But green lumber cuts like butter, and it stays straight and true. Since
I don't sheath the walls as they go up, they are exposed to sun and wind for
a few months as I'm building and are mostly dry by the time I close in the
walls.
Careful design prevents problems with uneven shrinkage. For instance,
using flush beams instead of below-joist girders, allows the entire floor
system to shrink downward as a unit. And, once the framing is locked in
place, there's almost no twisting or bowing. Many people who visited the
site remarked how straight the framing lumber in the structure was.
Also, how's the consistency of the rough sawn lumbers dimensions?
In this case, since I got my lumber from a
computerized bandsaw mill, it was remarkably accurate and consistent.
However, with a double wall system, only one plane needs to be lined up.
The same is true for the roof and ceiling. For inside partitions, other
than the center load-bearing wall, I use KD lumber.
What is your approach to windows and doors on these superinsulated houses ??
I go with steel or fiberglass insulated entry doors with lowE/argon
lights. Steel doors have the advantage of an available magnetic
weatherstrip (like a refrigerator door) which seals better than bulb
weatherstrip, and adjustable oak/aluminum thresholds with thermal breaks.
For windows, I've found that double-glazed lowE/argon units offer the
best balance of solar heat gain and insulative quality, on the S, E & W
facades in a 7000-8500 DD climate with 50% solar availability. The only
place more insulating windows can be cost-effective is on the north, but
it's simpler (and less costly) to order the same windows all around.
It's getting more difficult, however, to find high solar heat gain lowE
windows (Canada offers a better selection). For passive solar construction,
a window should have a SHGC in the .60 range. Many commonly-available
windows are now in the .40 range, and they significantly reduce the possible
solar gain. While they might be appropriate for E & W sides were low sun
angle makes shading impossible, they make no sense on the south.
I've always used aluminum clad wooden windows as the best balance between
embodied energy and environmental cost on the one hand and longevity with
minimum maintenance on the other. A building material or unit with a higher
initial environmental cost can be "greener" if it outlasts a material or
unit with a lower initial impact.
A material can be said to be "sustainable" if its life-span is longer
than the time it takes for the Earth to recover from its impacts.
I also like to use casement windows, rather than double-hung, where the
design permits. A casement offers full (rather than half) opening for
ventilation, can scoop prevailing winds into the house in summer, can be
opened against high noise areas, offer more opening for emergency egress,
and tend to seal more tightly. However they are not appropriate where they
will open into a traffic path, such as onto a deck. In my last house, I
used double hungs for the aesthetic on the front half of the house (living
room, dining room, great room) and casements on the back half (kitchen,
baths, bedrooms).
Can you
recommend some good reading on this stuff?
I wish
I could, but I don't think there's been a book on the subject published
since the 80s (following is a list). And there isn't even a website that I
can find that covers the spectrum of superinsulation options.
You
might just have to come to Vermont and take one of my classes! :)
Booth,
Don, Sun/Earth Buffering and Superinsulation, 1983, ISBN 0-9604422-4-3
Nisson,
J. D. Ned; and Gautam Dutt, The Superinsulated Home Book, John Wiley & Sons,
1985 ISBN 0-471-88734-X, ISBN 0-471-81343-5
Marshall, Brian; and Robert Argue, The Super-Insulated Retrofit Book,
Renewable Energy in Canada, 1981 ISBN 0-920456-45-6, ISBN 0-920456-43-X
Shurcliff, William A., Superinsulated houses: A survey of principles and
practice, Brick House Pub. Co, 1981, 1982 ISBN 0-931790-25-5
Shurcliff, William A., Superinsulated Houses and Air-To-Air Heat Exchangers,
Brick House Pub Co, 1988, ISBN 0-931790-73-5
McGrath, Ed, The Superinsulated House: A Working Guide for Owner-Builders,
Architects, Carpenters and Contractors, 1981, ISBN 0-918270-12-X
Robert is willing to answer your
email questions at: housewright AT ponds-edge DOT net (replace AT with @
and DOT with a period)
mailto:housewright@ponds-edge.net
For more information, see Robert's new blog --
Riversong
HouseWright...
Feb 1, 2008, Mar 7, 2008