Search
The Renewable Energy site for Do-It-Yourselfers
Low Thermal Mass Attached Sunspaces
for Solar Home Heating -- A Performance Test
|
This section covers some tests done on a low thermal mass sunspace
with a design optimized to produce solar heat for the home its connected
to.
The efficiency of this
sunspace as heaters may surprise you. I think that attached
sunspaces are 1) underused as a way to provide both solar heating and
very usable space, and 2) often not very well optimized to do the heat
production job well.
The tests cover:
- How efficient this sunspace design is in producing heat for spaced heating.
- Compares the sunspace to conventional solar collectors.
- Looks at effect of some design variations on heat output.
- Pprovides a survey of the temperatures in various parts of the
sunspace.
- Covers some of the things that can be done to maximize the use of the
sunspace for a variety of purposes (producing heat, pleasant place to
spend time, drying laundry, ...).
If you have a sunspace,
I'd very much like to hear what your experience has been (good or bad),
and what your ideas for improvements are. |
|
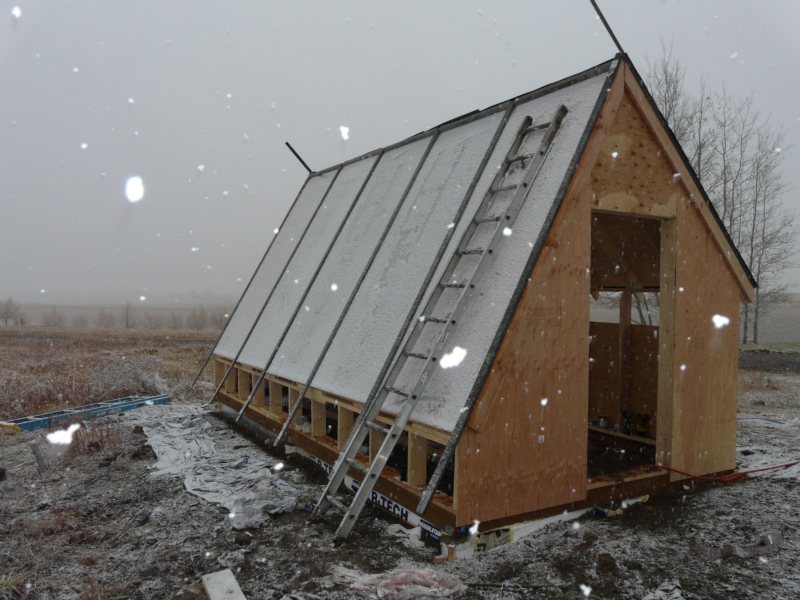
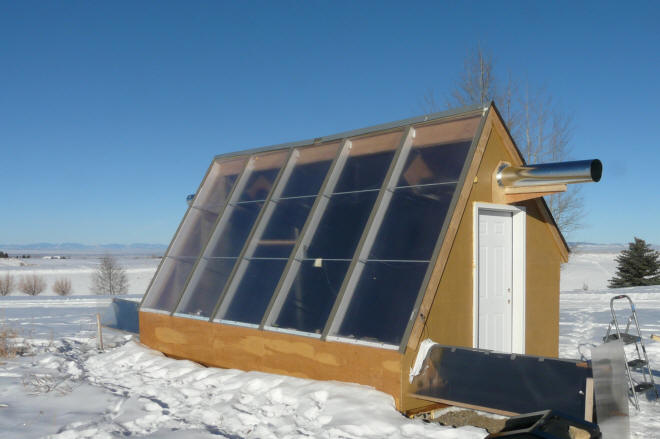
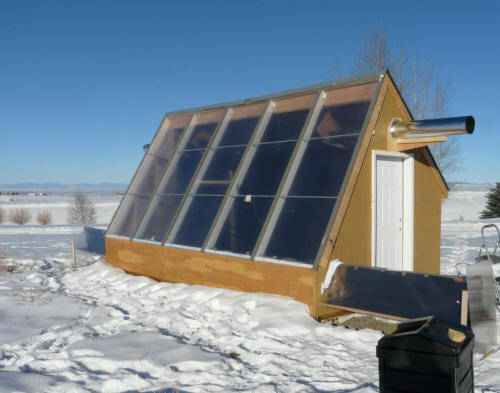
I'm doing this work in what will become our all season greenhouse. As
is clear from the picture its not an attached sunspace. This
approach results in some things that are not quite the same as if an actual
attached sunspace was used for the testing...
- The greenhouse is freestanding and does not share a wall with the house. Given
that the back wall is well insulated, I don't think that this makes much
difference in the results.
- The heated air is just blown out into the great outdoors through those
odd looking ducts above the door. The sunspace is too far away from
the house to make duct the hot air to it. I don't think this makes any
difference in the results.
- The intake air is taken from outside, so its much colder than it would
be in an attached sunspace where it would be (say) 65F air from the house.
This does effect the results. The consequences of the cold inlet air
are discussed in the performance section.
- All of the things like insulation levels, thermal mass, wall colors,
interior configuration were set up to optimize sunspace performance, and
will be changed when its converted into its greenhouse role.
Bottom line is that I think that using the greenhouse as a sunspace simulator
gives good results, and there is so little actual measured performance data out
there on sunspace performance that its quite useful.
Page Index
- Sunspace description
- Performance Tests
- How the performance test
measurements were made
- What the sunspace its like to spend
time in
- Cost
- Potential Improvements
- Conclusions
- Comments
Test Sunspace Description
The sunspace performance tests were actually done in our new all-season
greenhouse. I've had a long term interest in seeing how well an attached,
low thermal mass sunspace actually performs compared to (say) active solar
collectors, and the greenhouse has a lot of the same features, so we decided to
use it to do some sunspace performance tests before it becomes a greenhouse.
The main features include:
- A 200 sqft glazed area that is oriented at a 60 degree tilt angle for
maximum winter solar gain. The glazing is double wall polycarbonate
for better winter performance (lower glazing heat loss).
The glazed area is just about equal to the total floor area.
- Surfaces that do not receive much winter sun are not glazed as
they might be in a 3 season greenhouse. This is to reduce the heat
loss through the glazing, which is high.
- The sunspace has very low thermal mass so that the bulk of the incident
solar heat is carried off to the attached house, and very little is stored
in the sunspace mass.
- All non-glazed surfaces are well insulated. The walls and ceilings
are insulated to R28, and the floor has vertical insulation around the
perimeter as well as 1.5 inches of floor insulation.
- The sunspace is well sealed against air infiltration.
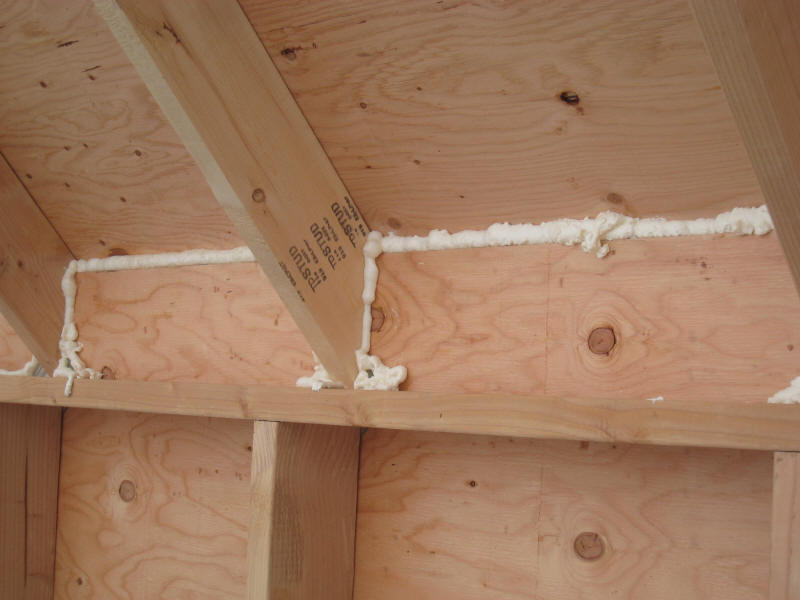
- All inside surfaces that see the sun are painted dark to absorb the sun.
These surfaces are also low mass, insulating surfaces that heat up very
quickly when the sun is on them. This results in rapid heating of the
air next to the surface The heated air then rises up to the peak area
where the fan and ducting move it to the house.
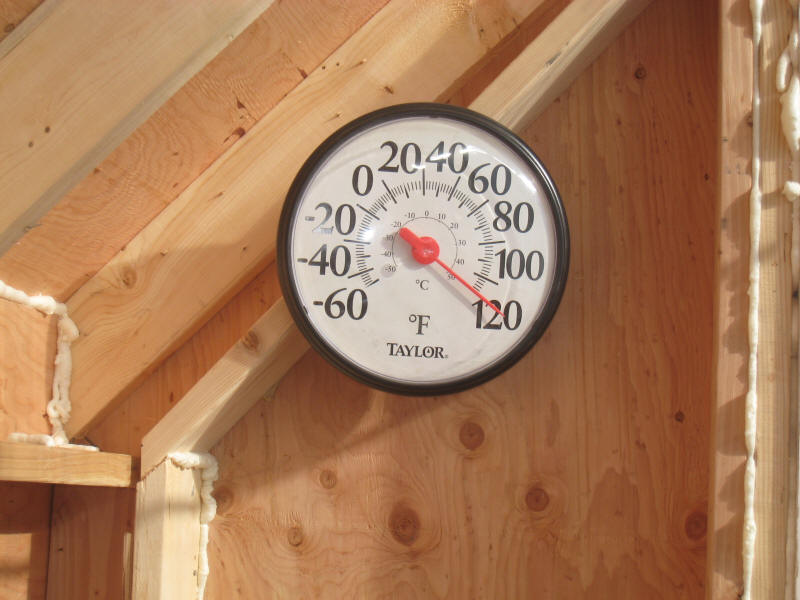
For example, If the fan that removes heat from the sunspace is turned off,
the sunspace increases in temperature at a rate of about 10F per minute.
The end result is a space that heats up very quickly when the sun gets on
it-- it is ready to start making heat for the attached house as soon as the sun
is on it.
At the end of the day, when the sun goes off the sunspace it very quickly
cools to the outdoor temperature, because it has no stored heat.
The pictures below show the sunspace/greenhouse build. Bear in mind
that this sunspace setup is for performance tests only -- you can make your
sunspace much more pleasant to be in with nicer finishes. Its also
possible to do very simple sunspace that cost next to nothing, but still produce
a lot of heat. See the Sunspace Section for examples of both ends of the
spectrum.
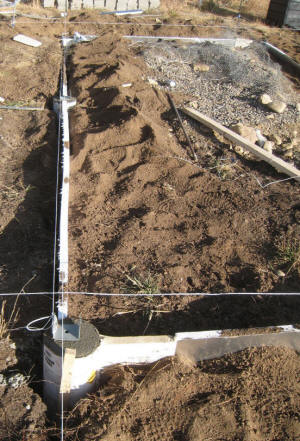
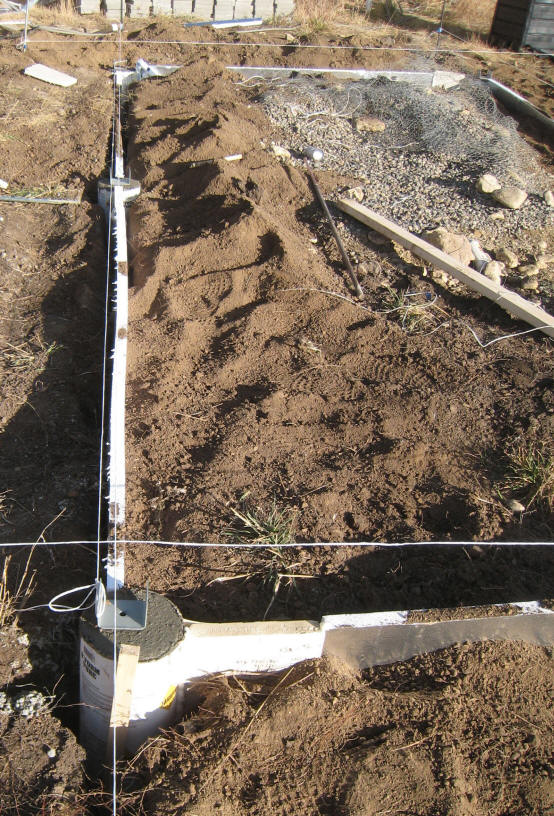
Concrete footing post support the sunspace.
1.5 inch vertical Styrofoam insulation extends
2 ft down. |
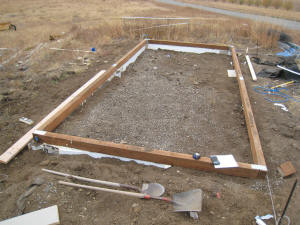
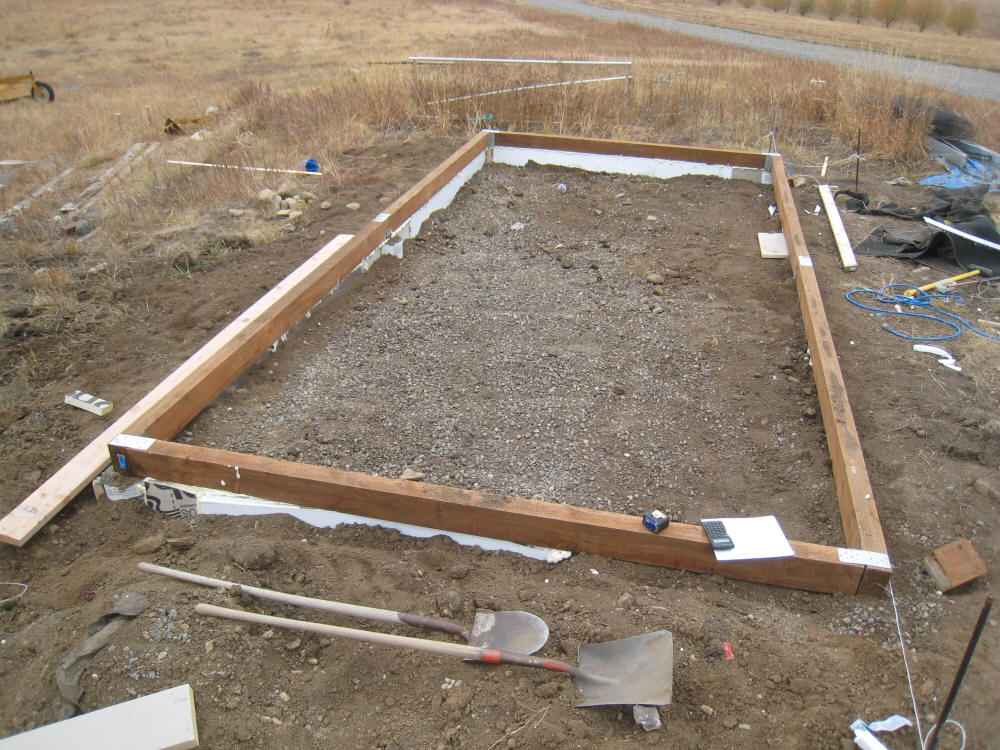
Built on treated lumber sill plates. |
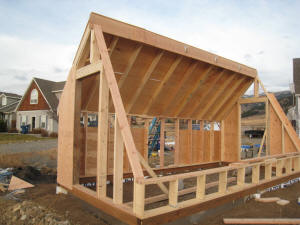
Framed with 2 by 6 lumber 24 OC.
|
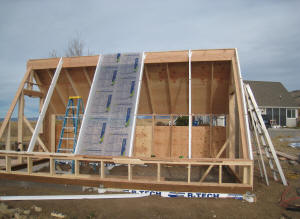
Glazed with 10 mm thick twinwall
polycarbonate glazing in 4 by 10 ft sheets.
200 sqft of glazing total. |
Pretty carefully sealed. |
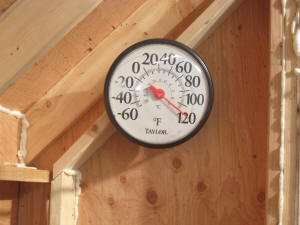
It got pretty warm even before
insulation was installed. |
Maybe should have started construction
earlier in the season :) |

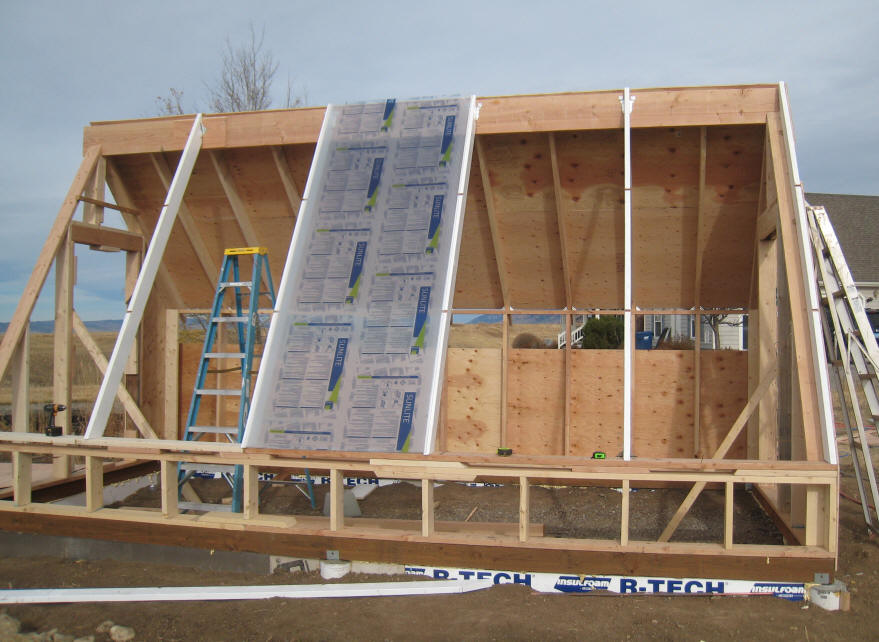
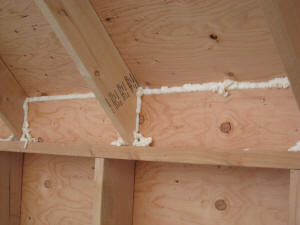
R21 fiberglass batts first. |
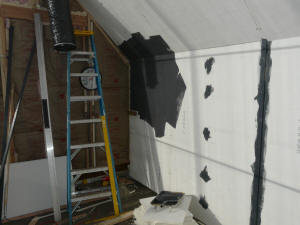
Then,
1 inch rigid poyiso insulation inside the
framing.
Total R value about R 28 with minimal
thermal bridging.
The goal was to keep the wall heat loss low
compared to the double glazing even if an
insulating curtain was added to the glazing. |
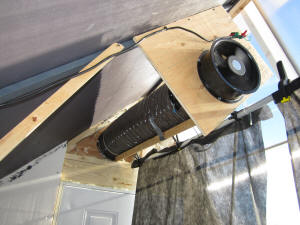
One of the two 10 inch Grainger fans
that push air out of the sunspace.
The duct is extended outside to provide
a long straight duct for more accurate
flow measurements.
The vertical weed fabric screen used
in one of the configurations is also visible.
|

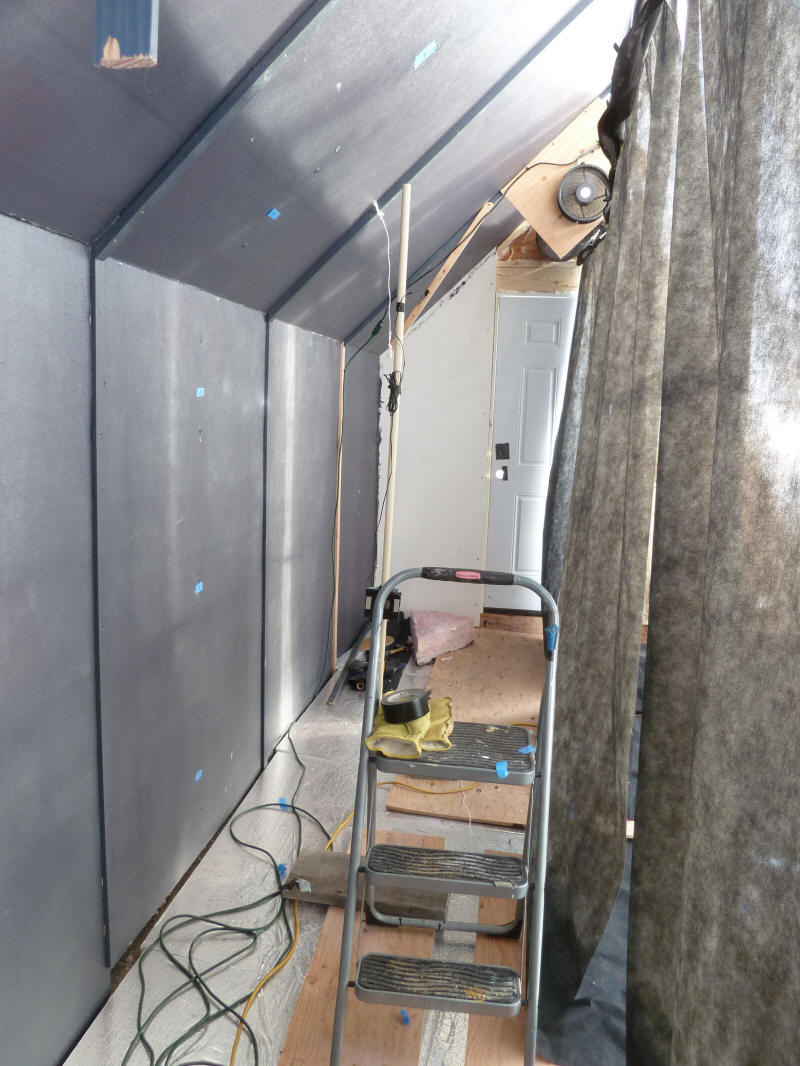
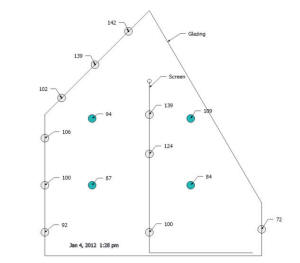
Setup for one of the tested configurations.
North wall is to left, weed fabric hung from
ridge line to right. The vertical pipe has
temperature sensors at 3 ft and 6 ft off floor
between fabric and north wall.
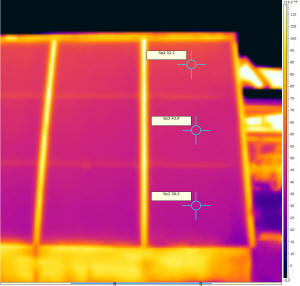
The blue tape spots mark places where surface
temps were taken. |
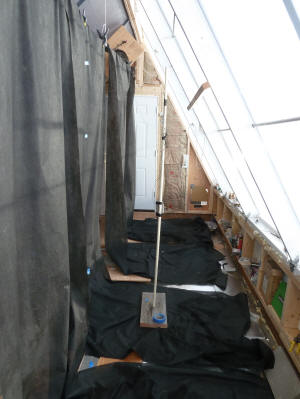
Same configuration with vertical weed fabric
and picture taken on south side of the fabric.
The vertical PVC pipe has two temperature sensors.
The blue tape spots mark places where surface
temps were taken. |

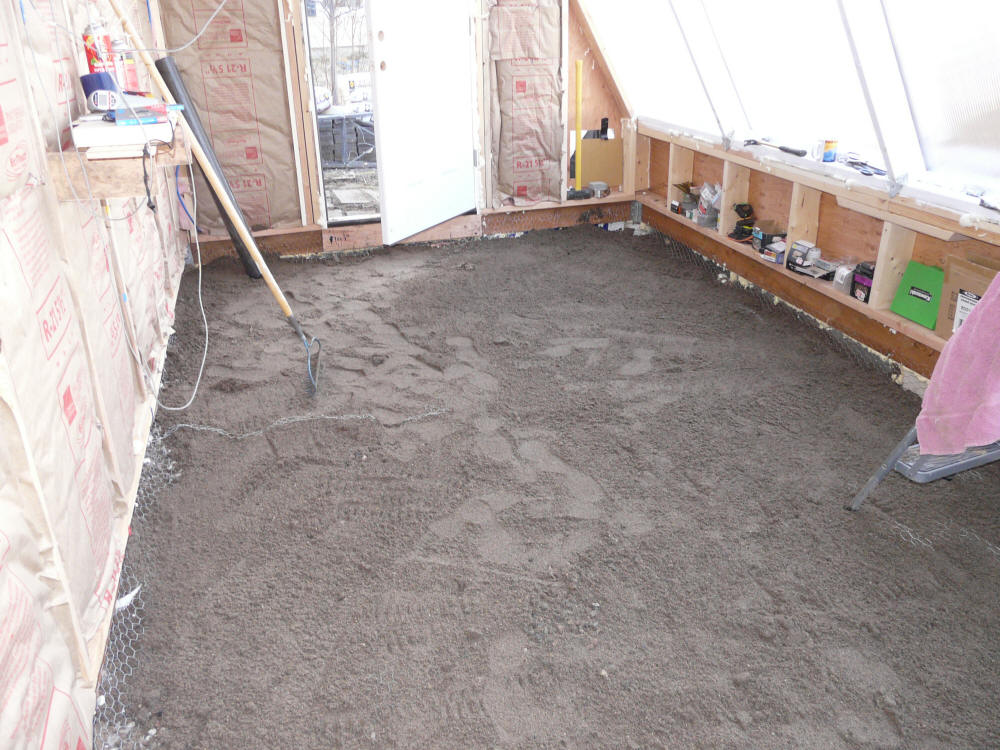
Floor is some sand over dirt followed by
a layer of 1.5 inch thick Styrofoam
rigid insulation board. |
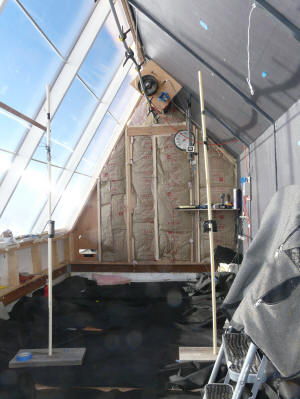
Looking west with weed fabric on floor.
The floor is dirt covered with 1.5 inch
Styrofoam insulation with some plywood
walking strips laid on it, and black weed
fabric on top.
The two PVC pipe posts support temperature
sensors. |
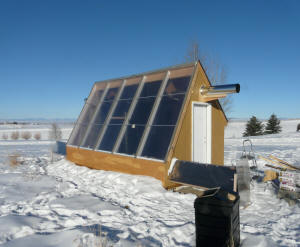
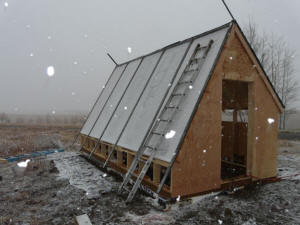
Sunspace on one of the test days.
The two "tunnels" extending east and west from
the lower south corner preheat the flow
of inlet air a bit. |
Performance Tests
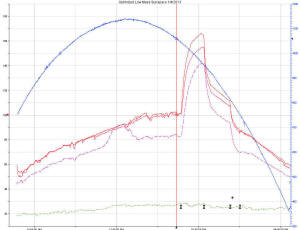
Several days of performance testing were done -- the section just below links
to pages on three of the most useful test days.
Test day 1: Optimized sunspace with vertical screen
This configuration included all of the features listed
above. The walls, ceiling and floor were insulated and nearly all interior
surfaces were painted dark.
In addition, a screen of dark weed fabric was hung
vertically in the space. The fabric was suspended from near the peak and
ran vertically down to the floor, and then extended along the floor south toward the glazing
along the floor.
The idea is to see if this vertical screen is more
efficient in getting the heat up to the peak area. The screen was also
helpful in evaluating whether some form of screen is desirable to increase the
comfort for people using the sunspace to (say) read or have a cup of coffee.
The test also includes a stagnation test in which the
fans and all ventilation are stopped to see how high the temperatures go.
All the details on test
day 1....
Configuration 2: Optimized sunspace without vertical screen
This configuration is nearly the same as configuration 2,
except that the dark weed fabric was just distributed evenly over the full
floor. So, for this configuration, the sun could shine onto the
north wall and north roof.
< picture>
Configuration 3: Non-Optimized
This test was done earlier in the construction before
some of the features above were incorporated. The glazing and shell were
in place, but the floor was bare (heat absorbing) dirt, and the walls and
ceilings were not insulated.
Interior surfaces were not painted a dark color.
The idea was to see how much difference it degrades the
performance if not all of the features listed above are included.
<show pictures of config 1>
The results of the testing for each of these configurations are given below.
How the Performance Measurements Were Made
Getting good performance data on solar heating collectors is challenging, and
air heating collectors are even more challenging. Its right to be a bit
skeptical about performance numbers you see around the internet. So, here
is a rundown on the instrumentation I used -- you can judge for yourself.
Sun -- Sun intensity was measured with an Apogee
pyranometer that was mounted to the glazing frame and was perpendicular to the
plane of the glazing.
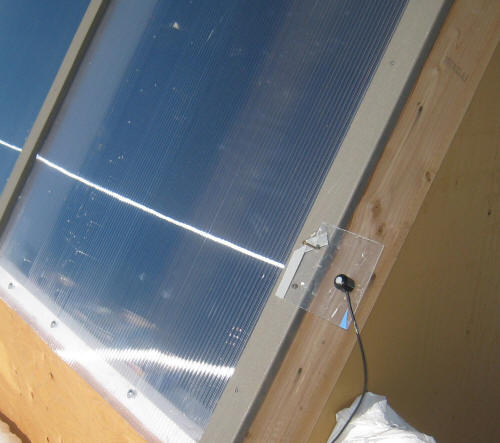
Apogee pyranometer mounted in plane of glazing.
In this position, it directly measures the sun intensity on the glazing.
Temperatures -- I used
Onset Computer loggers with thermistor sensors to measure the temperatures
used for performance calculations. These sensors specifications call for
plus/minus 0.25 C accuracy. A a check, I generally put all the sensors
together in the same location at the start of the test and make sure they read
close to the same value.
Areas -- Glazing area was measured with a tape, and the
frames were included (not just net glazed area) -- this is in the SRCC
style. See the test page for a little more on this.
Flow Rates -- In air collector testing, getting good
estimates for flow velocity is usually the most challenging measurement. I went
through several iterations getting to an arrangement that I feel is giving
decently accurate velocities. The final arrangement includes an about 11 ft long straight length of 10 inch duct on the exit of each of the two fans
-- this provides 13
duct diameters of straight duct between the fan and the velocity measurement station. This lets the
turbulent flow of the fan mix and settle down after leaving the fan.
A 2 ft long flow straightener is used to take most of the swirl out of the flow.
Before the flow straightener was installed, the swirl velocity was about 400 fpm
and the velocity in the center of the duct was significantly lower than the
velocities around the periphery. With the flow straighteners, the velocity
profile is as expected with higher center velocity, and consistent velocities
around the periphery.
I take the velocity measurements with a new
Kestrel 1000 turbine style anemometer. The Kestrels are high quality
instruments that all receive an individual factory calibration before going
out-- they are certified to be within plus/minus 1.66% for the velocity range I
use.
I take one reading in the center of the duct, and 4 readings around the
periphery (up, down, North, and south). The 5 readings are simply averaged
to get an estimate of the average flow. I take these readings several
times during the day -- they tend to be quite consistent. Typical readings
would be 740 fpm center. Readings around the periphery vary from about 530
fpm to 630 fpm, but the readings at each peripheral point are quite consistent
from one reading to the next. The swirl component of the velocity is less
than 100 fpm.
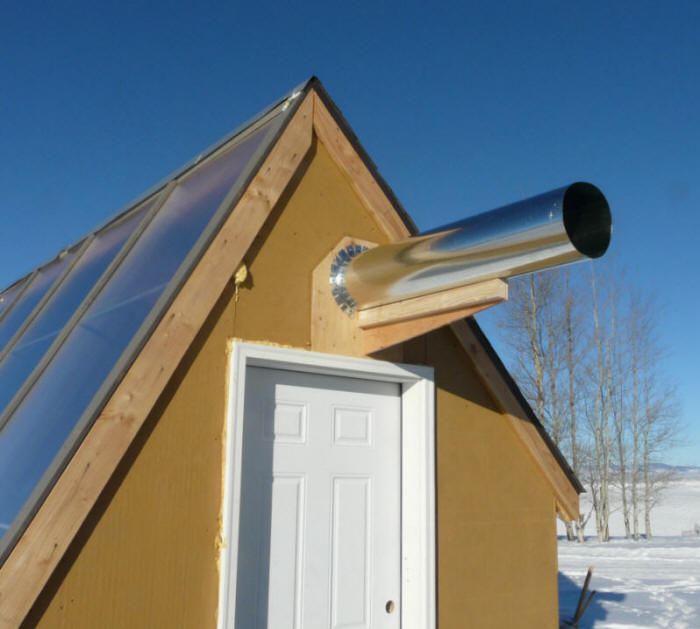
The afterburner on the new sunspace propulsion system.
I'm expecting it to do Mach 0.86 at 32,000 ft.
It is (maybe) interesting to note that before the flow straighteners were
installed, and with a lot of swirl velocity, taking the 5 readings in the same
places as mentioned above -- each individual reading was markedly different than
the after flow straightener readings, but the average of the 5 readings with and
without flow straighteners was close.
I may further check these readings with a Pitot tube survey, but the
velocities are down in the range that are difficult to measure accurately with a
Pitot tube. Past experience leads me to believe that the
Kestrel is probably the best way to go.
Air Density -- I use a density of air of 0.061 lb/cf -- this
correction from the sea level standard conditions of 0.075 lb/cf accounts for
our altitude of 5000 ft. and 80F air temperature. Based on
this calculator.
What is it Like to Live In?
I spent the better part of several days in the sunspace during the testing,
so these are some quick impressions of how it is to be in while its in the
process of gathering heat for the house.
There were a lot of times when the sunspace was quite pleasant to be in.
But, there were times near midday when the glare from the sun and reflection off
the snowfield were a bit uncomfortable for me (this may be a matter of personal
taste). I think that some form of shade cloth like screen that runs
parallel to the glazing and can be deployed to filter the sun, or pushed to the
side to let in all the available sun would be good. It would allow you to
quickly adapt to full sun, part sun and light overcast conditions and to
personal tastes.
Even though I would call the Grainger fans I used relatively quiet, the fan
noise would be objectionable for (say) reading the paper or having a
conversation or just having a cup of coffee. Using fans that
are very quiet and/or getting them into locations that noise shield them from
the sunspace is important.
As a place to hang clothes for drying, it would seem very good. The air
is warm and is moving, which should reduce drying time, and it could be setup so
that the sun shines directly on the clothing to further reduce drying time.
One observation is that it does not take very much sun to warm the sunspace
up to where its comfortable to be in. Even in some cloudy conditions that
keep the sunspace from gathering enough heat to do much space heating, it was
able to heat the sunspace itself to a comfortable temperature.
Another thing that is no surprise is that that when sunset rolls around, the
temperature in the sunspace falls like a rock. It very quickly becomes a
very chilly place.
If these characteristics are not what you want out of a sunspace, then you
can alter the design to to the direction you want -- for example, adding more
mass. You will likely pay some price in the heat delivered to the house,
but this may well be worth it for other gains. Sunspaces are very
flelible.
Cost
This is a very rough idea what an attached sunspace modeled after the
freestanding greenhouse in the pictures above might cost. Its based on
what I paid for the materials for the GH, but adjusted down in places because
the sunspace would not have a north wall.
It includes what you see in the pictures -- nothing fancy.
|
Item |
Cost |
| Glazing |
$414.00 |
| Foundation
Supplies |
$285.00 |
| Framing and
plywood |
$420.00 |
| Shingled
roof |
$150.00 |
| Insulation |
$150.00 |
| Door |
$157.00 |
| Fans |
$180.00 |
| ductwork |
$77.00 |
| Controls |
$60.00 |
| Paint,
Great Stuff, … |
$100.00 |
| |
|
| Total |
$1,993.00 |
Bear in mind that costs of low thermal mass sunspaces can vary over a huge
range. There are a couple of examples of
dirt cheap ones that can be built for $25 ish, all the way up to ones
that cost a couple hundred per sqft. Thermally they all behave about the
same way -- the cost
is more a matter of the look and feel that you want to achieve.
Just as a very rough idea how other solar heating options might compare:
- 200 sqft worth of commercial air heating panels (you
install) -- roughly $10,000.
- 200 sqft of DIY air heating panels with fans, ducts,
... $1500?
- 200 sqft of DIY simple thermosyphon air heating
collector like
this one $450
Of course, the sunspace comes with all sorts of functionality beyond the
solar heating, whereas the rest of the options just do heating.
Potential Further Improvements
While the test sunspace as it is does a very efficient job of producing heat,
there are some things that might improve it.
What causes a sunspace to be less than 100% efficient? Two main
reasons:
Part of the solar radiation is absorbed by the
glazing itself, and never gets into the sunspace. For good single
glazing about 90% gets through, and for good double glazing a bit over 80%.
Heat loss out the glazing from the warm sunspace
interior accounts for most of the rest of the reason we don't see 100% efficient
collectors. This loss is partly conduction through the glazing from the
warm air next to the glazing, and radiation at thermal wavelengths from the
absorber toward the glazing.
Some things that might help:
- Reducing the temperature of the air near the glazing to reduce
conduction heat loss through the glazing -- see Deep Mesh below as one
example.
- Reducing the temperature of the absorbing surfaces, so that less heat is
radiated out the glazing. Efficient transfer of heat from the absorber
surface to the air is probably the main factor in reducing absorber
temperature. Good airflow on the absorber, lots of absorber surface
area, flow through absorbers (like screen), ...
Selective surfaces that are often used in commercial active collectors that
have low emissivity in the heat radiation wavelengths would might also help.
- There are some glazing materials (like Teflon) that have higher light
transmittance and might be used for the inner layer of glazing on double
glazed sunspaces.
Deep Mesh
Nick Pine's sunspace <link> has a
fabric mesh that is fairly close to the glazing. He introduces the supply
are (probably around 65F) between the mesh and the glazing. The mesh has
enough air resistance to spread the supply air over the full surface of the
mesh. So, the sun heats the mesh, and the uniform airflow through the mesh
takes that heat away. The desired end result is that the air next to the
glazing and the mesh absorber will both run relatively cool, and that this will
reduce heat loss out the glazing, which is what efficiency is all about.
Hopefully as Nick gets further along with his sunspace we will get a reading on
how well this works.
Storage
If the sunspace is large enough to produce more heat than the home can use
during a sunny day, It would be desirable to be able to store some heat in the
sunspace for home heating use after sunset. While its easy to add mass to
the sunspace to store heat, the problem is that with the normal sunspace design
a lot of this heat will be lost out the sunspace glazing before it can be used
by the house.
Some possibilities would be
- Movable insulation on the sunspace glazing. This would
reduce heat loss from the sunspace and would make the sunspace more
comfortable as well as allow storing house heat in the sunspace without as
much loss.
There are some sunspace and greenhouse insulation curtain designs out there
-- they tend to be somewhat difficult due to the large glazed area, but not
impossible.
Some of the commercial shades for home windows that have side tracks provide
R values up toward 4 (US).
- It might be possible to provide movable insulation over just the thermal
mass. These insulation panels would be closed around the thermal mass
to reduce heat loss after the collection period. For example, one
might have water barrels along the north wall for heat storage with an
insulating curtain or panels that deploy after sunset to insulate the mass
from the sunspace. Forced air circulation around the barrels would
transfer heat to the house. Another possibility would be to just have
a massive north wall that heats in the sun during the day, and has an
insulating panel over it at night. This would be like a Trombe wall,
and would transfer its heat to the house later in the day.
Air Pickup
An air system that picks up heat efficiently from the absorbing surfaces
would help to keep the absorbing surfaces cooler, and would reduce heat loss out
the glazing. Sunspaces provide a lot of room to work with, so maybe there
is a way to direct airflow so that it picks up heat from the absorber more
efficiently?
Absorber Design
An absorber that absorbs the heat from the sun efficiently and transfers it
to the air efficiently will run cooler and lose less heat out the glazing.
For example the flow through screen absorbers in DIY solar collectors have
proven to be a good deal more efficient that (for example) a bare black box.
Other Ideas?
Got other ideas? Use the Comments section below
or email me.
Conclusions
Low mass sunspaces can be very good space heaters for your home -- equivalent
to active solar collectors of the same area.
Performance takes a significant hit if the design guidelines are not
followed. But, you may well choose to take some loss in efficiency to gain
other benefits.
The environment in a sunspace that is designed as an efficient space heater
can be quite comfortable and useful for SOME other functions while still
providing lots of heat.
Comments
Looking for comments, questions, ideas, errors, experiences with your own
sunspace...