Search
The Renewable Energy site for Do-It-Yourselfers
ProMaster Camper Van Conversion -- Insulation
Thermal insulation is important to make it easier to heat and cool the van when its cold or hot outside. But, it seems to me that moisture control may be just as much of an issue. The van has moisture sources inside (like people and cooking) and the outer skin is totally non-porus metal that will be very cold at times. Its seems like a lot of condensation is going to form on the inside of the metal skin, and that this can't be a good thing from the point of view of rust or things growing. So, to me, it was as important to control moisture and condensation as it was to control heat loss.
There are lots of van insulating schemes out there. The thing I did not care for about many of them is that they did not prevent water vapor from reaching the metal walls.
Some schemes include a vapor barrier to the inside of the insulation, so from inside to outside you have: paneling, vapor barrier, insulation, and then the metal van wall. I am a bit leery of this scheme as it makes it hard for moisture that does get between the two vapor barriers to dry out -- for this reason, vapor barriers on the inside and outside is a no-no in home construction. I have read a small number of stories of people redoing van conversions and finding quite a bit of rust under several year old insulation. On the other hand, there are thousands of van conversions out there and you don't often hear of rust under insulation being a problem. So, I'm not sure, but i decided to use the spray foam to be safe. Maybe I'm wrong about this?
The things that I like about the spray in place foam are that:
- it insulates well (R7 per inch)
- It forms a water vapor impervious layer inside the metal that prevents water vapor from reaching the metal surface and condensing.
- If the insulation is thick enough, the temperature at the inside surface of the insulation will say above the dew point, and no condensation will occur at all because the water vapor impervious inside face fo the insulation is too warm for condensation to form. For example if the air inside the van is 70F at 50% relative humidity, as long as the inside surface of the insulation is 50F or more, no condensation will form.
All of the above plus the fact that some of the good references on van conversions listed spray foam as the best way to insulate, and it is the method used on at least one brand of premium busses convinced us to go with the spray foam.
On the negative side:
- Its expensive (maybe twice as much?)
- Its messy to do
- There is the potential for distortion of the sheet metal panels if the foam is put on as a thick layer.
- Its a bit intimidating -- especially if (like me) you have never done it before.
I did think about cutting out pieces of 1 inch thick polyiso rigid insulation board, spraying them on the back side with Great Stuff foam in a can, pressing them against the metal, and bracing them until the foam cures. The areas around the polyiso board could be filled with Great Stuff. It seems like this method might also provide a way of keeping water vapor from getting to the cold metal. It would also be a good deal cheaper than the spray foam.
Preparing
I would recommend watching some of the YouTube videos on spraying. This is one good one...
Once you start spraying, if you have to stop for more than 30 seconds, the nozzle will have to be replaced, so you want to have everything setup such that you can do it with a minimal number of stops. My kit included 5 fan spray nozzles and 5 regular nozzles, so you could break the job up into several sessions if that works out better.
Check the temperature of your foam cans. I'm told that ideal is about 80F. Mine were about 72F, so I placed them in an ice cooler and filled the cooler with warm water to warm up while I was masking. From what the manufacturer and others who use the foam, having the right temperatures for the foam and for the surfaces you are foaming is very important if you want to get anywhere near the full promised volume of foam.
Figure out which areas you want to foam. There may be places you don't want to foam until later after you have run wires or plumbing through them. I left a few areas for wires, figuring that I can always fill them with Great Stuff later. I also did not foam where I knew I was going to put windows.
I did some sound proofing in the wheel well area before foaming -- this is the GT sticky back product. Its easy to apply -- not sure how much good it does.

Sound damping around the wheel wells.
Mask off all the areas you don't plan to foam and cover the entire floor with cardboard or the like. There will be a lot of foam overspray on the floor by the time you finish.
Did not get a good picture of the masking, but this shows some of it.
Masked off the cab area with poly, cardboard and newspaper on the floor, poly over the main vertical pillars.
Lots of other small things masked.
|
|
The foaming process is messy with a fair bit of overspray, so good masking is essential.
During the masking time, if the foam cans are not up to temperature, this is a good time to get them warmed up.

Warming the spray foam tanks in warm water.
|
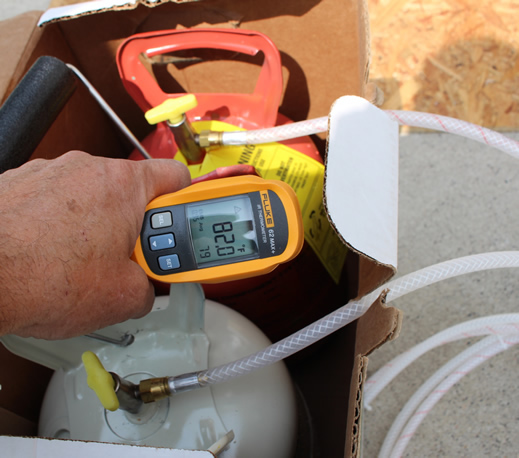
Checking the tank temperature before spraying.
|
I decided to put off doing the inside of the doors and delay that to a 2nd session. Since I used all of the foam in the first session, I'm going to have to find another way to do the doors.
Spraying
Its important to have a plan for what you are going to foam and what order. The foam should be put applied in layers with the first layer pretty thin. If the layers are to thick, the foam does not cure properly, and there is more risk of distorting the van sheet metal.
You want to carefully go through the instructions with the kit you have a couple times, but here is what I ended up doing:
- Clear all the junk out of the way.
- Arrange for some forced ventilation (like a fan) if the area is not already well ventilated.
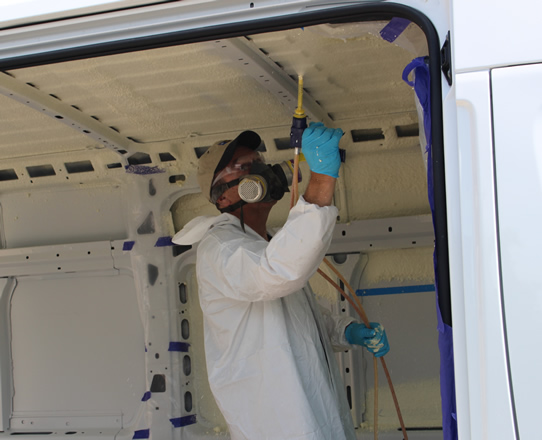
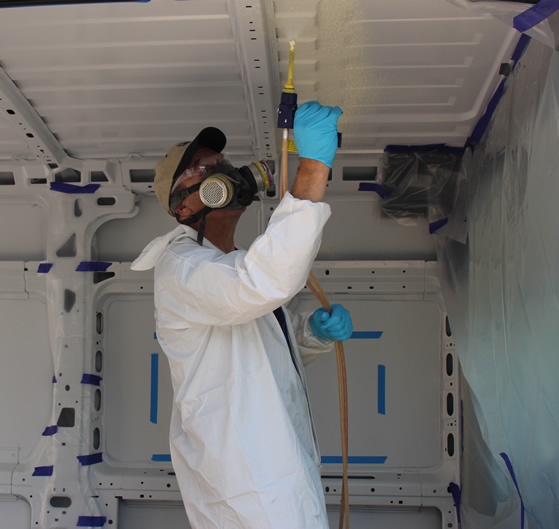
- Put on the silly suit -- this is the first time I've ever worn one of these -- fashionable and it does the job!
- have your eye protection, hat , gloves, and mask ready to go.
- Layout the nozzles and Vaseline.
- Have an scrap cardboard box you can test spray into ready.
- Tip the cans back and forth to make sure they are mixed (at least 30 secs)
- Apply some Vaseline. to the end of the spray gun.
- Put on the eye protection, mask, gloves, and hat.
- Check that the tanks and hoses are where you want them.
- Open the valves on each bottle -- slowly. On my first kit, one of the hoses had a big leak in the middle of it, and sprayed that component all over the place, including over my camera. Luckily it was just the one component and wiped off relatively easily. Had to go back to Home Depot and exchange for a new kit.
- Without putting the nozzle on, point the nozzle at a cardboard box and pull the trigger briefly. You are checking for two streams of material of the same size coming out of the nozzle.
- Install the nozzle -- its just a quick twist on.
- Start spraying.
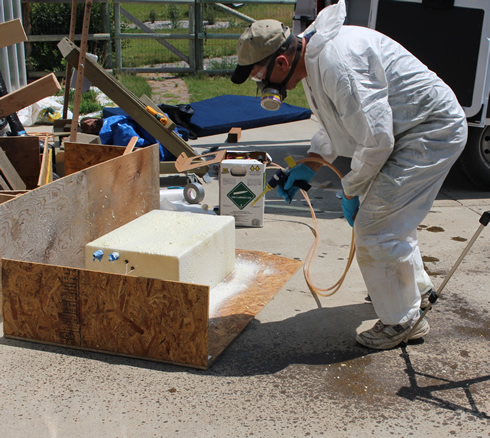
I did a little warm up on what will become our grey water tank -- sticks well even to a roughened up poly tank.
Starting the roof.
|

Spray is very nice for curved surfaces like wheel wells.
|
Start spraying. Spray on a thin coat. Avoid putting too much on as the foam does not cure properly, won't give full expansion, and may end up distorting the sheet metal as it cures. It helps to have watched the videos of others spraying to have an idea how fast to move and how far from the work to be. Its not difficult.
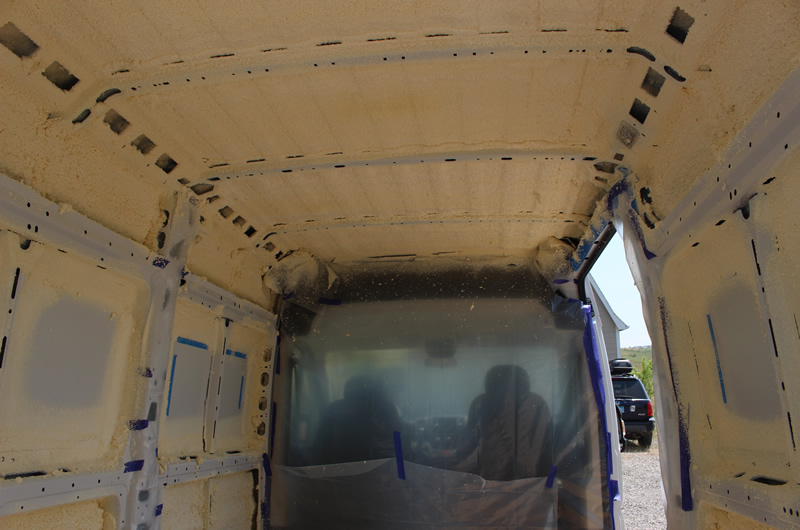
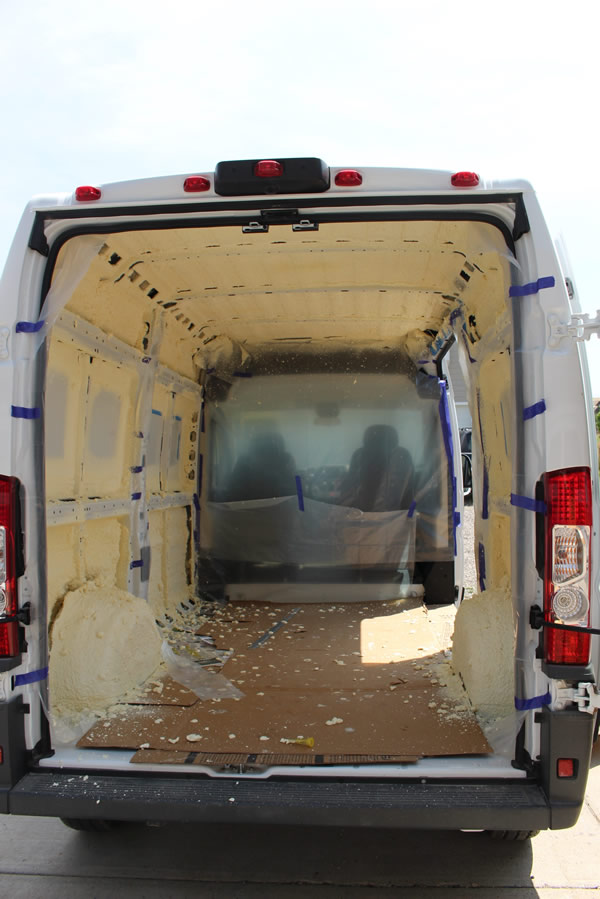
I may have over done it on the thinness of the coats, but I probably coated most areas about 4 times to build up about 3/4 inch before the cans ran out.

Forgot to mask the light.
|
Done except for cleanup.
|
So, start at one end and apply a thin coat over each area til you reach the other end. At that point, go back to the beginning and check the foam -- its should be pretty well cured, not to hot, and firming up to the touch -- if so, do the whole thing over again. I did this whole cycle about 4 times. This goes pretty fast. I don't think I was spraying for much more than half an hour.
The foam will tend to build up on the end of the nozzle -- just wipe it away. I got to a point about half way through where the nozzle did not seem to be working uniformly, and I changed to a new one -- this was easy and quick.
As the bottles run out of material, one will finish while the other still has a little bit of material left -- this will come out as a sticky goo that does not cure, so when you are getting toward the end look out for this and stop. There is a slight color change when there is just one component coming out.
I was hoping to get to about 1 inch of foam thickness all over, but only achieved about 3/4 inch. I'm still debating whether to just go with this, or add a 2nd layer of some other type of insulation.
Cleanup
There were a few areas that I got some foam spray that I did not want it. I cleaned these off with a plastic putty knife. This went pretty fast -- maybe 45 minutes.
I will say that any of this that gets on your skin is going to be there for a while -- it sticks to skin even better than Great Stuff.
How Well Did It Work?
The foam went on pretty easily and it cured to what appears to be good quality polyurethane foam. It appears to be very well adhered to the metal surfaces it was sprayed on.
It is certainly nice for highly curved areas like the wheel wells.
It was pretty quick -- one day, including masking, spraying, a couple trips to Home Depot, and cleanup (but, there is a bit more to go -- see below).
I was a bit disappointed in not getting the full inch I was shooting for -- it seems like the package that was advertised to provide 200 sqft at 1 inch did not, and this was with careful attention to getting all the temperatures right. I would say I got about 170 sqft to an average depth of about 3/4 inch.
I checked carefully after spraying for any sign of sheet metal panel distortion and did not see any. I did see a picture of a Sprinter van that was spray foamed that showed noticable distortion of some of the panels, so, this can be a problem. I think the answer is just to use thin layers. This may be more of a problem for commercial sprayers than the DIY kits.
Took it on a short ride after the spraying to see if the noise level had dropped. It was somewhat quieter, but no where near a Bentley yet. I suspect the flooring and paneling may help.
I still have some insulating to finish up. This includes filling in remaining areas (like inside the ribs and frame) that did not get foamed with the kit. I'm also thinking about adding another thin layer of some kind of insulation inside the foam before paneling.
Cost
The spray kit that was supposed to do 200 sqft to 1 inch thick cost $349 (gulp) at Home Depot. The silly suit was $10, and the rest of the stuff I had on hand or came with the kit.
I will fill in some of the remaining gaps with Great Stuff, so probably another $10 for that.
If I decide to add another layer of thin insulation inside the foam, that will add some additional cost.
Go back to the main camper van conversion page..
Gary
July 19, 2014