Search
The Renewable Energy site for Do-It-Yourselfers
Using Google
SketchUp to Model Sun On A Home, Collector, ...
|
This small example shows how
the Google SketchUp 3D geometry modeling tool can be used to show how
the sun and shadows play over an object over the course of a day.
It turns out to be a very good way to visualize what parts of a
structure are going to be in sun or in shadow for any part of the day or
year.
-
The "object" can be a
home, a commercial building, a collector array, ... Anything
that can be modeled in SketchUp. Shading effects of landscape
and other external objects can be included.
-
It shows sun and shadows
patterns both inside and outside the structure.
-
You can set the location
for anywhere on earth.
-
The time of day and time
of year can be easily and dynamically changed with slider bars.
Or, the sun can be animated.
-
SketchUp is an easy
program to model in. While no CAD program has a zero length
learning curve, SketchUp is about as easy as it gets. You can
use it for a wide variety of drawing chores besides sun paths.
-
There is a free version
of SketchUp which is quite capable, and has ample capability for
this sun modeling function.
|
|
I will say up front that I am just a
beginner junior grade on using SketchUp -- so, there may be smoother and better
ways to do what the example shows, and capabilities beyond what I go over.
But, I hope the example gets across what a nice and easy tool SketchUp is
for understanding the suns interaction with your home or collector array.
After you download
SketchUp, here are the
steps to follow. If you already have SketchUp on your computer, make sure
that its at least version 7, as V6 and before do not allow you to set your
location on the earth.
Step 1: Build a model of the
object(s) you want to see the sun path on:
You will need to learn a bit
about modeling things in SketchUp to do your model. I won't try to
cover the drawing tools here, but they are very simple and easy to learn,
and you don't need much to model something like a simple home or a
collector. There are some nice
videos and tutorials for beginners. It will probably take a couple
hours of going through the getting started materials to get to where you can
draw a simple house model. SketchUp is not limited to modeling simple
things -- if you want to take the time to learn the tools well, you can
model almost anything.
If you have problems, there is a
good user forum to answer questions.
By default, the north direction
will be along the green axis, but you can change this if you want to, so the
house can be oriented however you like.
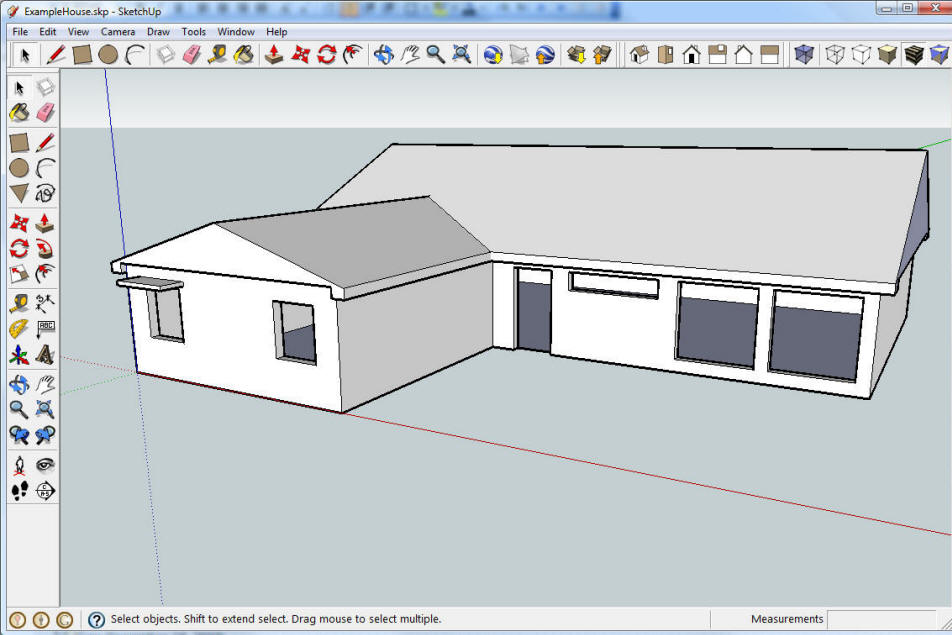
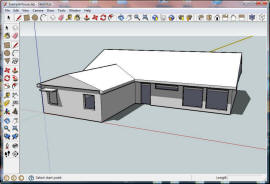
This is the simple home model I
created -- about 20 minutes to do -- probably 5 minutes for someone who
knows what they are doing :)
Click on picture for full size.
A simple house model.
Step 2: Set your Location:
From the "Window" menu, select
"Model Info".
Select "Location" in the Model
Info dialog box.

Using the drop down list, pick a
town near you -- it does not have to be right on -- a hundred miles is not
going to make much difference in the sun paths.
Or, use the "Set Custom
Location..." button to enter your own latitude, longitude, and time
difference from Greenwich.
If North is not along the green
axis in your model, then use "North Angle" box to enter the direction of
North. The "Select" button allows you to interactively pick the
direction of North in your model.
Click the "Show In Model" box,
and make sure that you and SketchUp agree on which way North is.
Step 3: Turn On Shadows
In the "Window" menu, check off
"Shadows"
This dialog will be displayed:
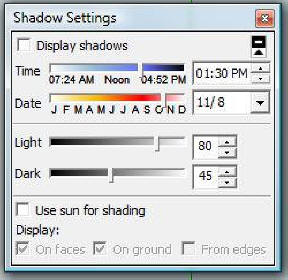
Click on the "Display Shadows"
box, and you should see sun and shadows on your model right away.
Changes for SketchUP 2014:
Some of the menus have changed a bit, but things work similarly.
In the Windows menu, select Model Info, then select "Geo-location". Then either enter your latitude and longatude in the "Set Manual Location" form, or use the "Add Location" to use Google Maps to set your location.
In the Windows menu, select Shadows
In the Shadow Settings dialog (shown above), in later versions of SU, the "Display Shadows" check box has been cleverly disguised a small cube. You must click this cube to see shadows.
Now just use the Time slider bar
to change the time of day, and the Date slider to change the time of year.
The shadows are instantly
adjusted to reflect the slider bar positions, so (for example), you can pick
a date, and then just slide the Time slider back and forth to see the sun
sweep over the model for a full day.
Or, you could pick a time of day
on the Time bar (say noon), and sweep the Date slider bar over the year to
see a how a window overhang does in allowing passive gain during the winter,
but shading out sun in the summer.
Its handy to remember:
June 21: Summer solstice --
longest day of year, highest noon sun of year
Dec 21: Winter solstice --
shortest day of year, lowest noon sun of the year
Sept 21: Fall equinox -- 12
hour day -- sun elevation at noon is 90 - latitude
Mar 21: Spring equinox -- 12
hour day -- sun elevation at noon is 90 - latitude
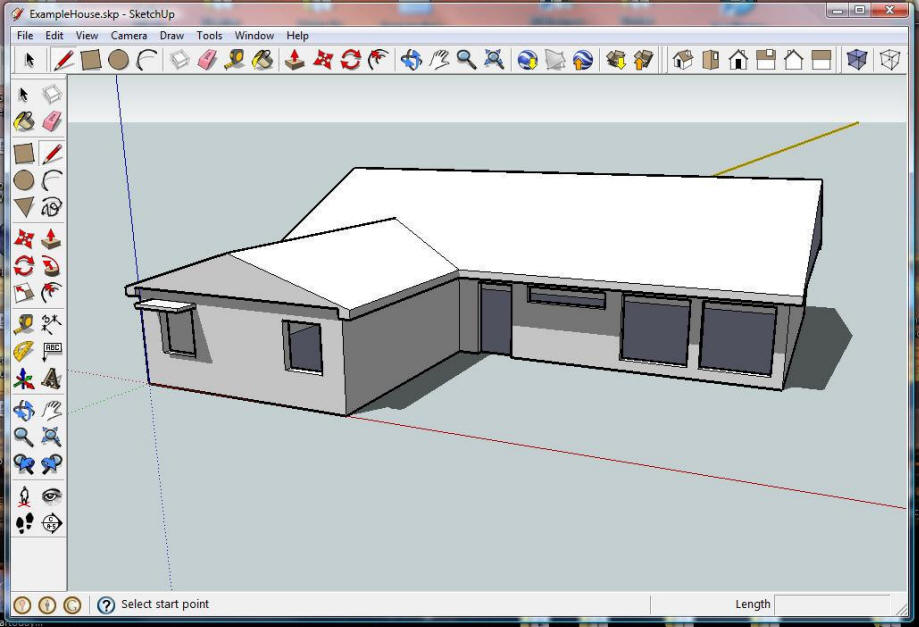
Here are a couple of views of the
simple model I did for the summer and winter solstice. Note how a
shading overhang would be needed to protect the south wing windows from
large heat gains in the summer. The deep eave does a fairly good job
of protecting the two larger south windows, but it could be a bit deeper.
|
Click on pictures for full size
Sun on house -- June 21 |
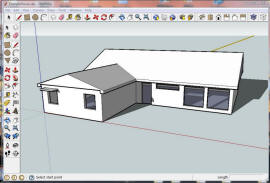
Sun on House -- Dec 21
Note the sun patterns inside the living room.
|
SketchUp makes getting overhangs
right pretty easy. The overhang shown on the west window is just a
rectangle drawn on the wall, and then pulled out to make an overhang.
Since the shadows are updated in real time, you can just set the date to mid
June, pull out the overhang until the shadow covers the window, and then use
the tape measure tool to see how deep it is.
Some other things to try:
-
You can, of course, model
shading overhangs and eaves, and adjust them until they do the job you
want.
-
You can also model things
like vertical shading fins along side of windows, or solar sails,
shading walls, pergolas, sun roofs, ... Just about any kind of
shading structure.
-
If you are designing a new
house, you can just examine how the sun and shadows pay over the house
at different times of year. Look for winter solar gain and
lighting opportunities and summer overheating problems. Change the
design or orientation to improve the house. Add shading structures
external to the house to eliminate overheating problems.
-
You can see the sun patterns
inside the house. Using the "x-ray" tool makes it easier to see
sun patches and shadows inside the house.
-
You can add trees and
landscaping to the model from the big selection of stuff in the Google
component library. Just be sure you scale anything you bring in to
its real size, and locate it correctly in relation to the house.
-
If you can model all of the
potential things that might block the sun that surround you, you could
use SketchUp to instead of the
Solar Site Survey tool.
But, I would be very careful about this, as a small mistake in modeling,
or missing a tree or hill or the skyline or nearby house could cause you
real grief -- best to do the real Solar Site Survey, and then follow up
with SketchUp.
-
You could model a greenhouse
and see the effect of various amounts of roof glazing on sun patterns in
the GH.
-
You could model skylights or
clerestory windows and see what the sun patterns are created in the
house.
-
You can tackle problems like
laying out rows of collectors on a flat roof so that they don's shadow
each other.
About the only thing I would like to
see added is a reflector surface that will reflect sun onto other surfaces --
anyone know how to do this?
Gary December 18, 2008