
Search
The Renewable Energy site for Do-It-Yourselfers
Shop Heating Thermosyphon Collector
-- Potential Changes
|
Our solar shop heating collector
built back in 2003 has worked well, but, as always, there are a few
things we might do differently -- this page lists changes I'd consider
if starting over.
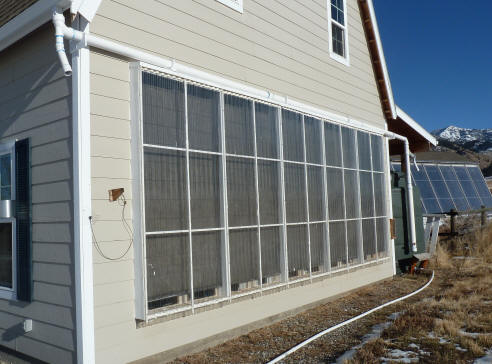
The collector on Jan 3, 2012
The pipe above it is for the new rain water collection system.
|
|
 Back
to the shop heating collector main page...
Back
to the shop heating collector main page...
Absorber
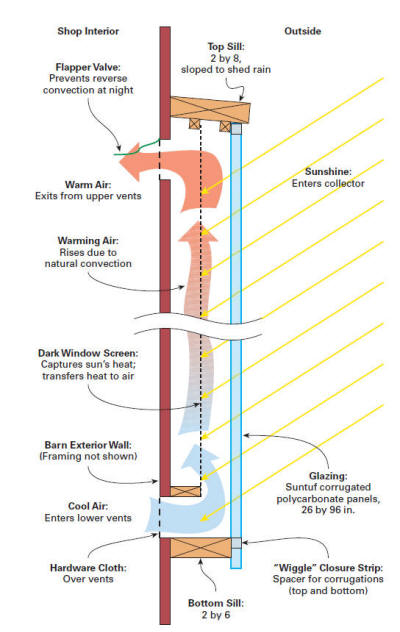
The picture to the right (from the Home Power
article) shows a cross section of the collector. The absorber is the
black dotted line. It actually consists of two layers of black aluminum
insect screen. I would make these two changes:
I would tilt the absorber screen so that it starts out
further away from the glazing at the bottom and ends closer to the glazing at
the top. The idea here is that all of the air is on the glazing side
of the screen at the bottom of the collector, so the flow path should be deeper,
and at the top its just the opposite.
I would move the bottom of the screen to about 1 inch from the back wall, and
move the top of the screen to about 1 inch from the glazing -- these are just
guesses.
On the current version the two layers of screen are not
separated -- they are in direct contact with each other. I would space the
two layers of screen a bit (3/8 inch?) apart from each other. The idea is
that this would allow easier airflow around the screens and improve the heat
transfer.
I don't have any real data that says either of these two changes will
actually improve performance, but they seem sensible, and they don't really add
much work. I may change one bay to use this new construction later this
winter and actually compare.
Glazing
I would consider using the
twinwall polycarbnate glazing instead of the SunTuf glazing. This is
by no means necessary, as the SunTuf performs quite well.
The reasons I would consider making this change are:
- Its somewhat easier to build with the twinwall glazing in that you don't
have to contend with the wiggle strips to seal the SunTuf corrugation ends.
- For colder climates, the performance will be better.
- While this is personal preference, I think the twinwall has a bit
cleaner a look.
Inlet Filters?
I would consider adding an inlet filter on each inlet vent if your collector
is in a dusty area. From this
testing, it
appears that a relatively open inlet filter will not affect performance by very
much.
My collector is 9 winters old, has no inlet filters, and this does not appear
to be a problem. There is a bit of dust accumulation on the bottom of the
collector, but the screens appear to be relatively free of dust.
Flashing
The top sill of the collector should have metal flashing that starts under
the siding just above the top sill, and then extends out onto the sill a couple
inches. This would insure that rain does not get into the collector or rot
the top sill.
I don't have this flashing and its not been a problem, but our climate is
very dry.
Glazing Supports
The horizontal glazing supports that run horizontally just behind the glazing
at the 1/3rd and 2/3rds points were made from 1 by 1's on the original
collector. I have since found that half inch EMT galvanized electrical
conduit works better for these supports. The EMT is very cheap, straight,
and comes galvanized -- its available at any big box (or little box) hardware in
the electrical section.
Daylight
I would work out a way to incorporate some additional glazed area in the back
wall of the collector that would let more daylight into the shop.
My other shop (everybody has two?) uses this
collector setup... A set of glazed doors was added outside
the regular panel garage door, so that when the door is up, the added set of
glazed doors make a large solar collector. They not only let in
solar for heating, but the lighting is really nice. I like
this lighting so much that I'm planning to add some glazed panels to the
thermosyphon collector to improve the light levels in the barn/shop.
If anyone has ideas on how best to incorporate more glazing in the collector
back for daylighting, I'd really like to hear them.
Heat Distribution
The collector outlet vents are up near the ceiling, and the hot air coming
out them tends to stay up near the ceiling. Its good to have some way to
mix up the air in order to make better use of this hot air near the ceiling.
I'm currently using a PV power attic ventilation fan that I bought for
another project to do this, and it works pretty well. A low power
ceiling fan would likely also work well. Anything that keeps the air a bit
stirred up should work fine.
Vent Cutouts
Paul House, who
is now offering a commercial version of this
collector, has suggested that a large hole saw might be used to cut the
inlet and outlet vent holes. This would save some time and probably look
better. I did some testing on this, and while
there is some performance hit, and 8 inch round vent hole could be used with an
about 19% drop in heat output. I don't know if larger hole saws are
available, but a 9 inch hole saw would probably reduce the performance hit to
zero.
Gary
January 5, 2012