
Search
The Renewable Energy site for Do-It-Yourselfers
Dual Pane Interior Mylar Storm
Windows
|
The pictures below show a couple
methods to make dual pane interior storm windows using Mylar film.
The advantages of the two pane Mylar
film method are:
-
The dual panes add about R2 to the
windows current R value, instead of the R1 that a single pane storm provides.
This cuts the loss from a double glazed window about in half.
-
The Mylar film is quite clear and
does not distort the view
-
These storms are very light weight
and easy to install and remove -- or they can just be left in place.
-
These storms can be made for odd
shaped windows.
|
|
I used 2 mil Mylar purchased from
www.MirrorSheeting.com at a cost of
about 20 cents per square foot per pane.
The windows are made by making an
edge frame from 3/4 inch strips of Medium Density Overlay plywood. The
Mylar film is then placed on a flat surface, and tensioned with tape on the
edges to remove any wrinkles. A bead of silicone caulk is applied around
the top surface of the frame, and it is placed on the Mylar film and weighted.
After the silicone has cured, the process is repeated for the 2nd layer of film.
You end up with two layers of Mylar film separated by the 3/4 inch edge frame.
The frame can then be installed with dabs of silicone, or Velcro tabs, or small
screws. The pictures below show the full process.
An alternative to the Mylar film
might be polycarbonate sheet. My understanding is that rolls of thin (0.01
inch?) polycarbonate sheet can be purchased for about $1 per square foot.
My understanding is that the material is available with a UV resistant
coating to extend the life. The material is said to be optically very
clear, and would probably be easier to form a wrinkle free surface in than the
thin Mylar film. If you have any experience with this material, or know of
a good source for it, please let me know -
Gary.
An alternate frame that utilizes a
hardware store kit for making window insect screens is also shown.
I consider this whole thing still in
the experimental area, so if you have any thoughts or ideas that might improve
the design, please let me know --
Gary.
How-To
Make an edge frame.
Measure the inside of the existing
window frame. Deduct 1/4 to 1/2 inch from these dimensions to allow
clearance to install the new storm.
I used some scraps of Medium Density
Overlay plywood for the edge frames -- this material works well because it is
stable and warp resistant. But, other materials may do just as well.
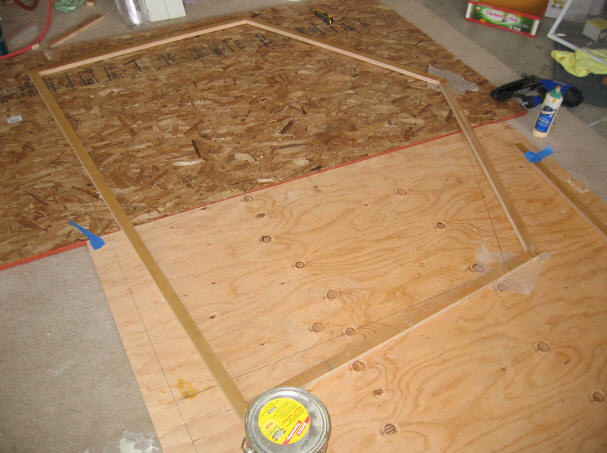
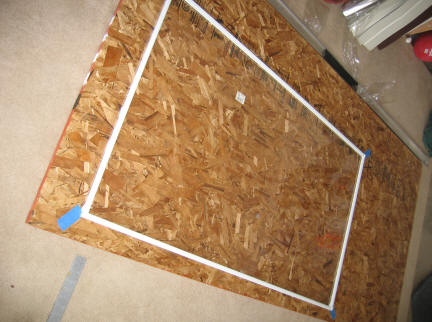
The edge frame -- this is for a
window with a peak on the top.
Assemble the frame on a flat surface.
Detail of top joint.
The corner joints are made with
simple butt joints that are glued and nailed.
Be sure to check that the frame is
square, and adjust if necessary.
The waxed paper is to prevent the
frame from sticking to the surface it is resting on.
After the glue cures, paint the edge
frame to match the window frame color
Lay Out the Mylar Film and Stretch
It Flat
Cut a piece of the Mylar film that is
a couple inches larger than the edge frame all the way around.
Lay the film down on a flat surface.
Stretch the film out flat by pulling
the corners out with tape. For smaller windows, one piece of tape on each
corner is enough -- for larger windows use a piece on each corner plus a piece
in the middle of each edge.
Put enough tension on the tape to
pull any wrinkles out. You may have to go around and adjust the tape
tension a couple times.
The picture below shows the Mylar
pulled out flat with the edge frame already positioned over it.
Apply Silicone To Edge Frame
Apply a bead of clear silicone caulk
to the outer surface of the edge frame. Then, carefully position the edge
frame over the stretched Mylar film, and lower it onto the film. Press
down the edge frame all the way around. Then weight the edge frame down
with any handy weights until the silicone cures.
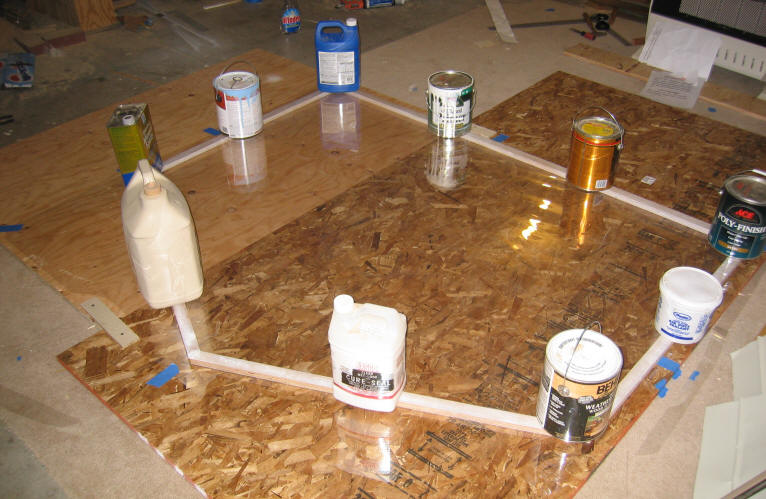
The storm window edge frame placed on
top the Mylar film. The paint cans are just to weight down the edge frame
while the silicone caulk is setting. Note the blue tape that is used to
stretch the Mylar flat.
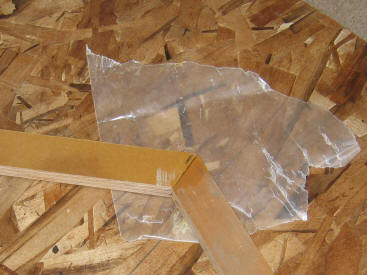
After the silicone has cured, remove
the weights and trim off the excess Mylar with a razor blade knife.
2 nd Pane
Do the 2nd pane in the same way you
did the first pane.
Be sure that the inside surfaces of
the Mylar film are clean and dust free before you silicone the 2nd pane in
place.
Install the Storm Window
Install the storm window in the
existing window frame.
I used two small screws that just
barely penetrate the Vinyl frame of the existing window. Very little is
needed to hold the storm windows in place.
The final product is good.
The Mylar is quite clear and non-distorting. The only deviation from
"perfect" on mine is that there are some very minor wrinkles that are visible in
certain lighting -- for a $30 fuel saving per year, I can live with that :)
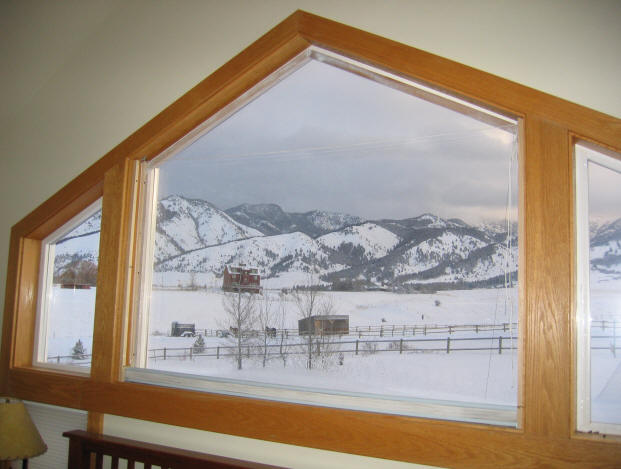
The installed
storm window.
Alternate Using Window Screen Frames
Here are a couple pictures of an
alternative that uses a window screen frame kit for the edge frame.
These kits are meant for replacing window insect screens. These kits are
available in most hardware stores, and come in a couple different sizes.
They include the aluminum edge pieces and plastic corner pieces. This
makes a pretty easy way to make a storm window frame. The kit I bought at
Home Depot was about $13.
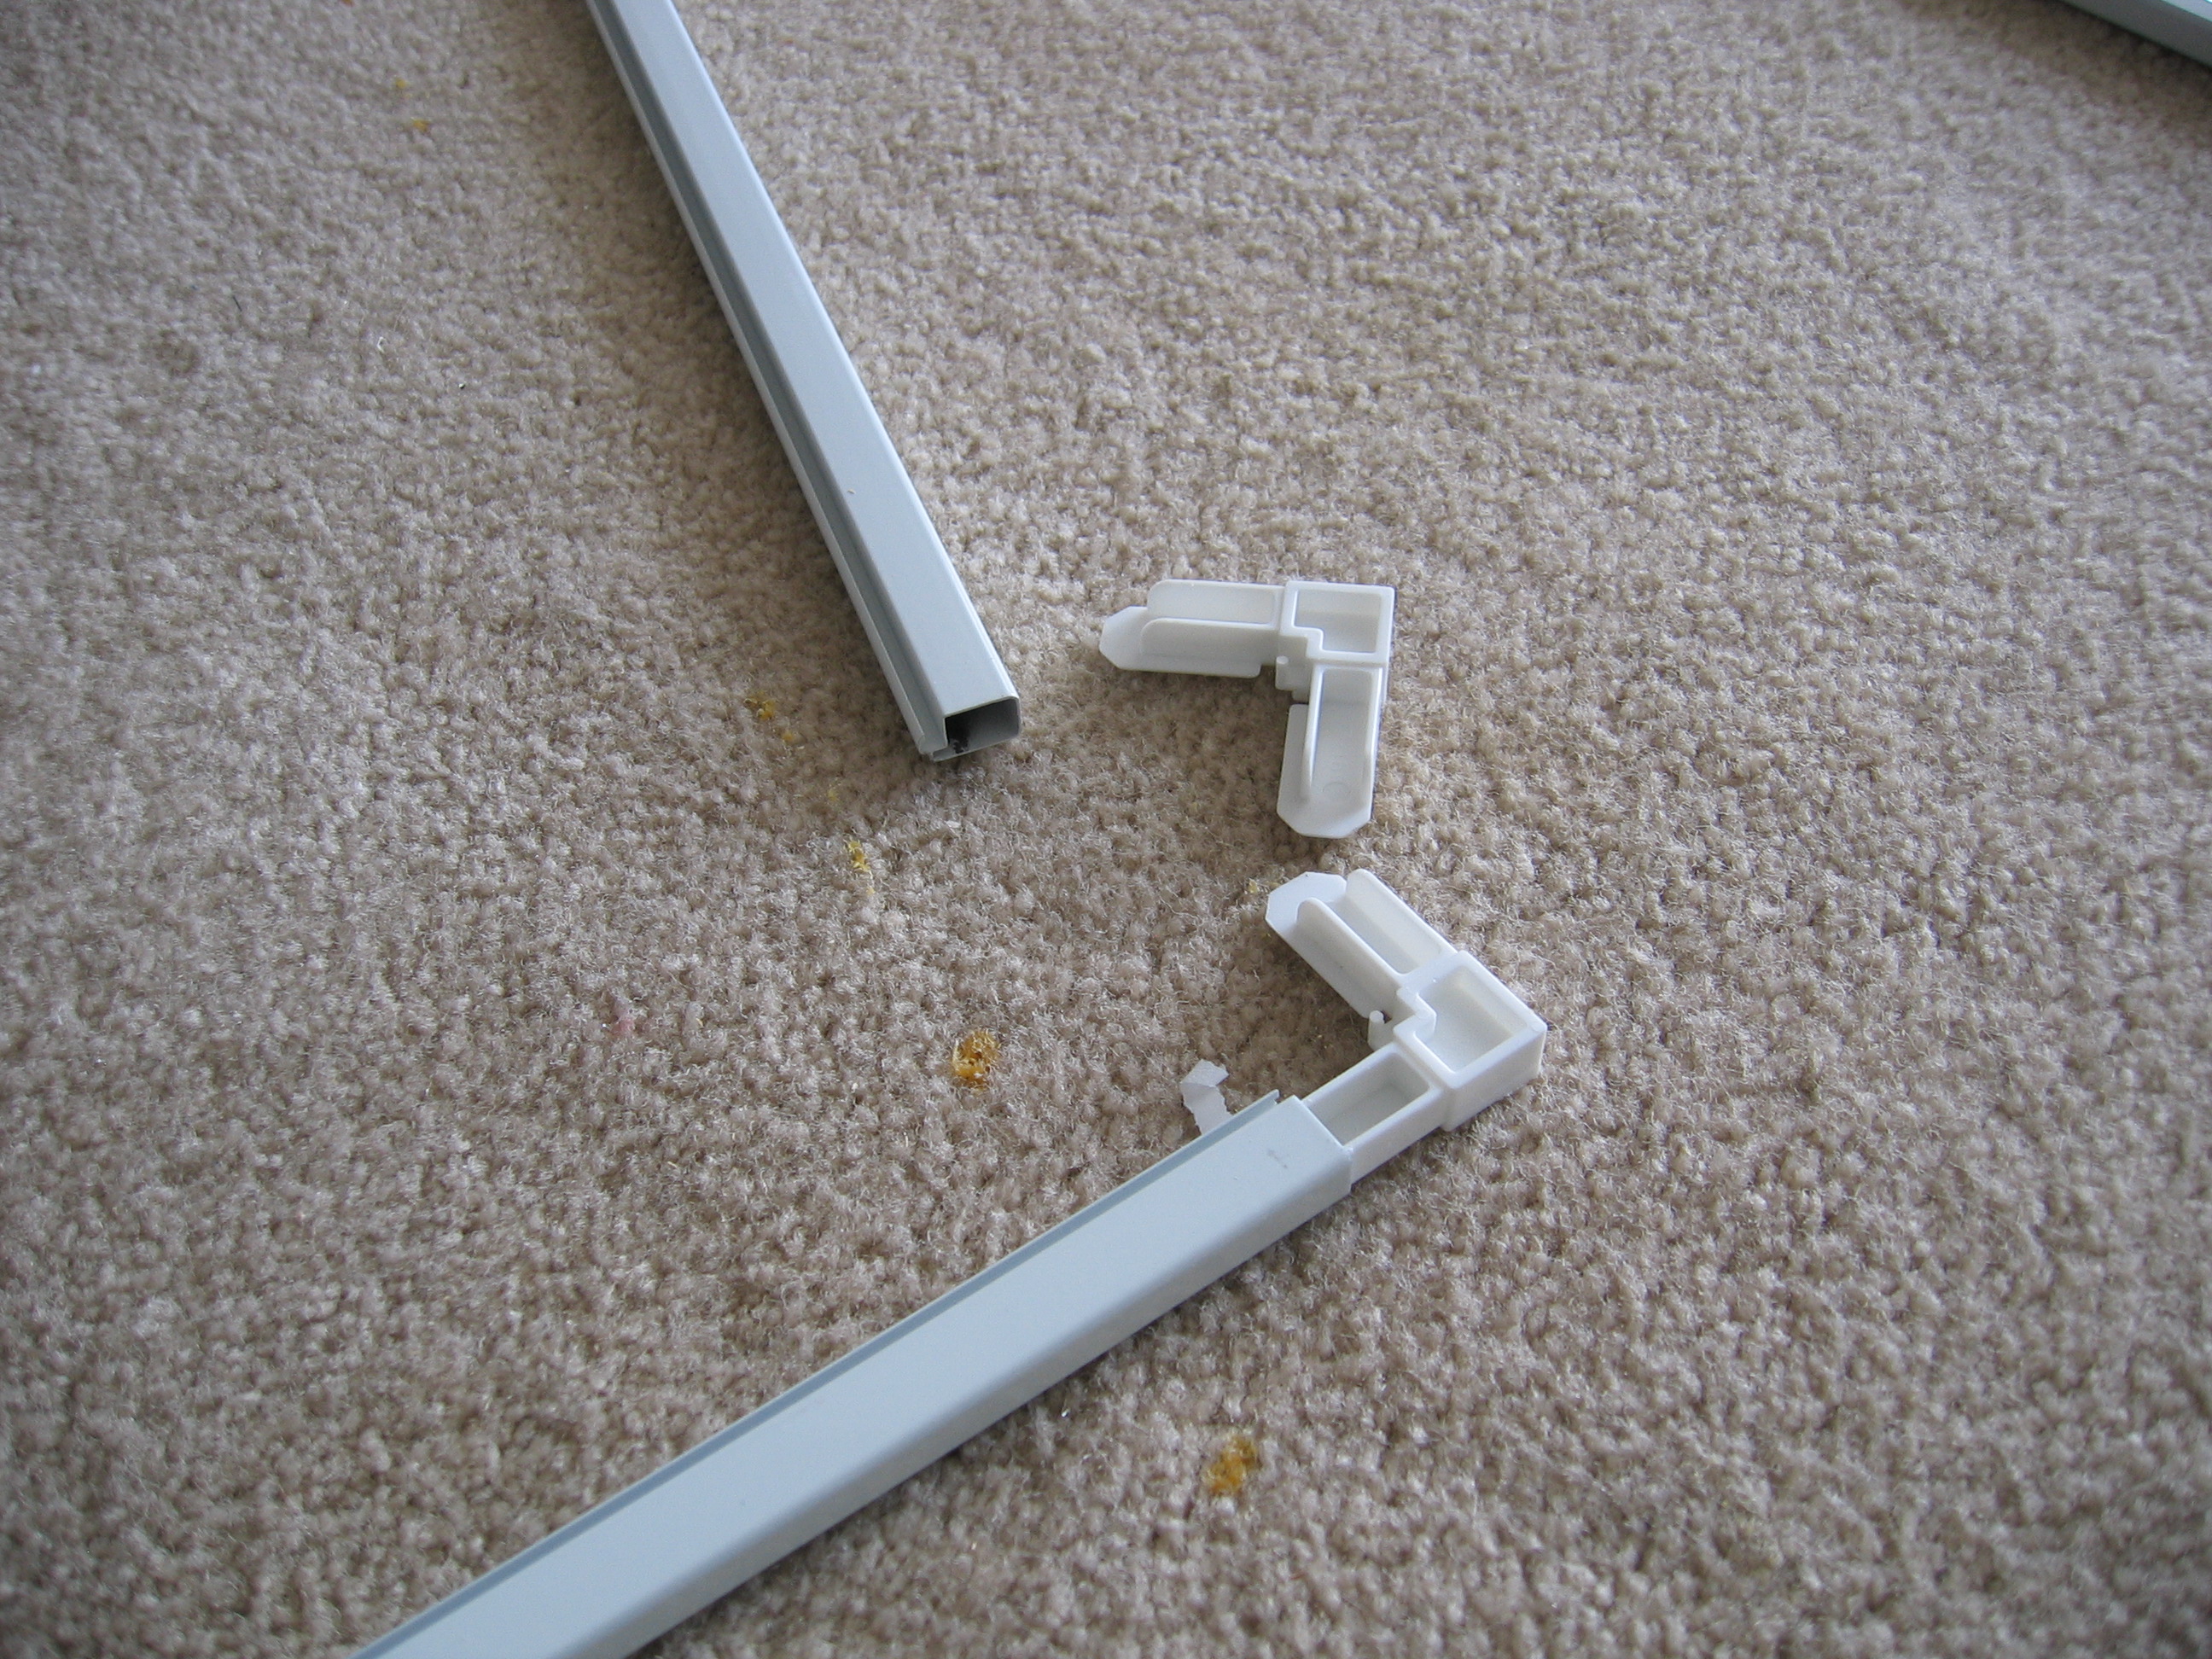
Picture shows the aluminum pieces
that make the edge of the frame as well as the plastic corner pieces that slide
into the aluminum edge pieces to make the frame.
You will need to cut the aluminum
edge pieces to the proper length to fit your window, and then assemble the
frames using the plastic corner pieces.
Once the edge frame is assembled,
build the storm window in the same way that is described above for the wood edge
frames.
The aluminum edge
frame being siliconed down to a Mylar sheet
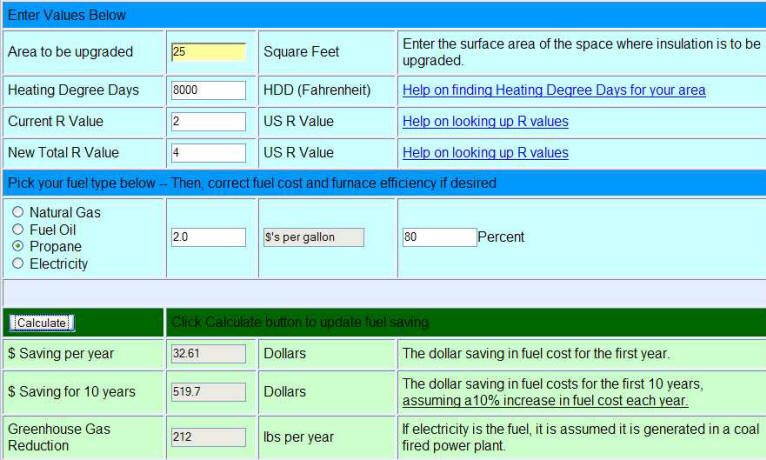
Performance
The 25 sqft Mylar window pictured
above cost me about $10 for the Mylar ($0.2/sf * 2 panes * 25sf) plus about $5
for the edge frame lumber and silicone, for a total of about $15.
For this window applied over my
current double pane windows, and for my climate:
Cost of the window about $15.
For my climate and fuel cost (8000
deg-days, $2 per gallon Propane, over dual pane windows)
Saving per year = $33
Ten year saving = $520
(assuming 10% fuel price increase per year)
Greenhouse gas = 210 lbs per year
reduction
So, the simple payback is about one
half heating season in my situation. You can use the
Insulation
Upgrade Calculator to estimate your saving.
Note that the payback on single
glazed windows in my climate would be around one month of the heating season!
Here is the Insulation Upgrade
Calculator results for my case:
Any ideas for improvements on this??
Gary.
Life
Life of
Mylar inside storm windows ...
Gary 2/28/07
Updated later 2/28/07 to correct cost
of Mylar (thanks to Randy for catching this!)
Updated February 6, 2009 to add note
on Life.