Search
The Renewable Energy site for Do-It-Yourselfers
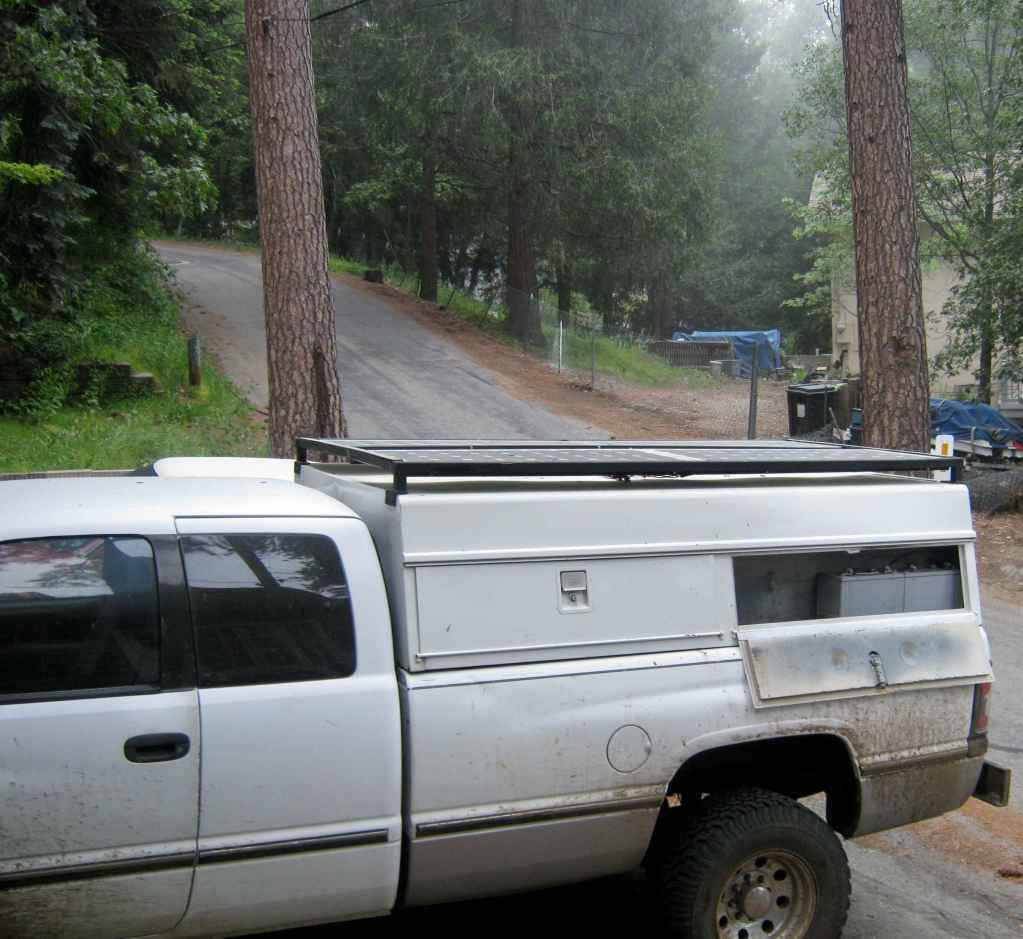
Truck Mounted PV
System
| Here is a good and detailed description of the construction of
mobile solar electric (PV) system mounted in a pickup truck. The
system can be used for providing power for remote locations, homesteads,
jobsites, camping...

MightyBooBoo describes the system in detail. Its a 320
watt system with 3+ KWH of storage capacity in the form of 4 batteries.
He was able to buy many of the components through Craig's List, and the
full system cost him less than $1000 -- about $3 per watt!
This would also make a good system for an RV, or even for a cabin.
Thanks very much to MightyBooBoo for sending this material in.
Many more PV projects (Large
and small) here... |
|
The details from MightyBooBoo:
| |
Caution
This project involves electrical wiring,
working with PV circuits that may be "live"
anytime the sun is shining, and working with lead-acid batteries
that can pose explosion hazards and very high electrical currents.
If you are not familiar with the kind of safety precautions you need
to take, then get some help!
I am not an electrician, and take no responsibility whatever for the
correctness of the wiring shown.
|
|
Overview
The system components are:
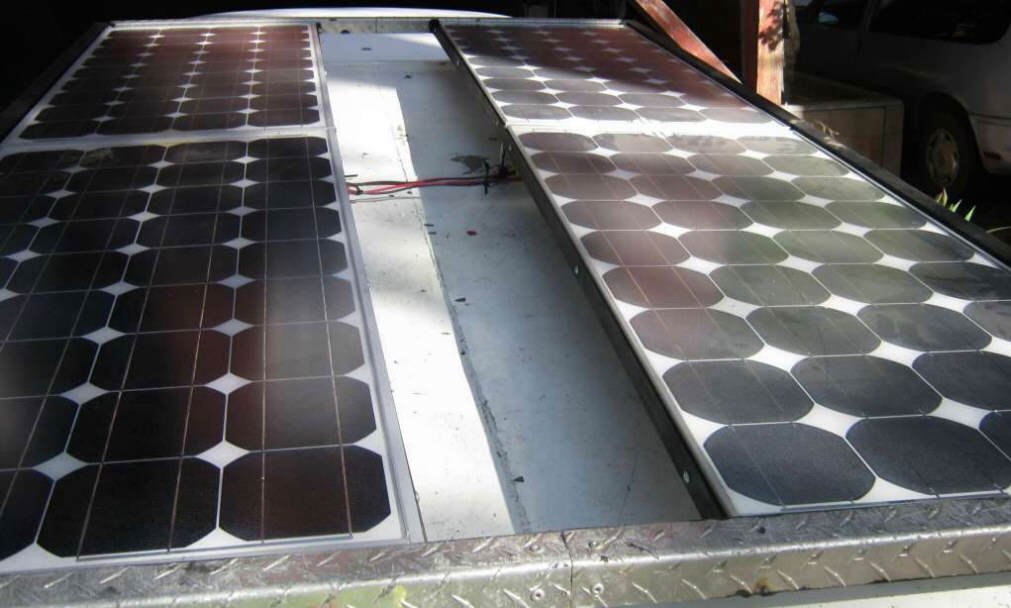
Four 80 watt monocrystalline PV panels for 320 watts total of PV power.
The PV panels nominal voltage is 18 volts -- this is compatible with
charging 12 batteries via a charge controller. The PV panel voltage
must not go over 25 volts with the charge controller used.
Four 12 volt, 95 amp-hour AGM Batteries.
Two 10 amp charge controllers and fuse blocks.
Assorted cables and wiring.
An inverter will be added to the system when 120 VAC "house" power is
needed.
The system is built as two independent systems (see below).
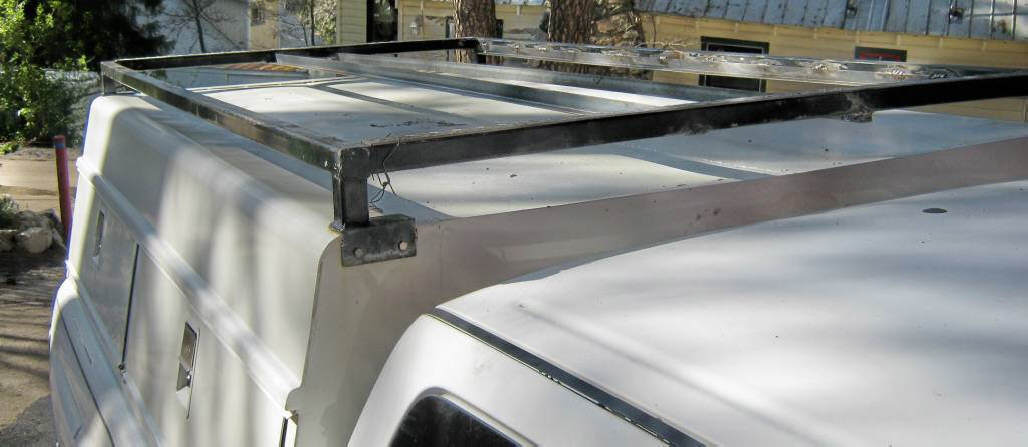
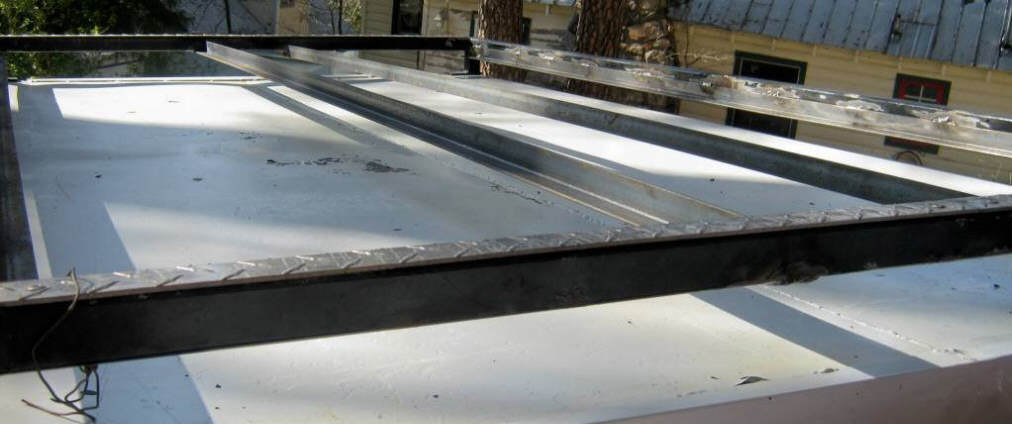
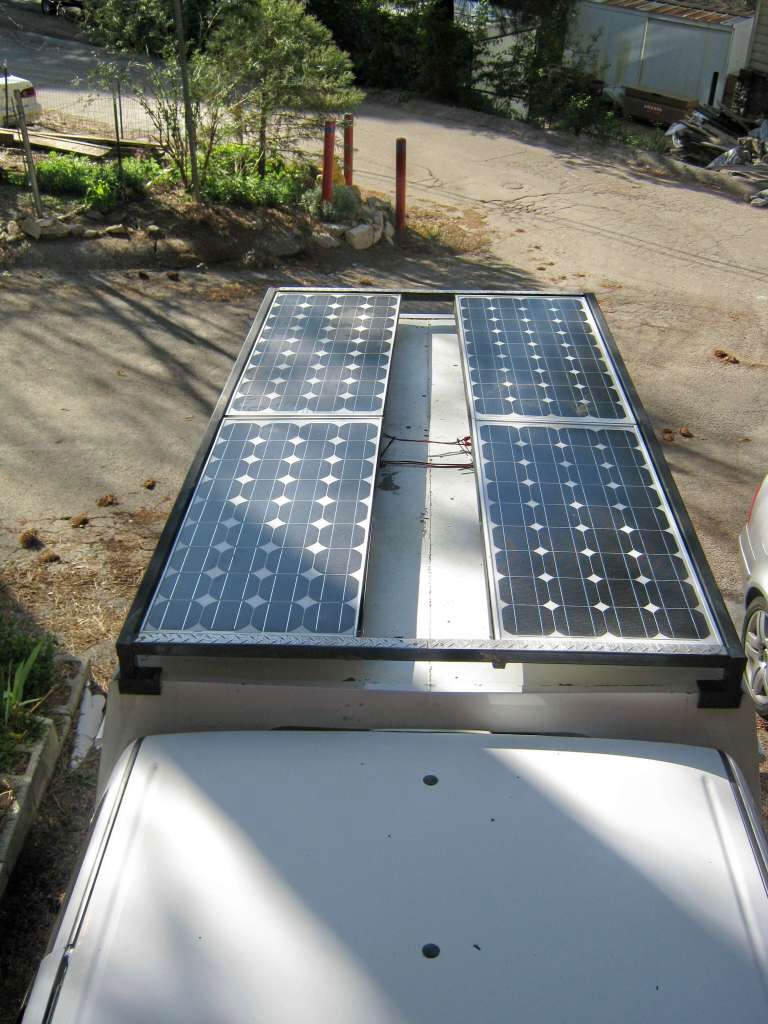
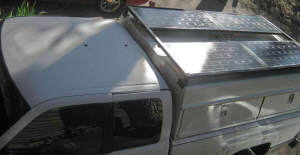
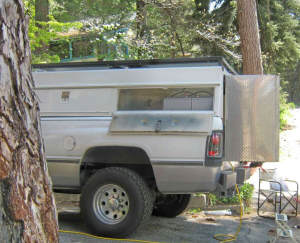
The Rack and PV Panel Mounting
The new PV panels are supported on my existing lumber rack by four lengths of
angle iron. The new angle iron pieces run from the front of the rack to
the back, and they are spaced just a bit wider than the PV panels so that the PV
panels sit on top of the new angle iron flanges.
The PV panels will go down both sides with a walkway in middle.
The walkway starts at 8 inches and goes to up to 12 inches in front -- the
lumber rack is uneven, go figure!
The angle iron supports for the PV panels were welded to my existing rack --
the PV panels are supported along their long sides by one flange of the angle
iron, while the other flange of the angle is welded to the rack. Bolts are
used to hold the PV panel frame down securely to the angle iron.
The welding of the angle irons was done with the rack off the truck.
The Shell is a Stahl, the
rack was a custom made job by the previous owner who was an electrician and this
was his work truck. It still blows me away how those panels fit perfectly
into the rack on the long axis, was like rack was made to fit them, there is
maybe 1/8 inch play from front to back!
I got the rack painted on Monday using a rubber glove covered with a cotton
glove. Dip glove in paint and just rub the paint on . BIL's idea, he did
his wrought iron at house this way, worked too!
Click on pictures for full size
 |
 |

The four new lengths of angle iron
that support the edges of the PV
panels. Two near the center, and
two welded to the existing rack. |
I got most of holes to attach the PV panels to the rack drilled, at least the
really tough ones, they had to go thru both rack and angle on passenger side.
On the drivers side the angle sits lower so I just drilled angle iron holes.
I picked up an assortment of various bolt solutions at Thrift today, and I am
going to make doubly sure that shell is on securely.
| |
In regard to the question of whether the PV panels will be stable and
secure at speed:
We had panels on roof of our motor home, and they travel really well.
We have never had a sailing problem or a road grit issue. Seems as
much air passes over them as under. The panels have been on a 2000
mile camping trip with rough roads and speed up to 70 mph with
absolutely NO stability issues. Can't even tell at all they are up
there. |

The 4 PV panels mounted to the
added angle iron supports. |
 |
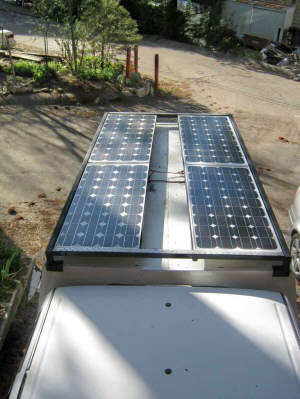 |
The system is installed as two separate systems. Each system has two PV
panels, 2 batteries, and a charge controller. The batteries go in the
trays in outside shell openings towards the back -- fit like they were made for
em, cool! .
These are the left side system panels mounted....
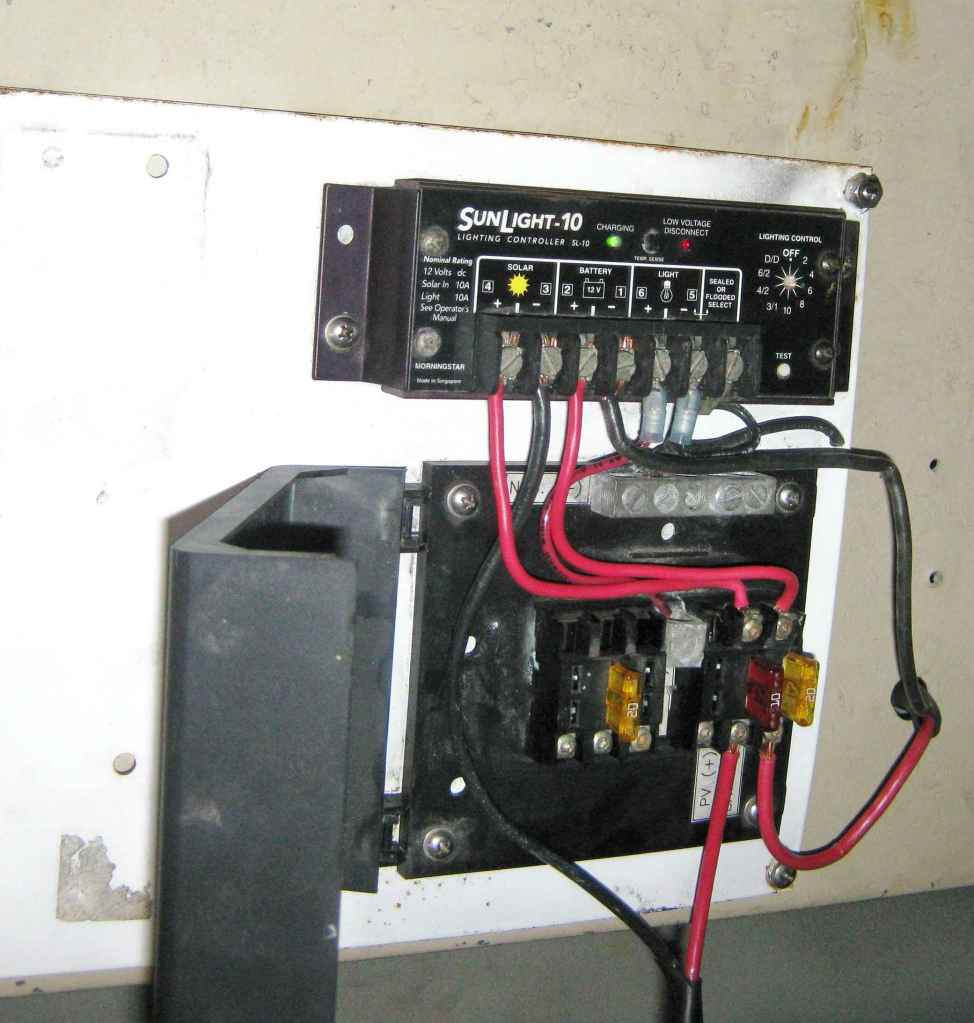
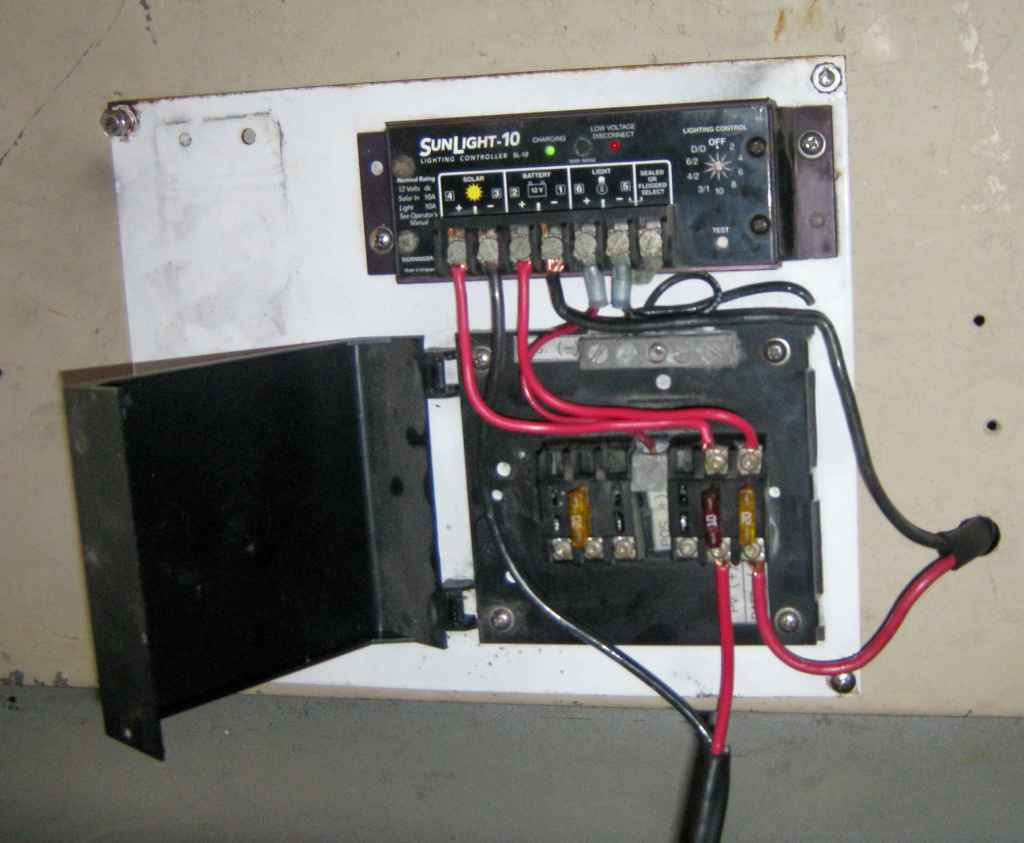
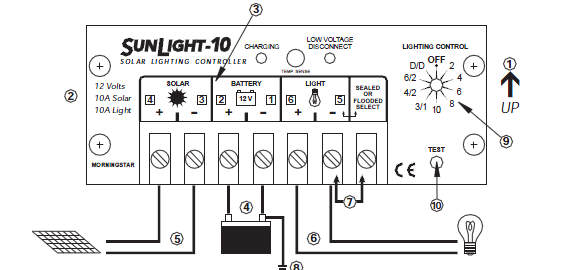
Wiring and and Charge Controller
The picture below shows the fuse block and 10 amp Morningstar Charge
Controller.
The charge controller adjusts the voltage from the PV panel for efficient
charging, and also prevents the PV panels from overcharging the batteries.
The charge controller I had on hand was the Morningstar
SunLight
controller -- this is a special version of the Morningstar
SunSaver controller that includes timing circuits for turning lights off and
on. The SunSaver would probably be the normal choice for most people, but
either controller works fine.
Be certain that the PV panel current output does not exceed the input rating
of the charge controller -- 10 amps in my case.
Wiring: No Rocket science here....
- The negative terminals of the two batteries are tied together and
connected to the negative battery terminal on the charge controller
(terminal 1 on the diagram below).
- The positive terminals of the two batteries are tied together and
connected to one terminal of the battery fuse. The other terminal of
the battery fuse is connected to the positive battery terminal on the charge
controller (terminal 2 on the diagram below).
- The negative wires from the two PV panels are tied together and
connected to the negative PV panel terminal on the charge controller
(terminal 3 on the diagram below).
- The positive wires from the two PV panels are tied together and
connected to one terminal of the PV panels fuse. The other terminal of
the PV panel fuse is connected to the positive PV panel terminal on the
charge controller (terminal 4 on the diagram below).
- The negative wire from your loads (lights or whatever) are connected to
the negative load terminal on the charge controller (terminal 5 on the
diagram below).
- The positive wire from your loads are connected via a fuse to the
positive load terminal on the charge controller (terminal 6 on the diagram
below).
- If you are using sealed batteries, then hook up the jumper between
terminal 5 and the "Sealed or Flooded" terminal. If using flooded
batteries, then don't use the jumper.
Morningstar recommends hooking the wires up in the order of the terminal
numbers (1 through 6).
On the
SunLight controller I used, the output to the load (lights) are
controlled by the "Lighting Control" timer and can be set to turn lights (loads)
on and off according to a schedule you select. The load is limited to 10
or 20 amps depending on the controller model.
On the regular
SunSaver
Controller, 12 volt electrical loads can be hooked up between terminals 5
and 6 up to the rating of the controller (6 to 20 amps depending on the model).
Loads can also be hooked up directly to the batteries as long as a fuse is
added to protect against shorts or overloads. But, if you hook loads up
via terminals 5 and 6 on the charge controller, the controller will shut the
load off when the battery voltage drops below 11.5 volts, and this will protect
the batteries from being discharged too far.
The manual for the controllers has complete wiring instructions:
SunSaver Controller manual...
Sunlight Controller manual...
Here is the wiring diagram from the Morningstar website:
The
Morningstar website has downloadable manuals for each controller.
Cost used for Power Panel-20 dollars.
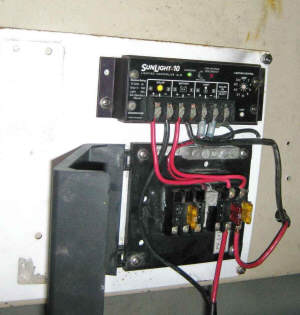
Fuse block above and Morningstar
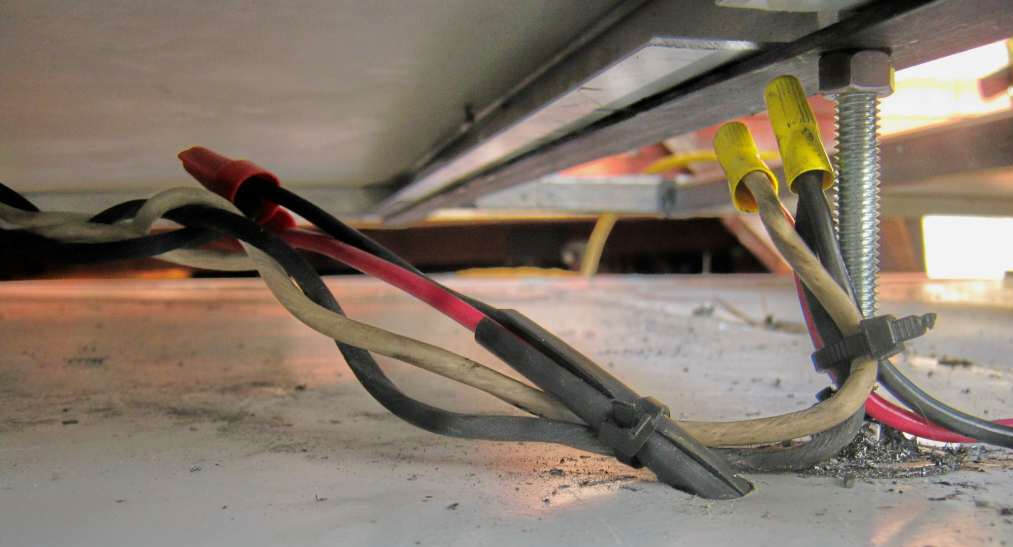
charge controller below. |
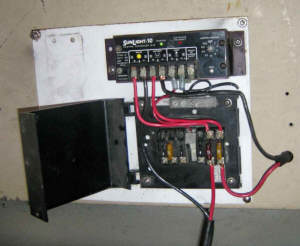
Showing the wiring coming into the
charge controller area. |
I have to say I REALLY like these Morningstars, they make a great product,
long life, good value. Highly rated with good reason. I think they
are THE small load controllers, and even new they are competitively priced.
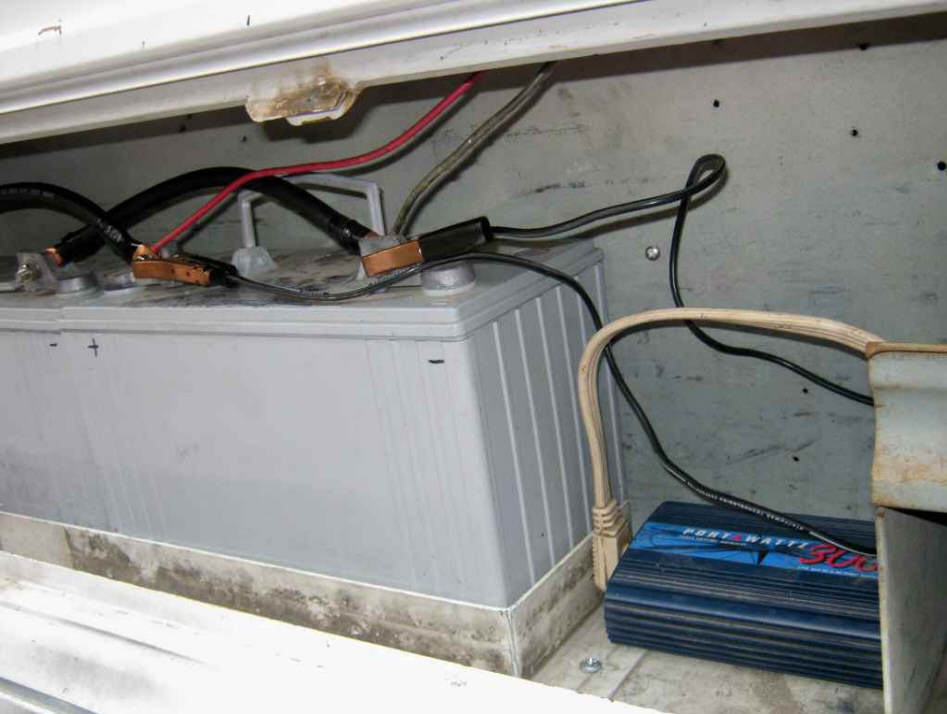
Installing the Batteries
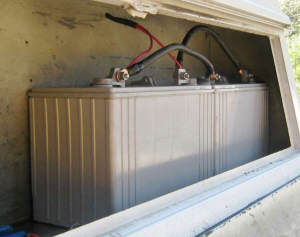
The two sealed 12 volt batteries
hooked in parallel. |
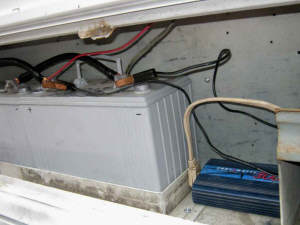
Angle iron around base of battery
keeps it from sliding, but a hold down
strap should also be used. |
Batteries fit nicely in the side compartments. |
Two batteries in the side drawer. The batteries sit far
back for good weight distribution. I put some angle iron around base of
battery to keep them from sliding but actually had one pop over edge on a rough
road. Its going to need a hold down strap in addition to the angle irons.
The batteries were picked up used on Craig's List for 50 dollars. Each
Battery cable cost $8 -- they were made to size at the local Auto Parts store.
I will repeat on other side of truck with two more panels and two more
batteries.
Inverter
To run regular household 120 VAC gadgets, you will need to add an inverter.
The inverter converts the 12 volt direct current battery voltage into 120 volt
alternating current similar to what the utility grid provides.
The picture shows a small 300 watt inverter. It merely clamps to the
battery terminals, and is self fused. You can put whatever size inverter
you want, but with just 2 batteries, I think 1000 watt would be plenty
.Follow manufacturers instructions for cable connections and fusing to batteries
for your inverter. I'm thinking a 2000 watt inverter and the four
batteries hooked together will be just about right eventually.
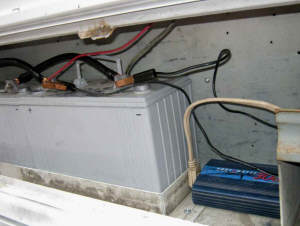
A small, 300 watt inverter just
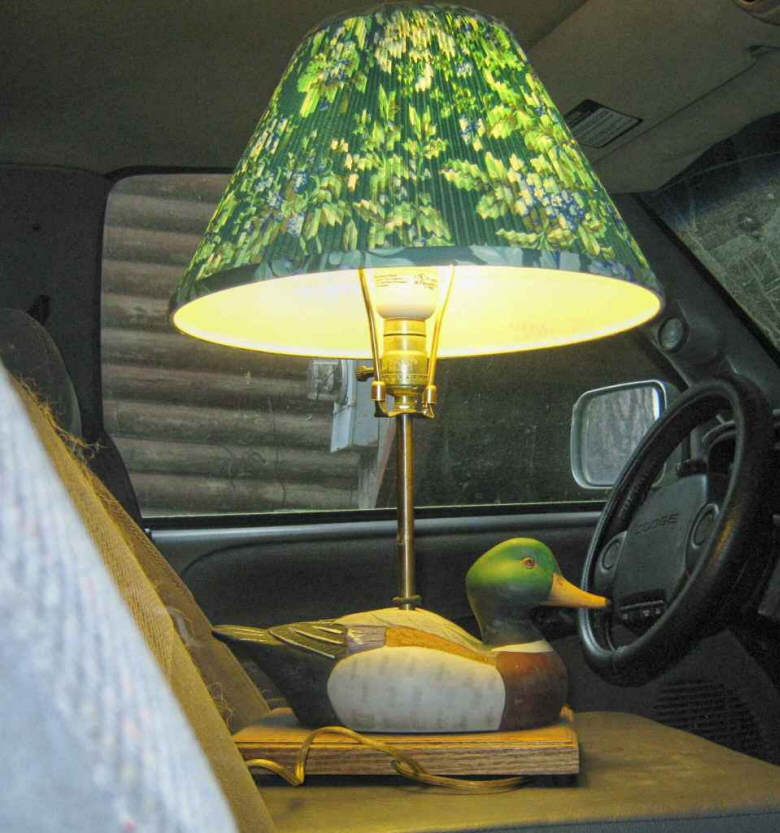
clamped to the battery terminals. |

The Duck Lamp happily running off the inverter.
How many times have you said
"If I only had a 120 volt Duck Lamp in my truck"? |
Cost
So what did I get and what did it cost?
I have 2 individual solar systems, each has two 160 watts of panels and two 95
amp sealed batteries. Much of this equipment was bought on Crag's list:
The angle Iron to make ladder rack a panel rack was 32 dollars.
320 Watts of Monocrystalline Solar panels @ 2dollars/watt...640 dollars.
Two power panels (fuse block and 10amp Morningstar controller @ $20
each...40 dollars.
Four batteries, 95amp sealed @ $50 each...200 dollars.
Four battery cables @ $8 each...32 dollars.
Assorted nuts and bolts ...$15 dollars.
Had my own wires on hand.
GRAND TOTAL.... $959 for 2 systems, 320 watts total, 380 amp-hours of batteries,
installed at 2.99 a watt!
June 6, 2010
Note: Boo is a regular on the
Homesteading Today forum in the Alternate Energy group. You can ask
him questions about the system there.

Girl approves.
Gary June 6, 2010