
Search
The Renewable Energy site for Do-It-Yourselfers
Blowing Cellulose
Insulation Into Walls
Blowing insulation into attic
ceilings is a straight forward and easy DIY job, but blowing insulation into
walls is a bit more challenging a task. Here is some information on doing
a good job on insulating walls with blown in insulation.
A few highlights from the Bruce Harley book "Insulate and Weatherize":
Find out what's in the wall now -- existing insulation may
make it hard to blow in new insulation.
If using a "filling tube" (see below) you will need to drill
a hole large enough to push the filling tube through for each stud bay.
These should be about 1/3 to 1/2 the way up the stud bay. If the stud bays
have horizontal blocking installed, then you will need a hole above and below
the blocking. The holes should be about 2 inches in diameter -- make sure
it matches the size of the filler plugs you are going to use to fill the holes
after blowing.
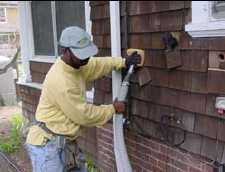
To drill the holes, you will need to remove one row of
siding. Do this carefully so that the board can be replaced. This is
better than drilling holes through the siding and having to patch each hole with
patches that will likely show.
|
|
The filling tube is used to fill walls more completely and to
dense pack the insulation for better R value and so that it does not settle.
The filling tube is and about 8 ft long by 1.25 inch diameter flexible vinyl
tube that is taped to the end of the blower hose.
In use, the filler tube is pushed into the hole you drilled
in the stud cavity. Push the tube to the top of the stud cavity, and turn
the blower on. With draw the hose as it starts to bog down.
You want to pack the cellulose as tightly as possible without clogging the
blower. Repeat the process for the lower half of the stud bay.
When all of the stud cavities are filled, plug the holes with
plugs made for this purpose and replace the siding board.
It is also possible to blow the cellulose in from the inside
by drilling holes in the plaster dry wall.
You may find that the blower that the home center provides is
not powerful enough to blow insulation into wall cavities. In this case,
you may want to rent a blower to do the job (see story below).
You can also blow the cellulose in without using the fill
tube. The Harley book recommends two holes per stud cavity in this case.
The nozzle of the blower is pushed through the hole, and insulation is blown in
until back pressure and bogging of the blower is detected, and then blower is
shut off and the nozzle is removed.
I highly recommend getting a copy of the "Insulate and
Weatherize" book by Harley. It has a great deal more detail on this and
many other insulating jobs.
Excerpt from: "Cellulose Insulation - A Smart Choice" article:
Here is an excerpt from an article on the Building Materials
and Wood Technology section of the University of Massachusetts. The full
article is here:
http://www.umass.edu/bmatwt/publications/articles/cellulose_insulation.html
...
Blowing fiber into enclosed wall and cathedral framing cavities is different.
Here a smaller 1- or 2-inch diameter fill tube is attached to the end of the
larger hose. The fill tube is inserted into enclosed cavities through a series
of strategically placed holes. The general idea is to drill a series of 2-inch
holes horizontally across the structural surface so that the holes are
centered in each framing cavity. One or more holes per framing bay are
required depending on the length of the framing cavity and the applicator’s
fill technique.
Filling walls and cathedral roofs from the outside is the typical practice.
Pieces of siding or roofing are removed, holes drilled and insulation fill
tubes inserted. Air pressure is cranked up for cavity-fill applications to
provide a more densely packed injection called dense-pack cellulose.
The narrow fill tube is inserted into the holes and pushed to within a foot of
the far end of the enclosed cavity as the blowing begins. When the packed
insulation becomes dense enough to stall the blower, the hose is backed out a
bit. The blower gears up and filling resumes. The process is repeated until
the framing cavity is filled. Then jump over to the hole(s) in the adjacent
cavity. The injected fiber compacts tightly around wires, plumbing, and other
penetrations providing an airtight insulating blanket with a slightly elevated
R-value approaching R-4 per inch. The holes are plugged and the siding and
roof covering is patched or reinstalled when the blowing is completed.
Cellulose can be blown into wall or cathedral roof cavities
from the inside as well. Remove interior trim, drill – or simply drill holes
through the interior drywall surface – and blow. Replace trim and patch the
holes after the cavities are filled. In new construction, walls must be
enclosed with fiber-reinforced plastic sheeting or drywall before cellulose
can be blown into the framing. The plastic sheeting doubles as a vapor
barrier. Choose whichever strategy makes the most sense for your situation.
If you have a home that was insulated years ago with
inadequate levels of insulation, you are not out of luck. Skilled cellulose
professionals can snake fill tubes into a wall already filled with fiberglass
batts. The installer fills the cavities with dense-pack cellulose in a way
that crushes the existing insulation without balling up the batts, achieving a
full uniform application of the new cellulose fiber. The goal on any
application is to assure complete coverage that is installed at a density that
will not settle over time.
Video on Dense Packing vs Non-Dense Packing on a See Through Demonstartion Wall
The video shows the techniques for dense packing a wall with cellulose for various hole locations. Also shows the diffrerence between a stud cavity that is not dense packed to one that is dense packed.
http://www.youtube.com/watch?v=ce-mM7R11Lo
A Post from Greenbuilding Digest on
blowing cellulose into walls:
The item below was recently posted on
the Greenbuilding Digest list service. It gives a good description of
blowing cellulose insulation into an existing wall cavity.
Two years ago we insulated our 1929 Craftsman
bungalow with Cocoon insulation.  We did it
ourselves, and none of us had ever blown
insulation before.  It was very easy to learn.
The main problem we had was the machine we
originally got for free from Home Despot was not
strong enough to fill the wall cavities.  We went
to a rental store and got another machine and it
did fine.  For the wall cavities, we would keep
the hose in the hole and the blower going until
the machine started to choke from being unable to
push more material in, then we would stop and go
to the next hole.  There would always be a little
puff of insulation when we took the hose out.

After we filled our original walls, we put sheet
rock over the new frame that we had constructed
5.5 inches inside of the original exterior walls,
and filled those holes.  So now we have 9 inches
of cellulose insulation in our walls, and we like
it a lot.

A year later, consumed with curiosity, I drilled a
half dozen holes in the walls to see if the
insulation had settled or turned into green goo or
oozing mold or any of the other numerous horror
stories that people tell about cellulose
insulation.  Each wall we checked remained tight
packed.  There had been no settling.  I think some
of those stories originate in the marketing
departments of fiberglass insulation corporations.

We also did our attic.  That was easy, but it is
very dirty for the person in the attic.  An
excellent respirator and goggles are mandatory.  A
coverall also helps as the cellulose gets all over
the clothing.

It is a 2 person job -- one to wield the hose, one
to run the machine outside.  We rigged a rope that
the person inside would pull when he wanted the
machine turned off, as the one we rented didn't
have a control that could be used inside by the
worker with the hose.

...


I suggest simply following the manufacturer's
instructions.  I am not a professional builder,
but as an amateur I found cellulose insulation to
be easy to install according to the manufacturer's
instructions. Just keep that hose blowing into the
wall until  it won't take any more.

If your hose clogs a lot (like every 20 minutes or
so), go get another blower.  We wasted a whole day
futzing with the Home Despot machine, trying to
make it work, when the plain fact was that it was
under-powered for the job.  About every 20 minutes
it would clog.  The machine from the rental store,
however, worked like a dream and only clogged a
couple of times during the rest of the work.  The
Home Despot machine would have been fine probably
for the attic, which is probably what most people
used it for, but it was underpowered for walls.

The winter after we did that insulating, we hardly
needed any backup heat (we also tore off the south
wall of our utility room and added windows to
collect solar heat).  Last winter we needed more
backup heat, but we also had an unusual (for us)
amount of cloud cover.  We don't regret the work
at all and are glad we did not yield to the
numerous "nay-sayers" who constantly went on about
how we were installing too much insulation, and it
would never work and the cellulose would settle
and turn into green ooze and kill us with nasty
diseases. Yadda, yadda, yadda.  Me, I look at my
$50/month electric bill and consider the work and
money to be an investment that is paying me
tax-free interest (in the form of energy I no
longer have to buy to stay comfortable in my
house) for the rest of my life.
Some More Links on Blowing Cellulose in Walls:
This slide presentation is geared toward people who want to do
this for a living, but it does have a lot of good installation pictures, and some
helpful hints on "challenges" you may encounter:
Dense Packing Cellulose Insulation Slide Show...
This is from www.Karg.com
Gary 6/2/07 Updated 9/13/2009