Enphase Legacy System Upgrade Offer
Enphase has an offer out to allow owners of older system to
upgrade to the latest IQ7microinverter at a discount. The upgrade
includes replacement microinverters, new cabling, and a new Envoy
unit. Total cost for our existing 10 miro inverter system was
$675. For our 10 micro inverter system this would be close to
$2000 at retail, so a pretty good discount.
Our old system was working fine, and still had years of warranty
left. But, the fact that they were offering the upgrade made me a
little uneasy about the long term durability of the older micro
inverters.

The upgrade also made it a lot easier to add the additional
capacity to the system in that all of the microinverters would be
the same IQ7's, rather than mixing our old inverters with the new
inverters which would have required two Envoy units.
Another nice thing about the newer micro inverters is that they
allow an Enphase battery units to be added. The batteries provide
for power if there is a power outage. We decided not to add the
batteries for now, but its nice to have the option. Most grid-tie
systems do not allow for operation during a power outage.
The new cabling system is lighter weight and very easy to hookup.
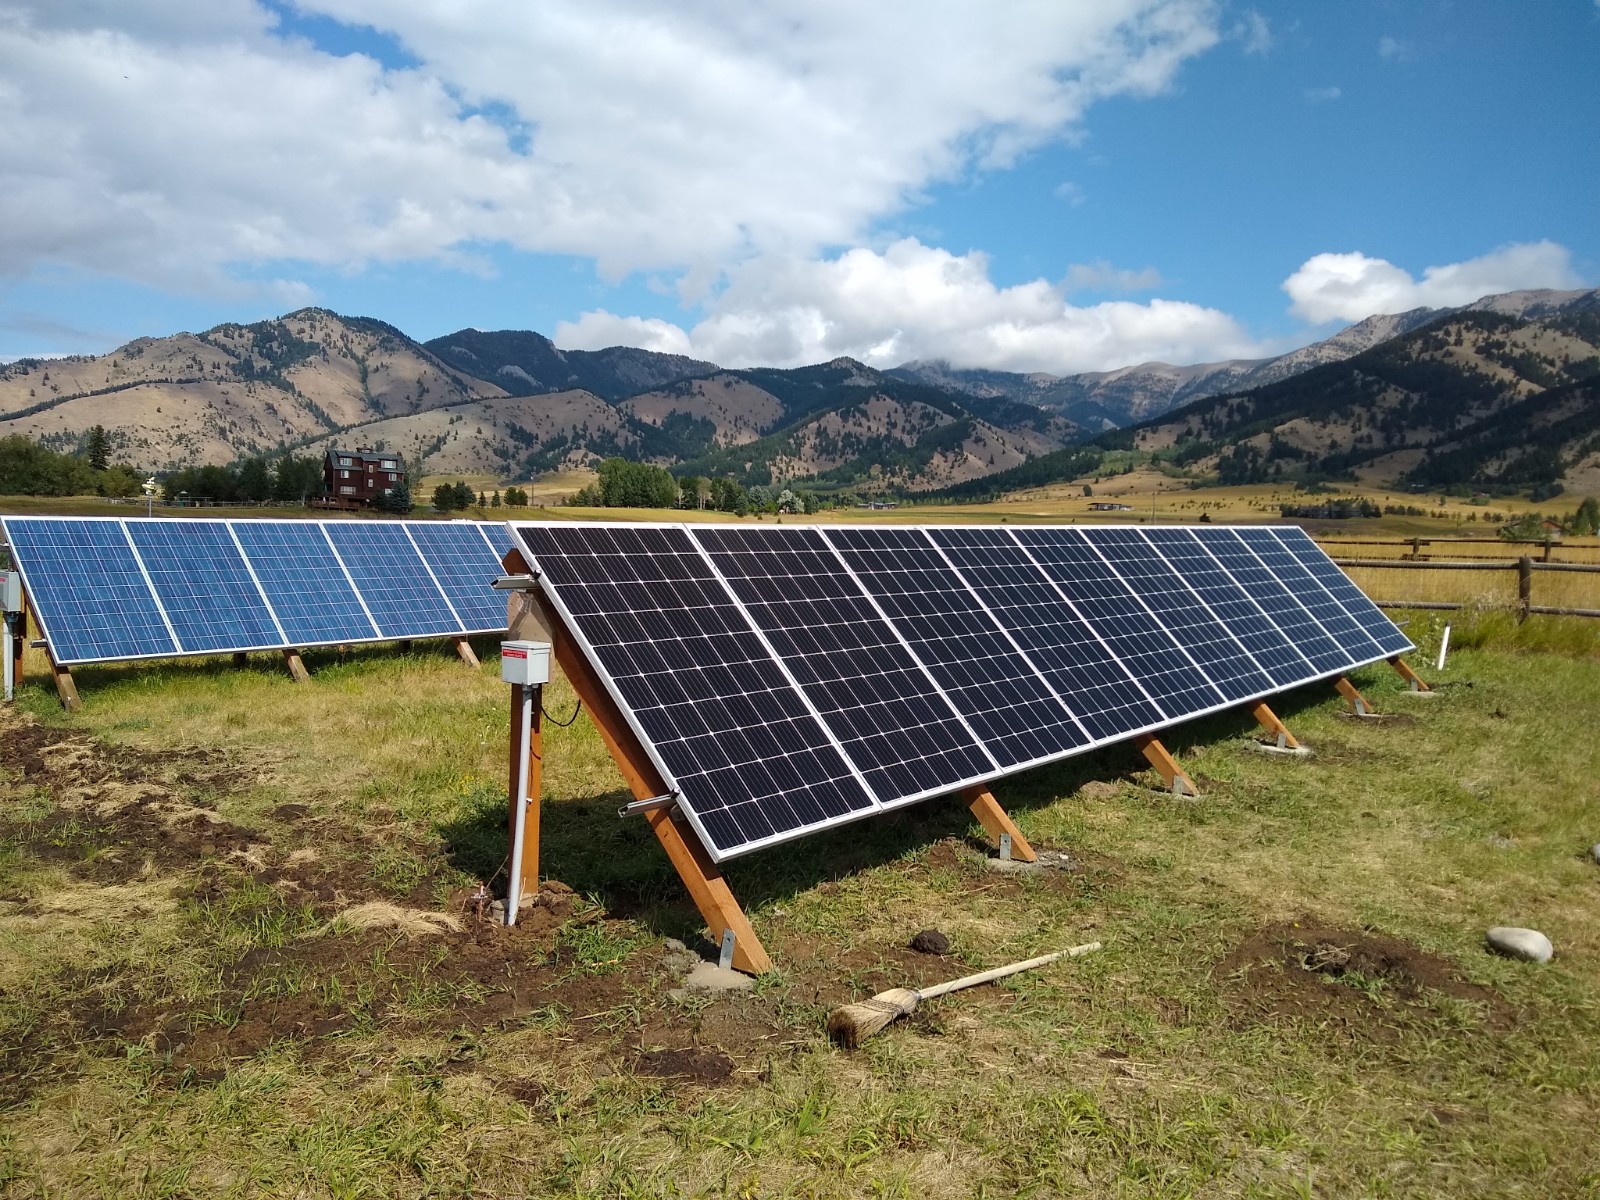
Adding the New Array Supports
We decided to use the same kind of arrangement to support the new
bank of 10 PV panels. We like the wood look and simplicity
andsimpleuncluttered look of it. So, we just duplicated the
existing PV panel support structure about 25 ft to the south. The
space between them insures that new panels will not shade the old
ones.
There were some doubts expressed about the life of the treated
wood supports, but our existing one looks just fine after 10 years
with no sign of problems. This may be in part due to our dry
climate.

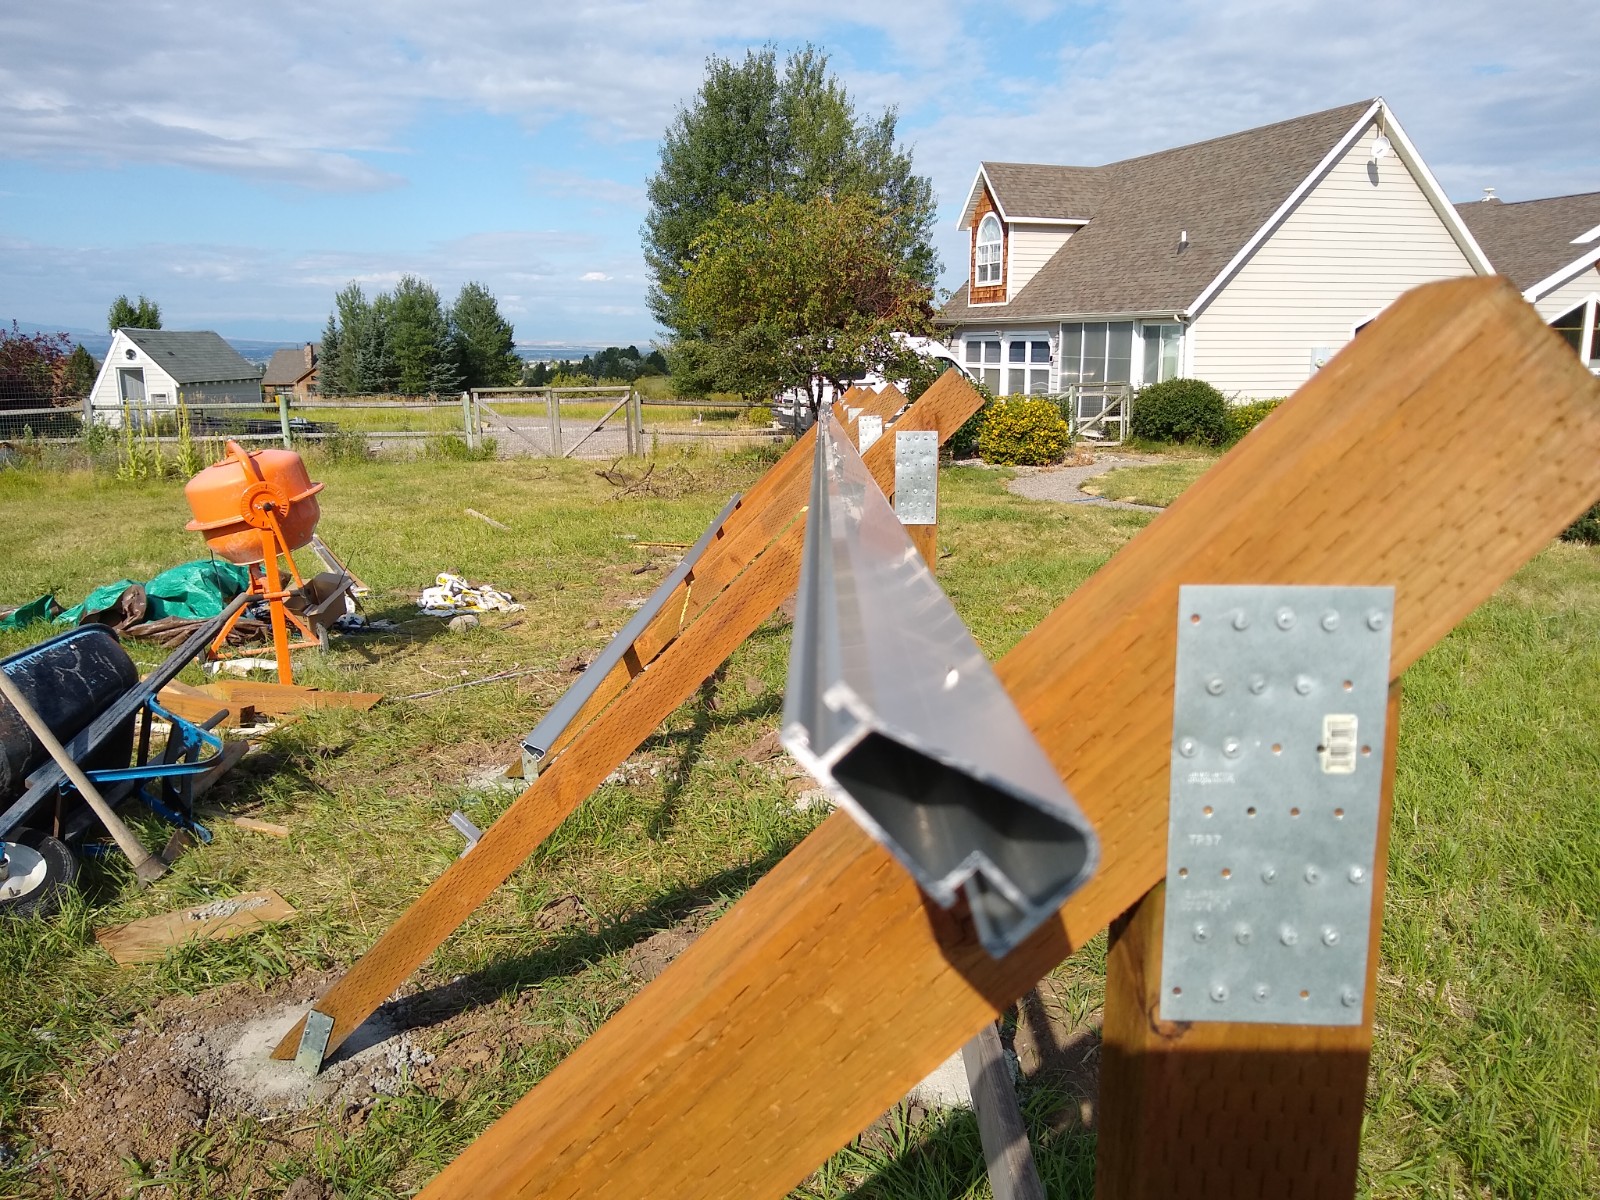
Supports for the new 10 PV panels -- same as the old one.
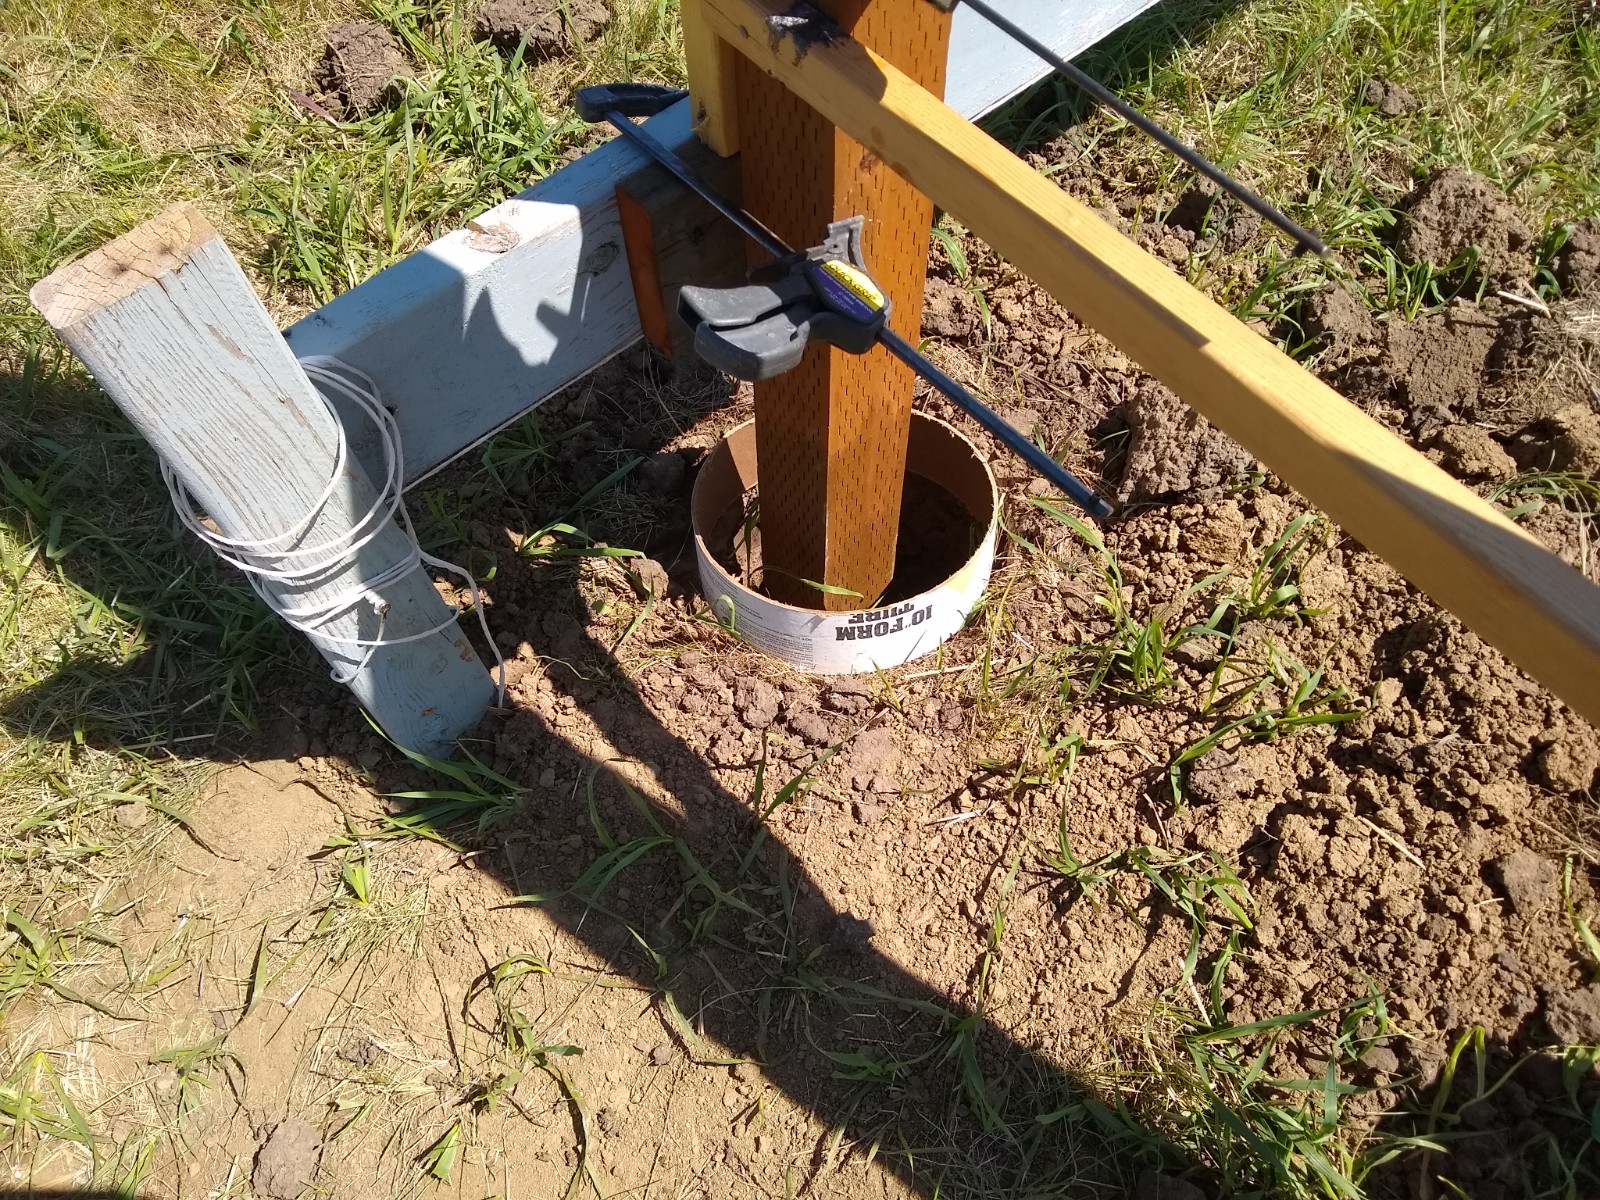
Footing for one of the supports. The grey wood is a temporary
support that I ran across the back of all of the supports to make
it easier to insure all the supports were lined up.
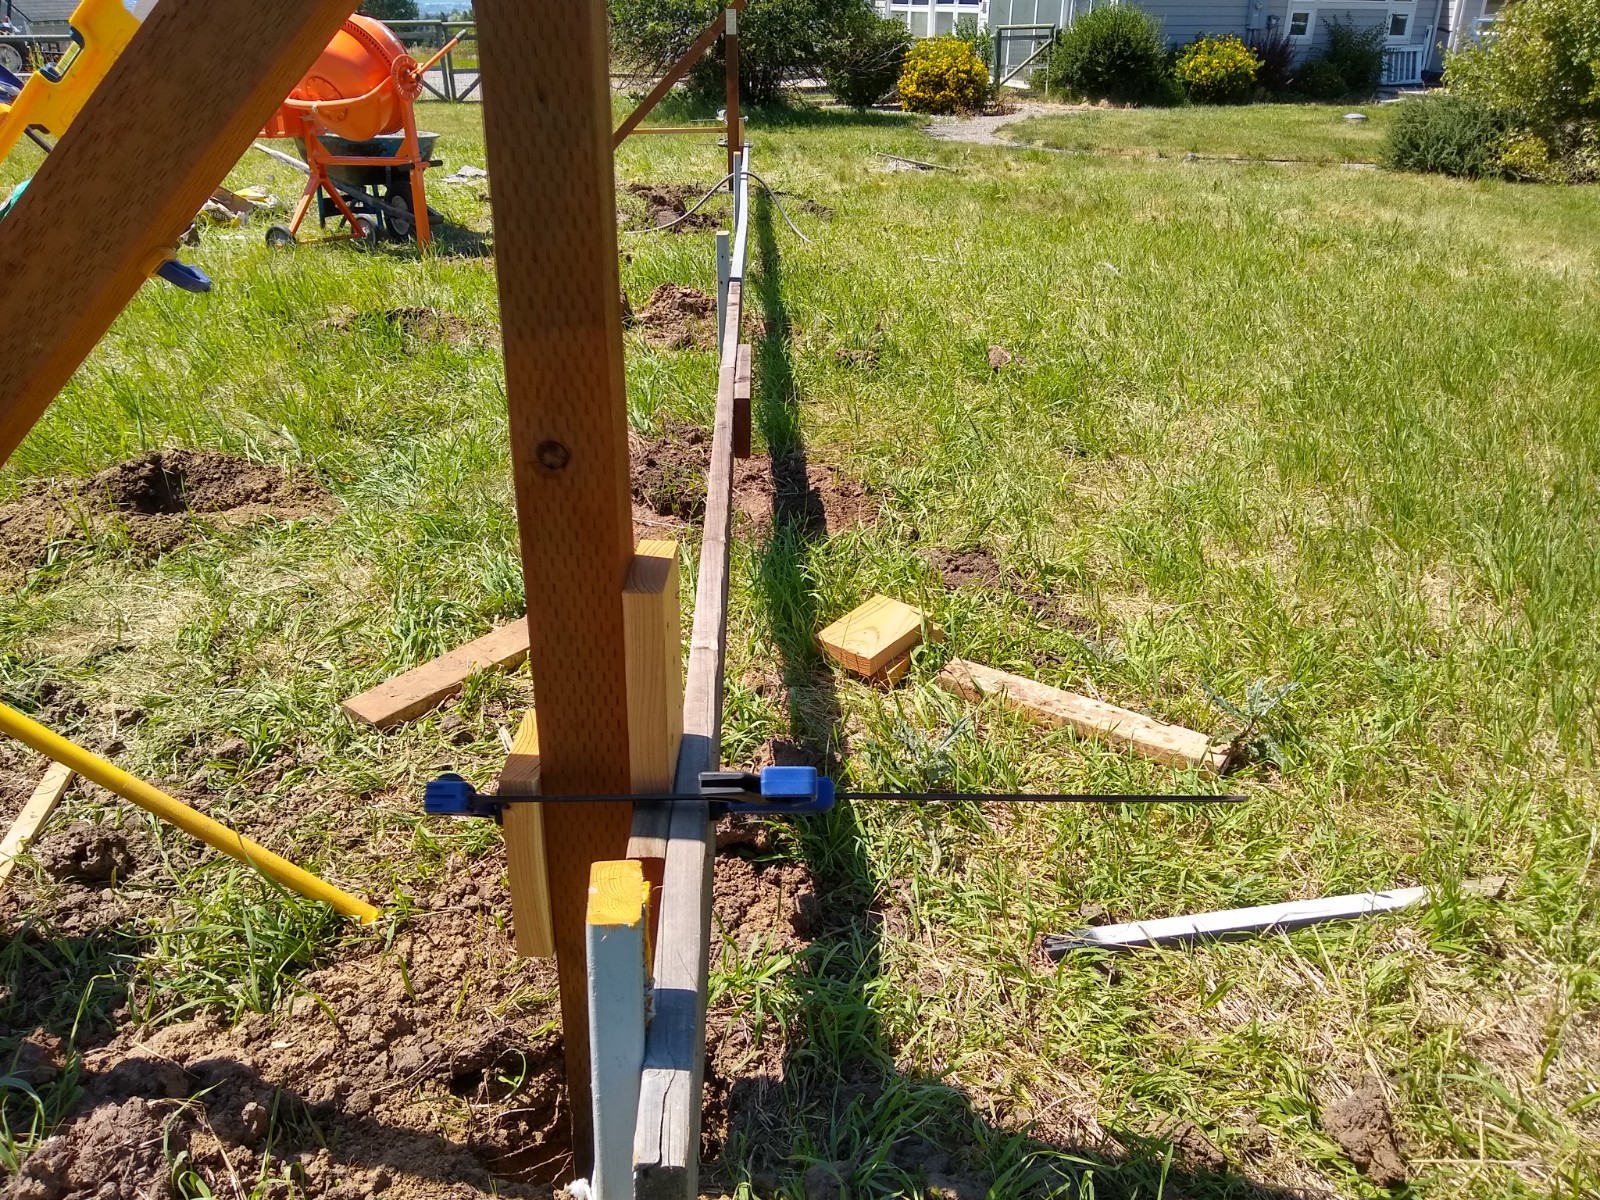
Another view of the temporary (grey) support beam to align the
supports while the concrete was setting.
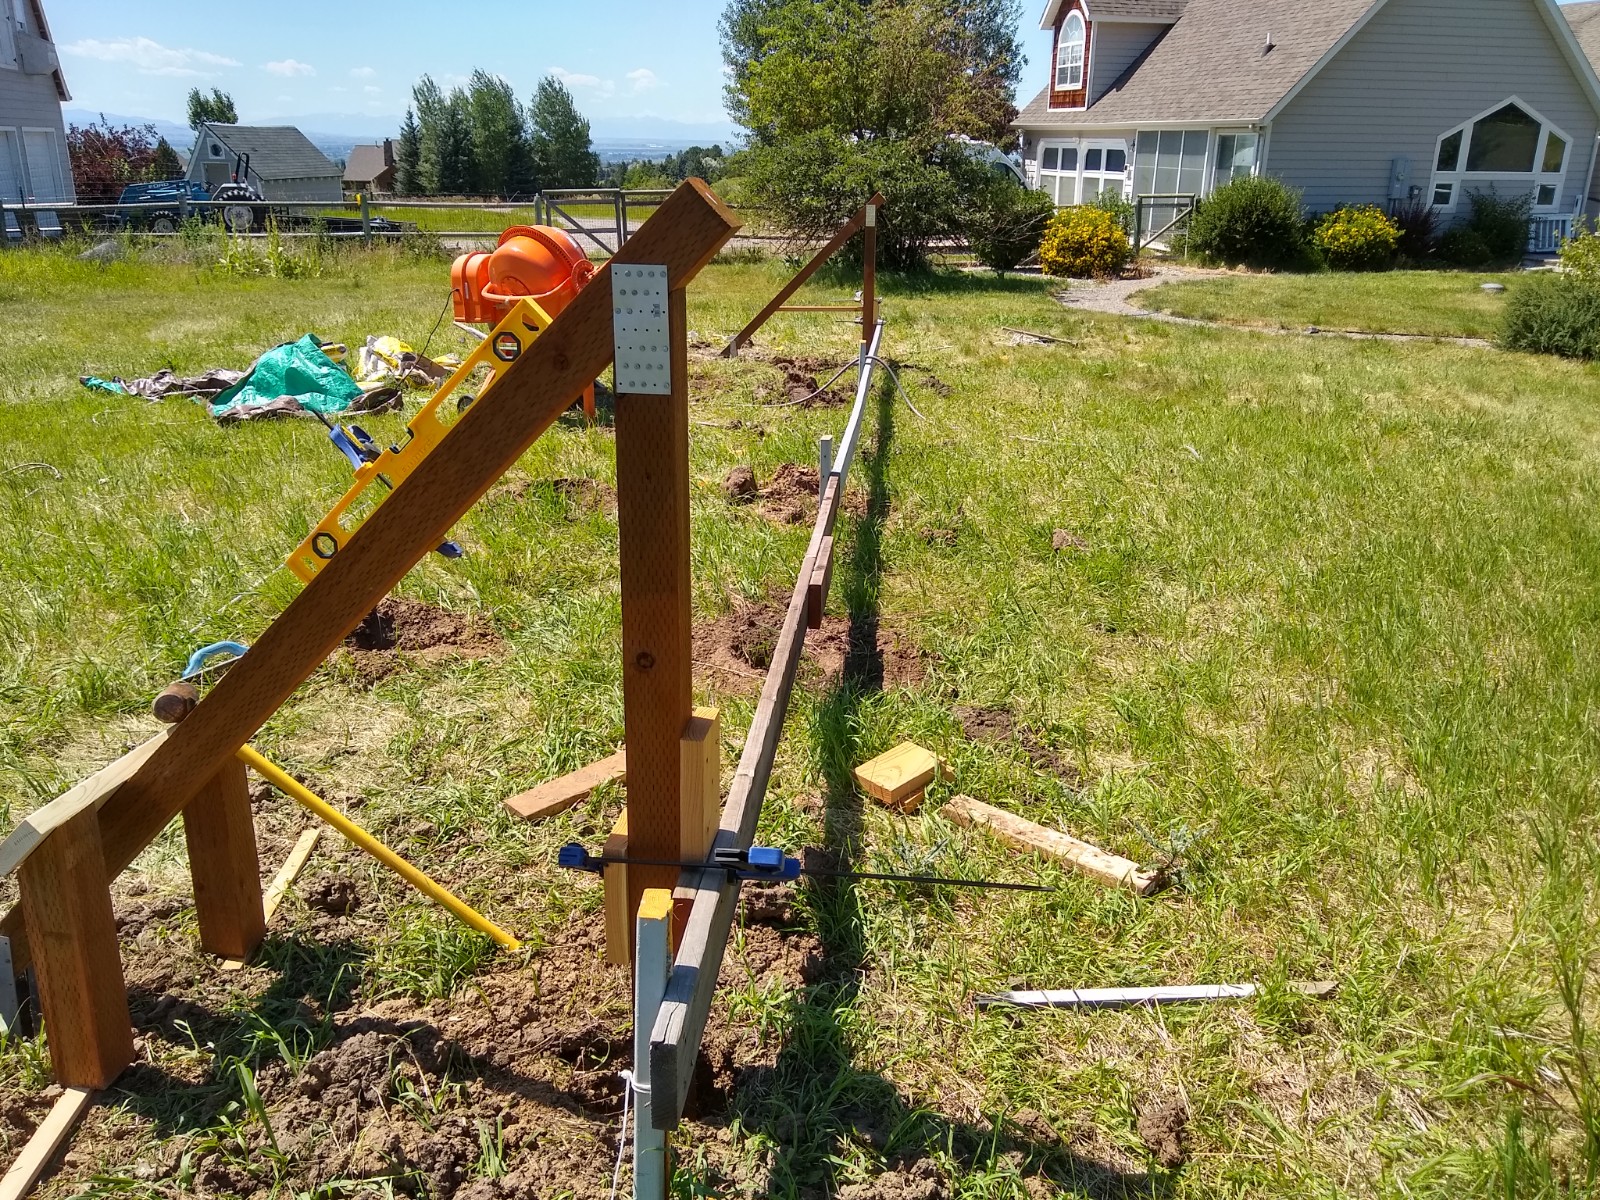
And anoter view -- At this point only the end supports are in
place, four more intermediate supports were added (you can see the
footing holes). The supports are sloped at 45 degrees (same as the
orginal ten panels). It is important to get all the support frames
carefully aligned as the adjustment in the Ironridge rail
attachments is limited.
Ironridge Rails
We also decided to use Ironridge PV panel support rails that are
the same as the rails on the old system.
Ironridge has come up with new wrinkles on the clamps that are
used to hold the PV panels to the rails. The new design is easier
to use in that the bolts have a T head that slip into the channel
in the rail anywhere - so, you don't have to slide them all in
from the ends of the rail before putting the PV panels on. The new
clamps also stand up in the rail slot, so it does not take three
hands to place the PV panels.
The new T bolts also have serrations that insure a good ground
connection between the PV panel frames and the Ironridge rails.
This means that you no longer have to use Weeb washers or a
separate grounding wire to ground the PV panel frames.
I do like the whole Ironridge system.
Update: Jan, 2020
Had a big windstorm last week and two of the new panels were
blown off their mounts.These were panels held down by the new
panel clamps described above. I'm not sure whether this is due
to the new clamps design not being so good, or to an error I
made installing them -- probably the later. I thought that I did
a careful job of installing them, but perhaps did not properly
engage T bolts into the rail, or missed torquing some of them.
Anyway, if you use the new clamp system be VERY careful that the
T bolts are fully engaged in the track and torque carefully.
Both of the panels that came off ended up on the ground just in
front of the PV array (glad the array is not on the roof!). One
of the panels does not have any apparent damage, the other has
some cracks in the glass as it landed on a rock in front of the
array. One conector was damaged where it was pulled out by the
wind, but a little bending of pins back into alignment with
needle nose pliers got it back into working order. Both panels
are now producing energy normally, but the panel with cracked
glass will have to be repaired or replaced before water gets
into it.
Upper PV panel support rail installed.
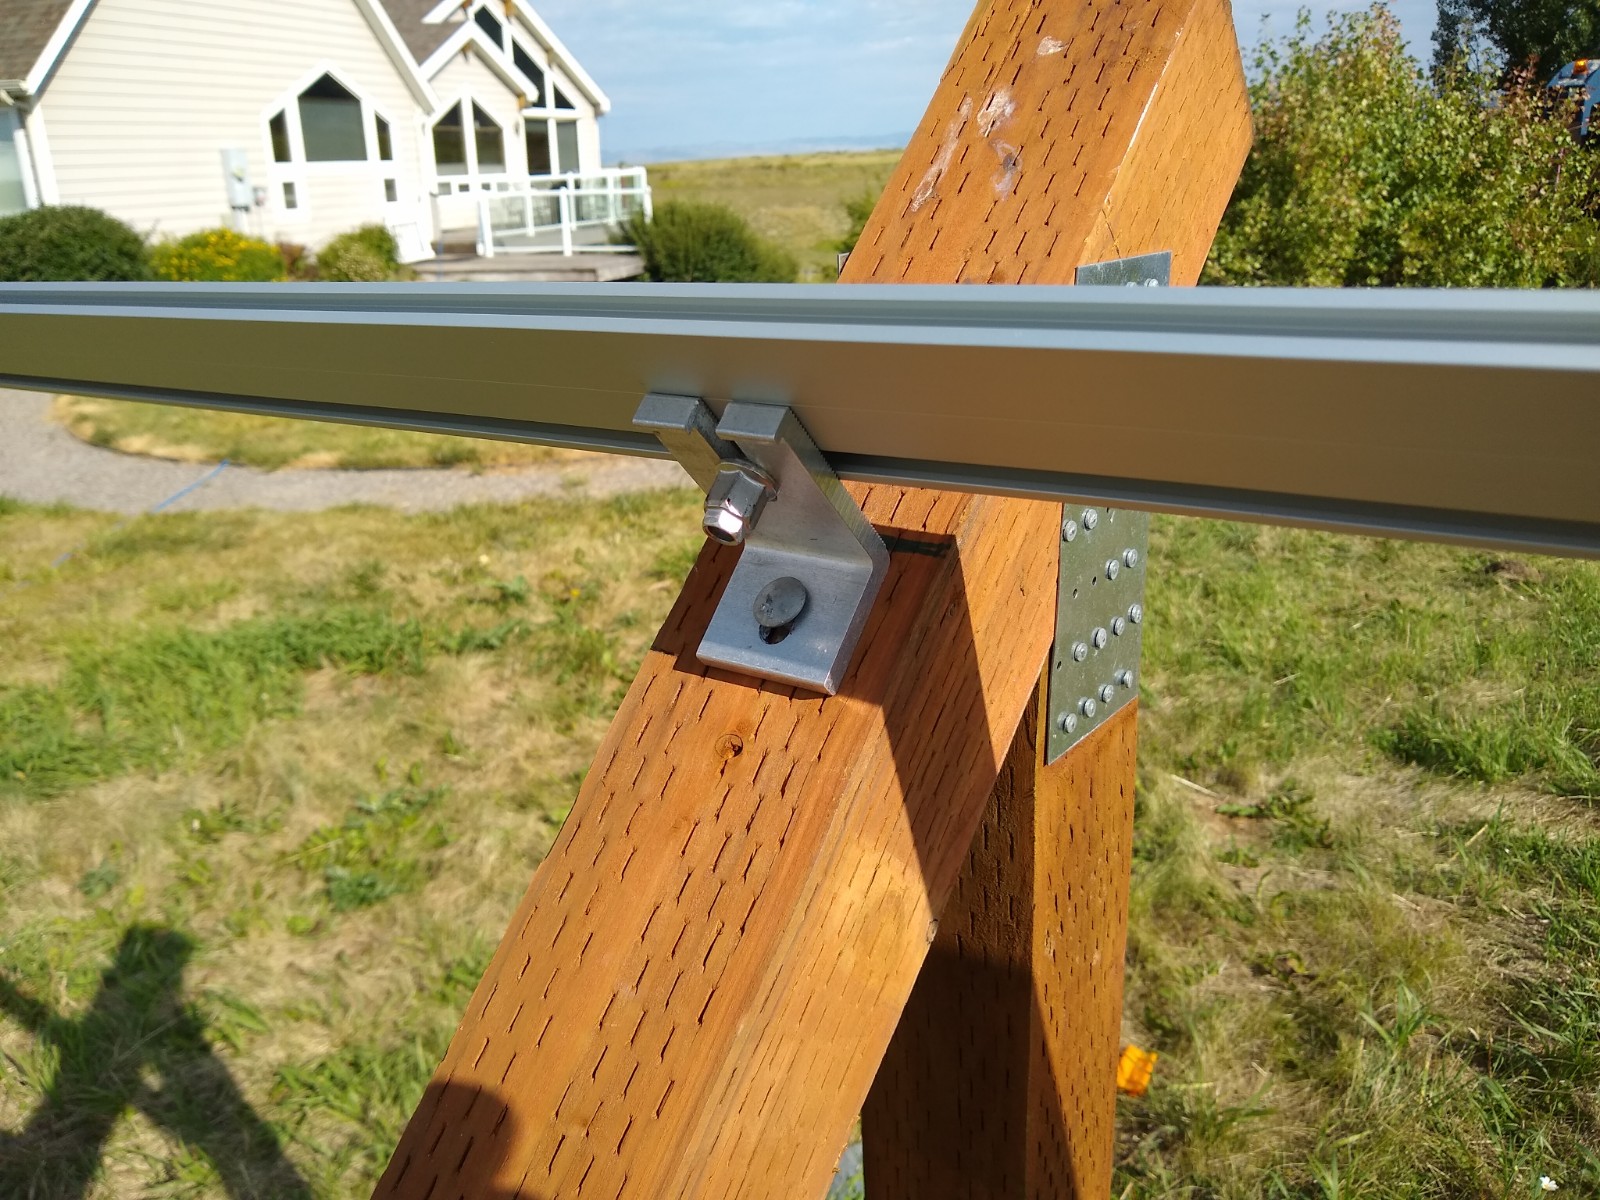
The IronRidge rail extrusions bolt to the wood support using L
brackets that IronRidge sells. There is some adjustment available
via the slotted holes in the L brakets.
Closeup of an L bracket.
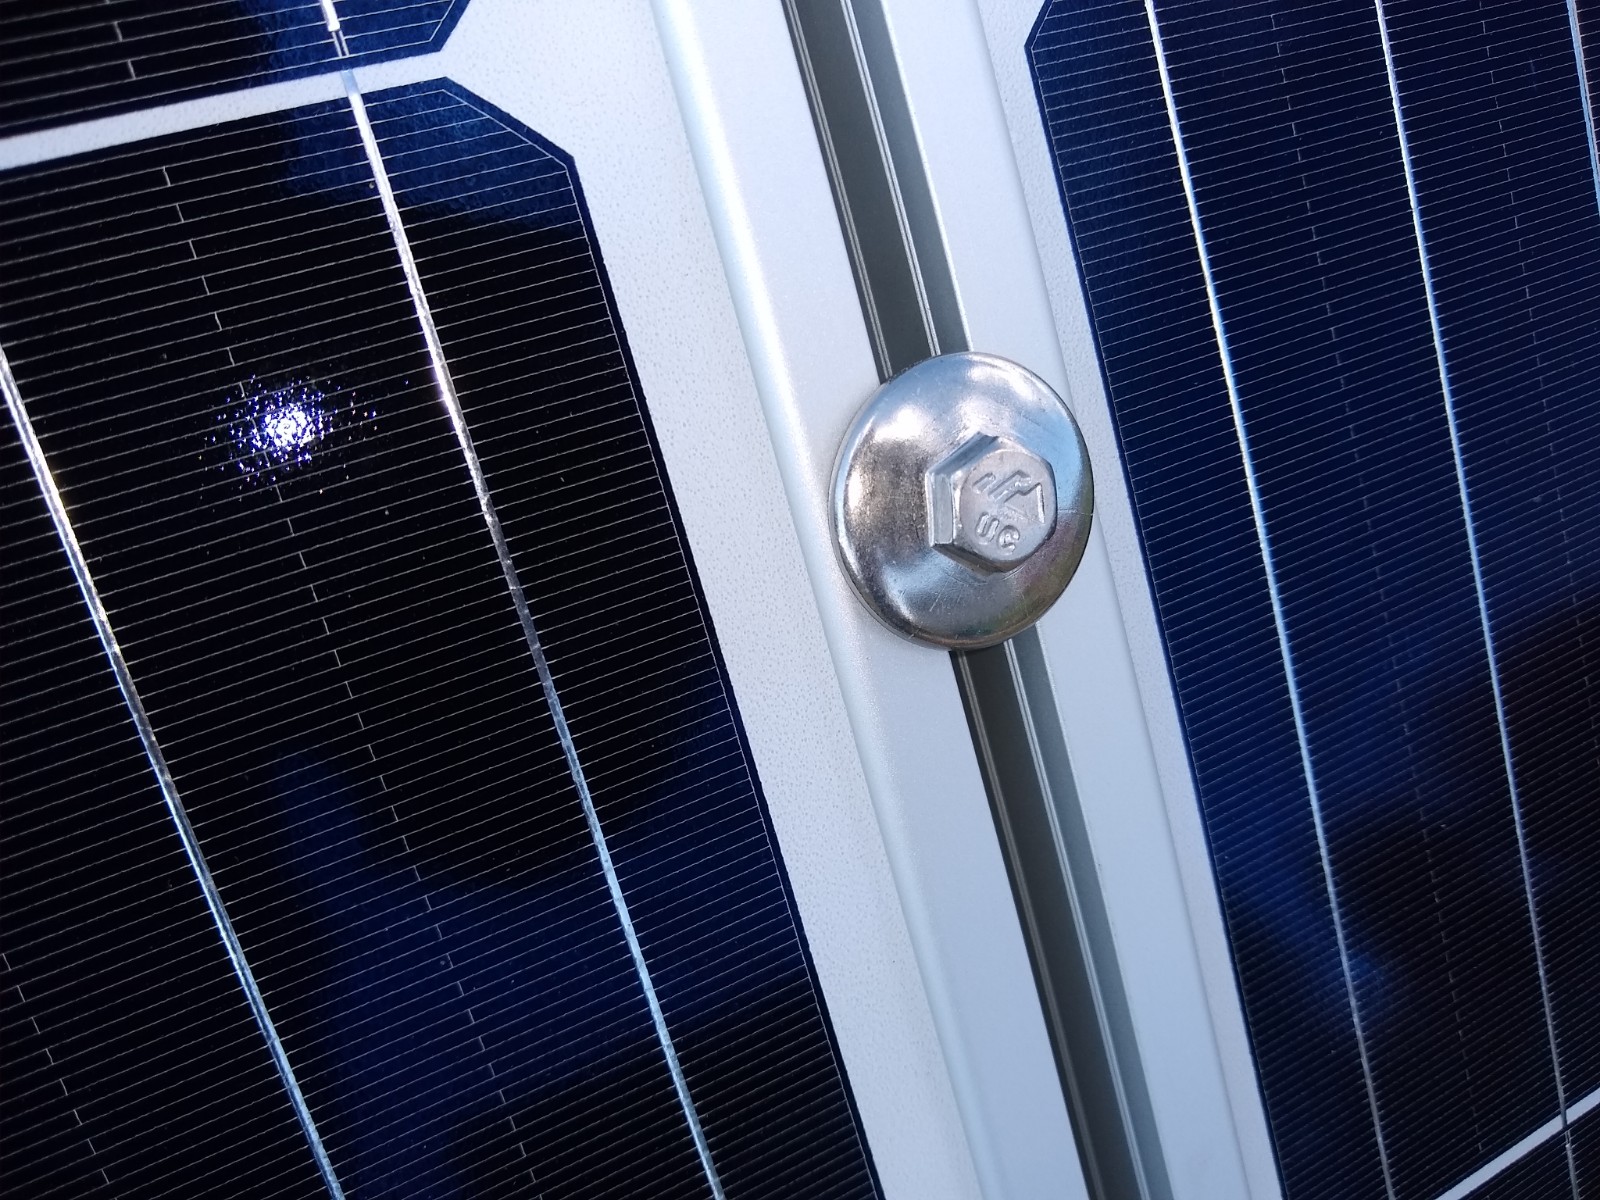
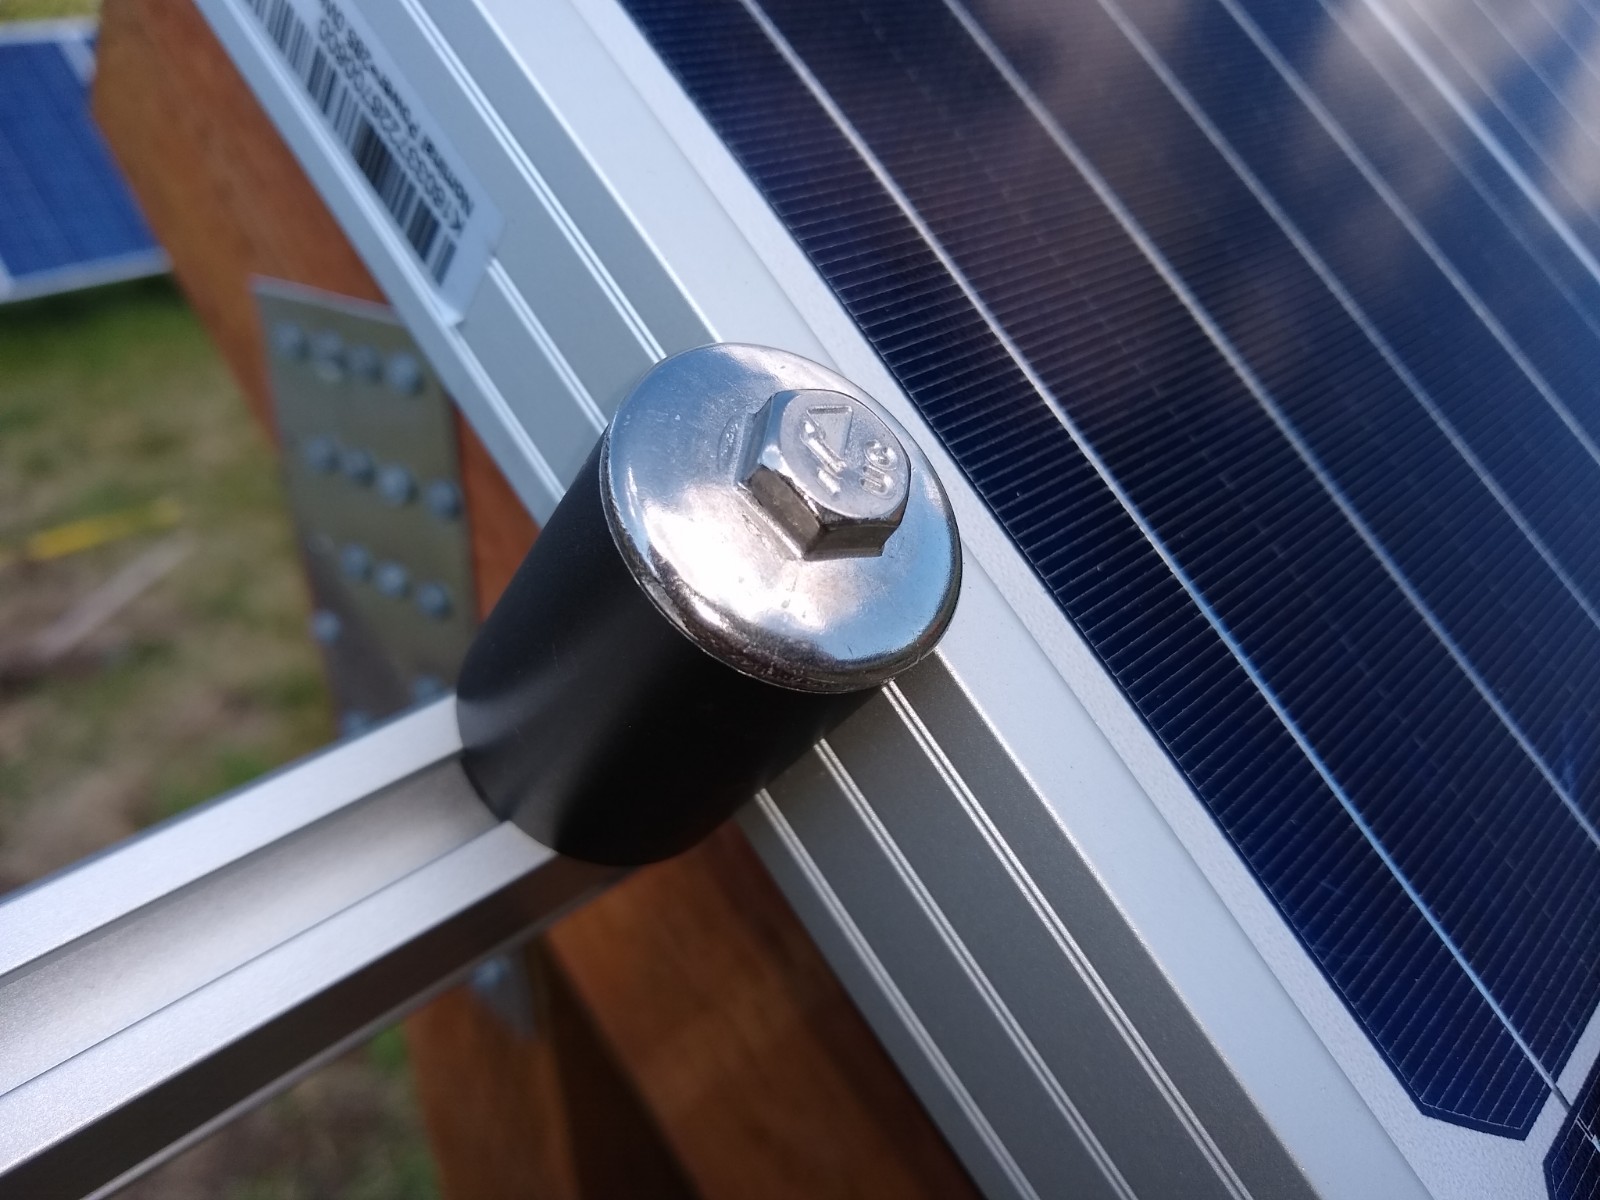
The new Ironridge fitting that clamps the PV panels to the rail
extrusion. Easier to install than the old design, and they provide
grounding as well without the need to use Weeb washers.
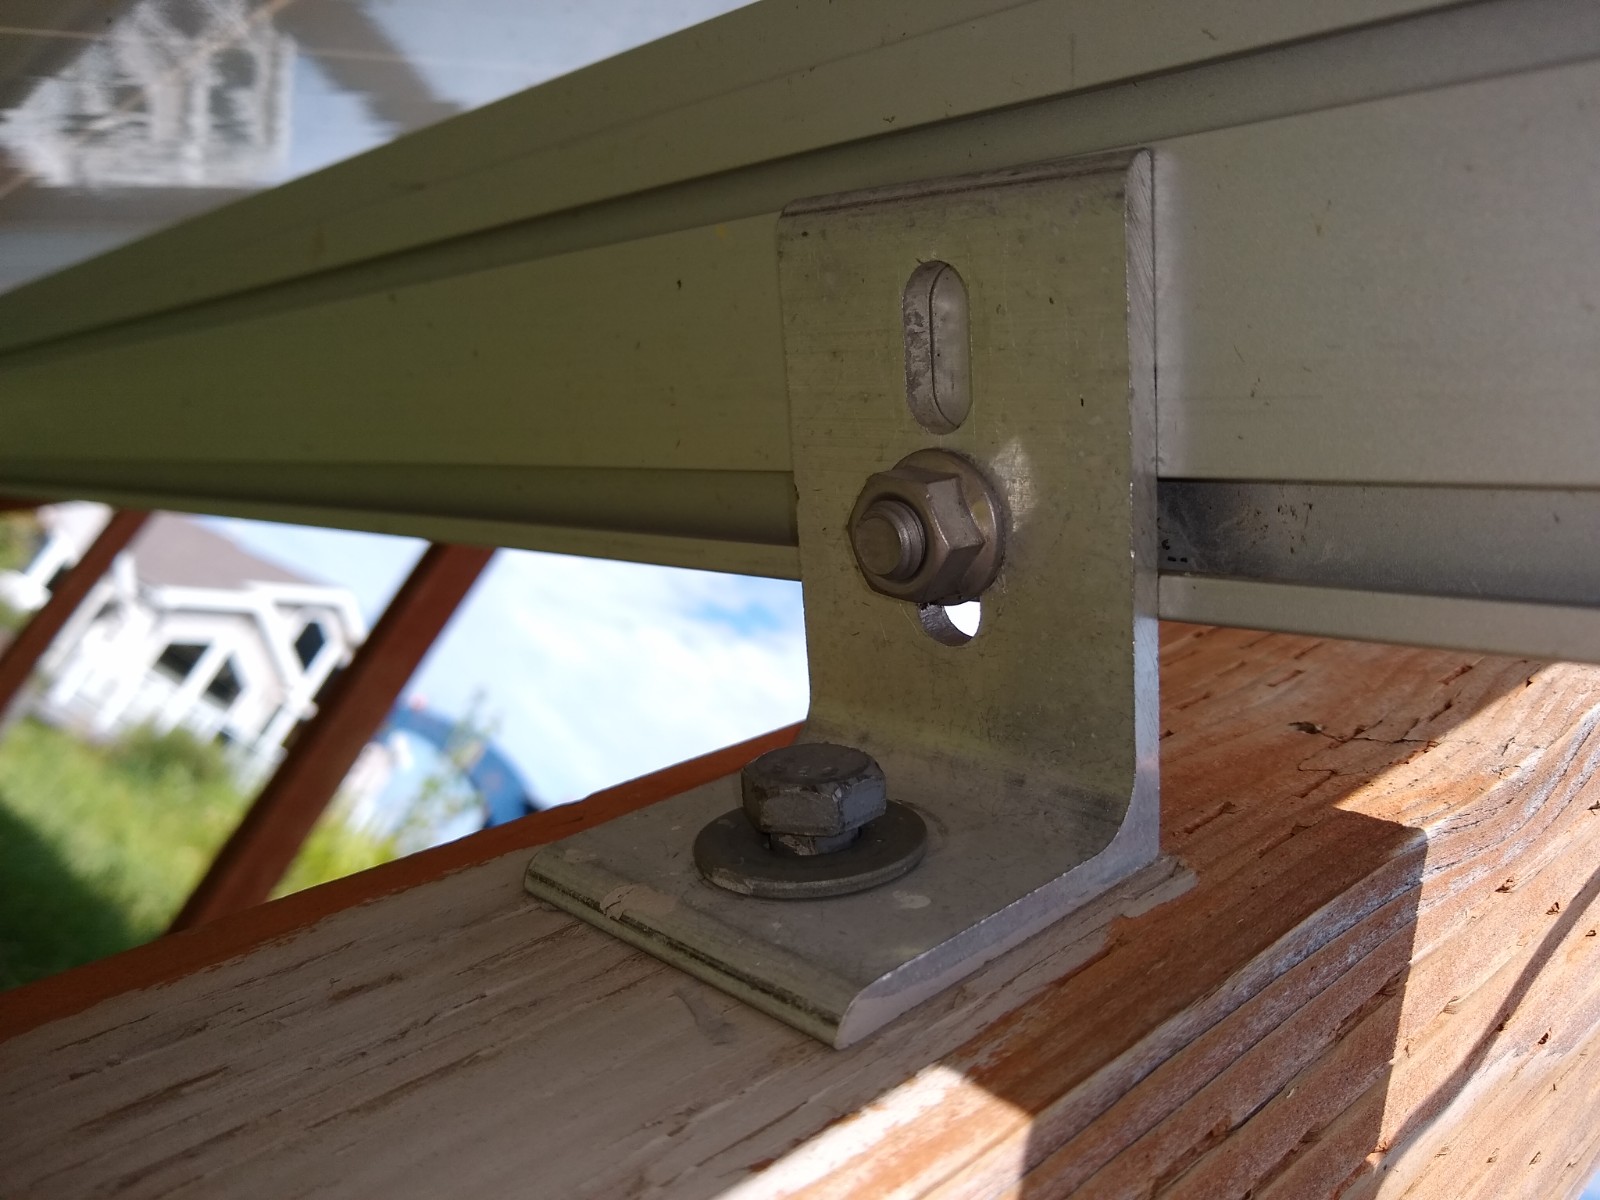
This is the fitting used to anchor the end panels done. It is the
same as the fitting used between panels, except that it has an
added aluminium sleeve to replace the panel that would be on the
left here.

This shows the PV panels being mounted on the IronRidge rails.
Iclampedd a 2 by 6 guide along the bottom so that the PV panel
could just be placed on the 2 b 6 while the inter panel clips were
being tightened. Its important that the panels be properly
aligned, and the 2 by 6 support makes this easy to do.
Installing Micro Inverters
For the old part of the system, I was able to remove the old
micro inverters and install the new ones without having to remove
the PV panels.
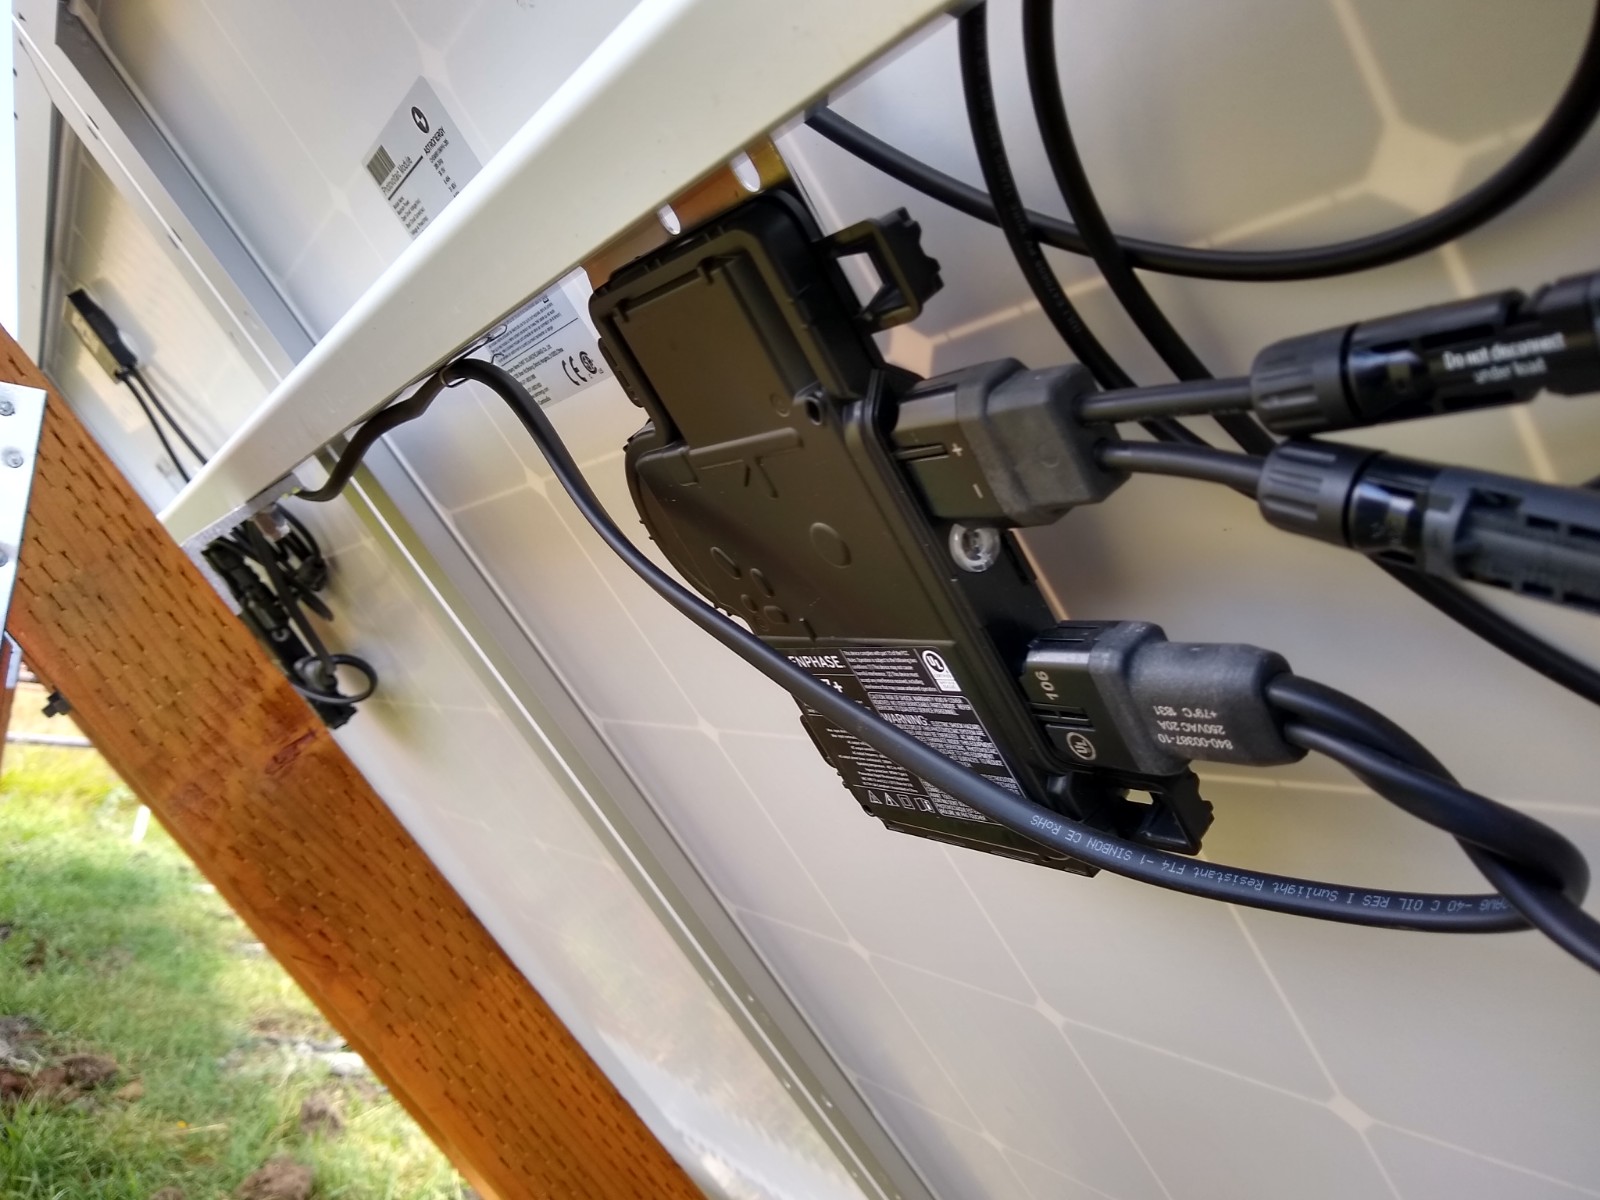
One of the enphase microinverters installed. The aluminum plate
that is part of the inverter mounts to the same extruded slot in
the IronRidge rail as the PV panels mount to. The new mounting
bolts also provide grounding of the inverter to the rail (which
may not even be needed as the new microinverters are double
insulated). The install of the microinverters goes fast, with just
one blot to tighten and a couple wires to plug in.
The new micro inverters are double insulated and (according to
Enphase) do not require a separate grounding wire (as our old
micro inverters did). The new T bolts that are used to mount the
inverters have serrations that insure that the inverter mounting
plate makes good contact with the rails, so are they do end up
being grounded via the Ironridge rails in any case.
Wiring in the Second Bank of Panels
Since the 20 PV panels I now have exceeds the 16 panels that
Enpase allows in one branch, I had to go to two branches, and each
branch requires its own 20 amp circuit breaker where it ties into
the house wiring. I decided to handle this by adding a new small
sub panel out at the PV array -- this allowed me to use the
existing wiring from the PV array to the house without having to
add another set of wires fro the 2nd branch. So, each branch comes
into the subpanel on its own 20 amp breaker and the sum of the two
currents goes to the house over the wiring that was buried for the
orginal PV system. I also used the new subpanel to mount a
lightening surge protector (which gets its own 20 amp breaker as
well).
The wires from the new line of PV panels go to the subpanel on
the old line of panels via a trench and conduit.
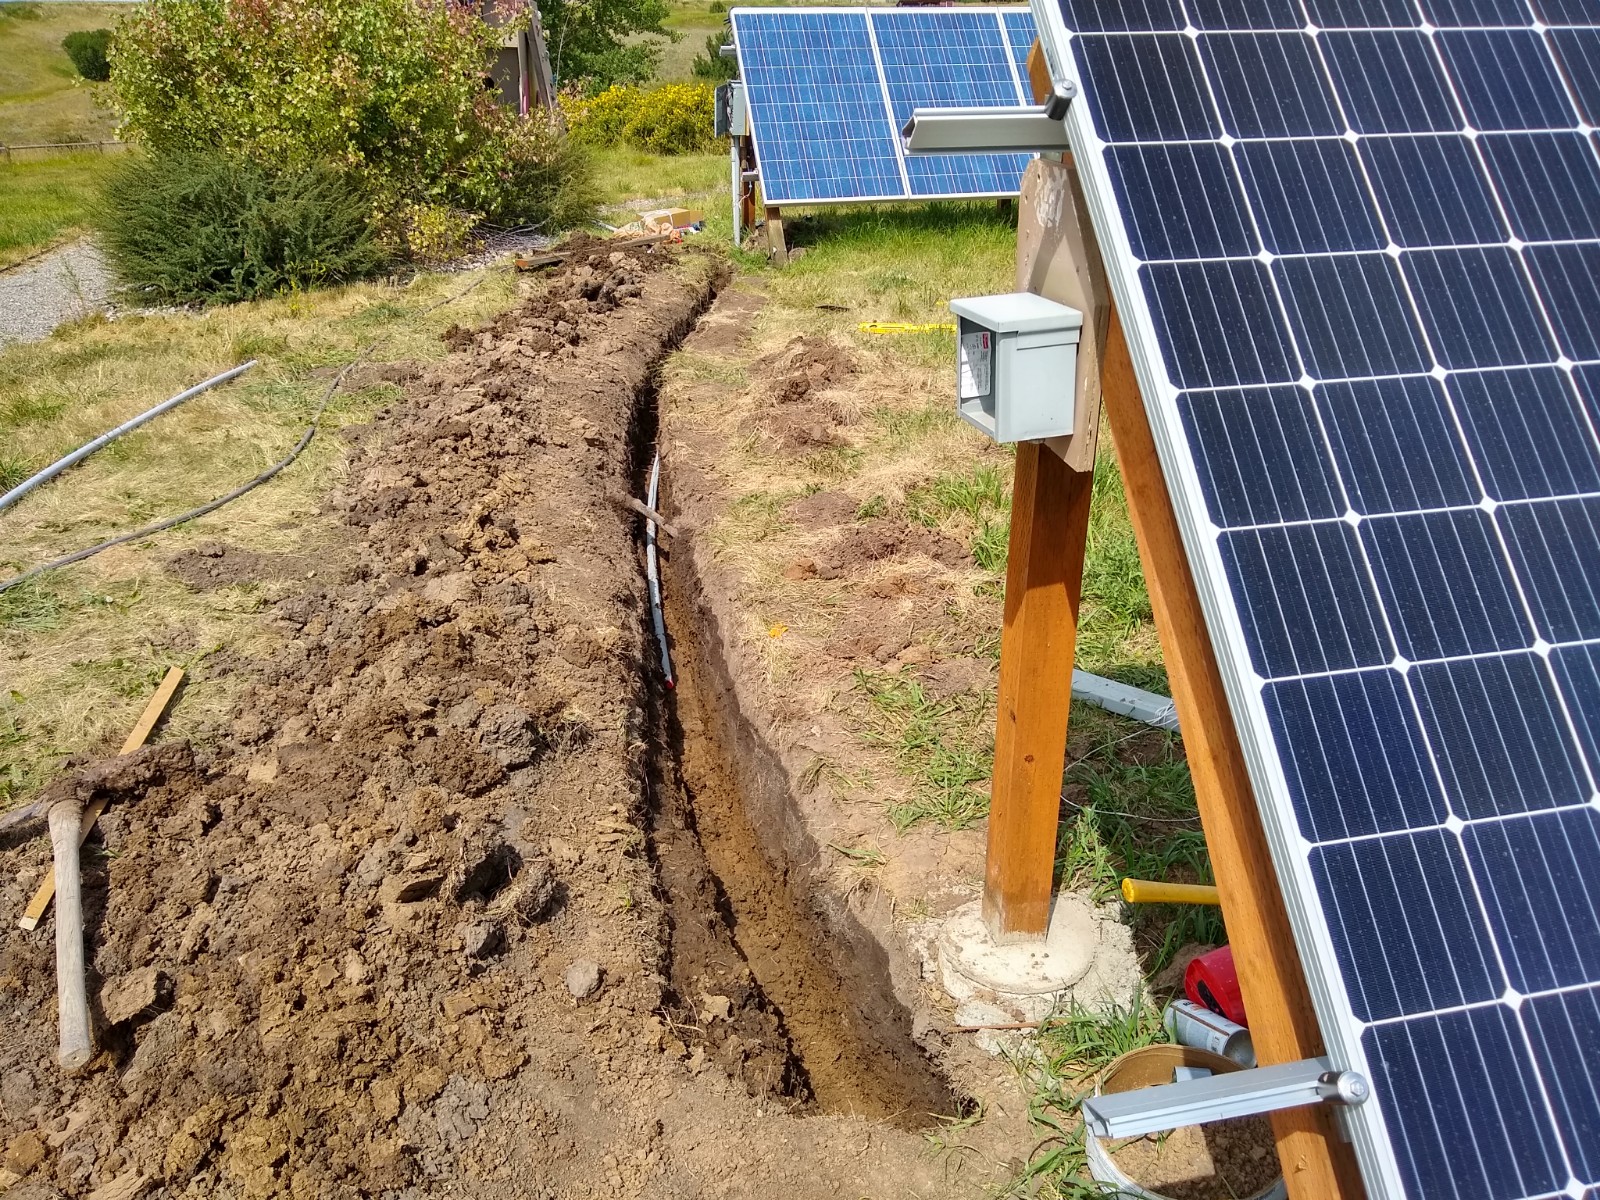
Trench for the wires from new panels to subpanel mounted on the
old ten panels.
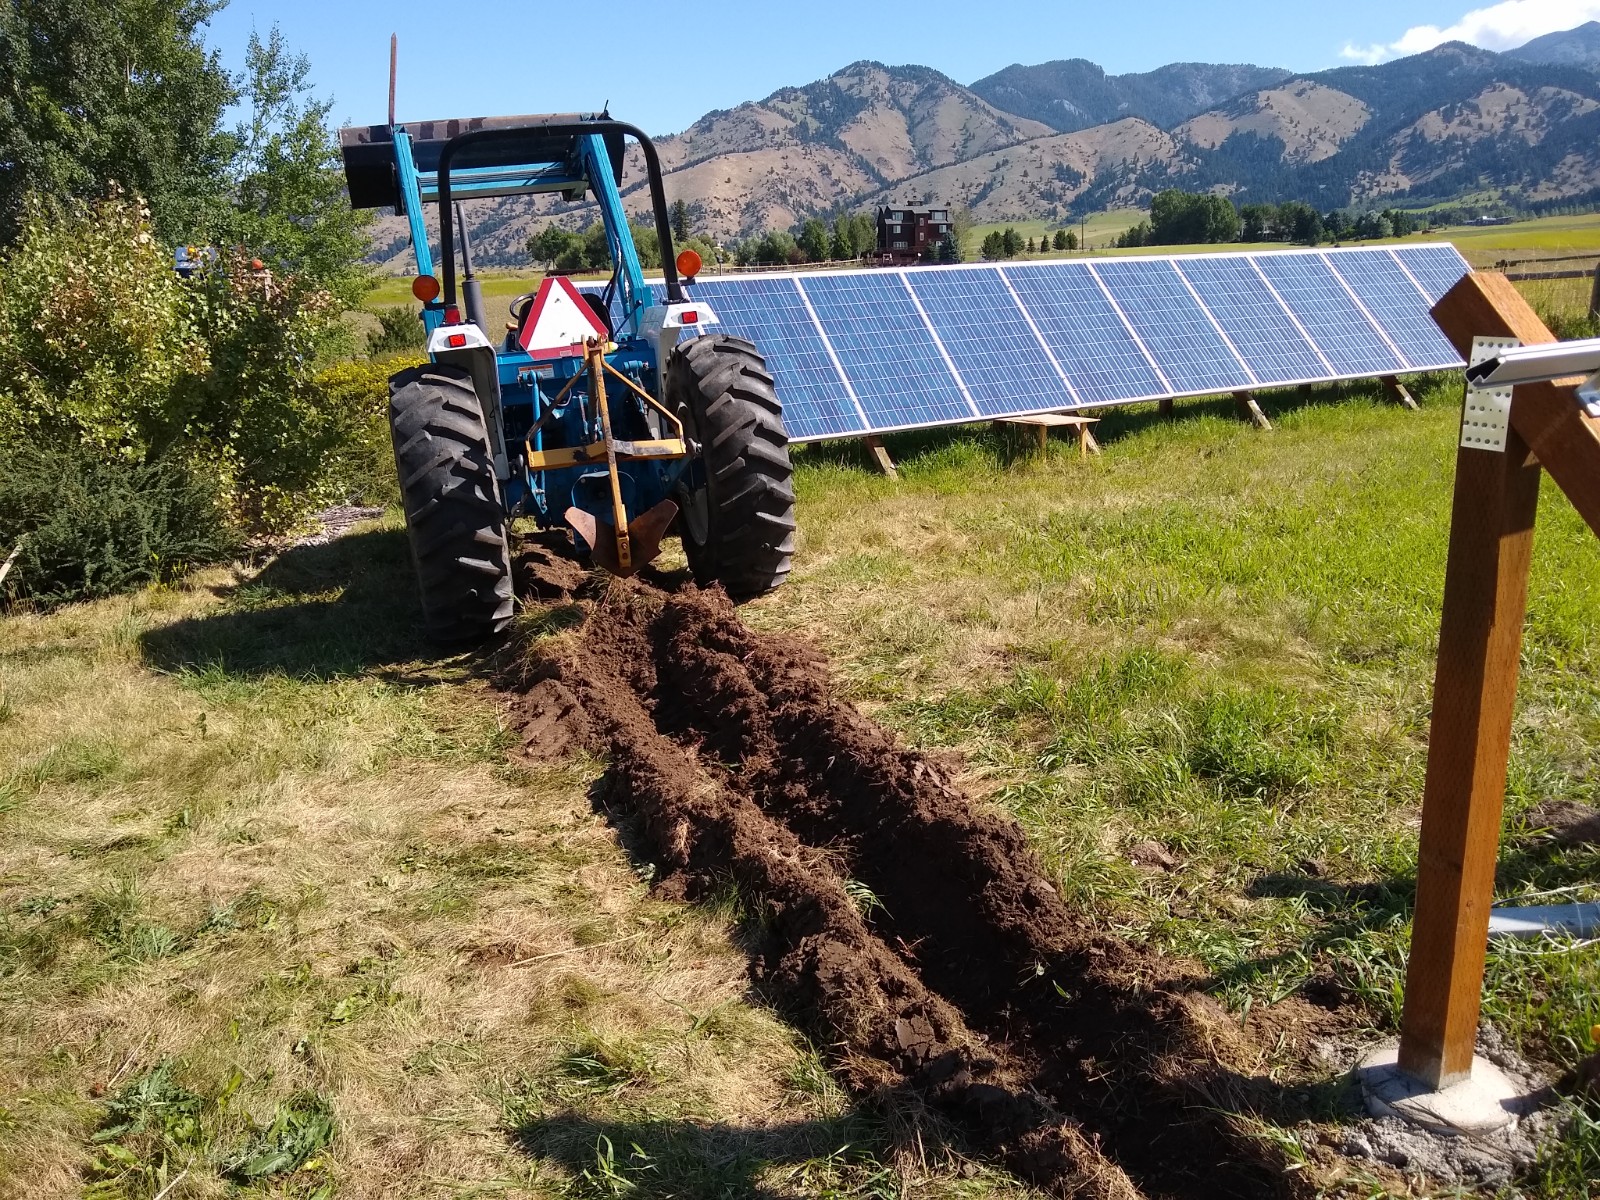
The tractor helped save a little digging using a small single
bottom plow, but was only able to get down to about 6 inches --
hand digging took it down to the required 18 inches.
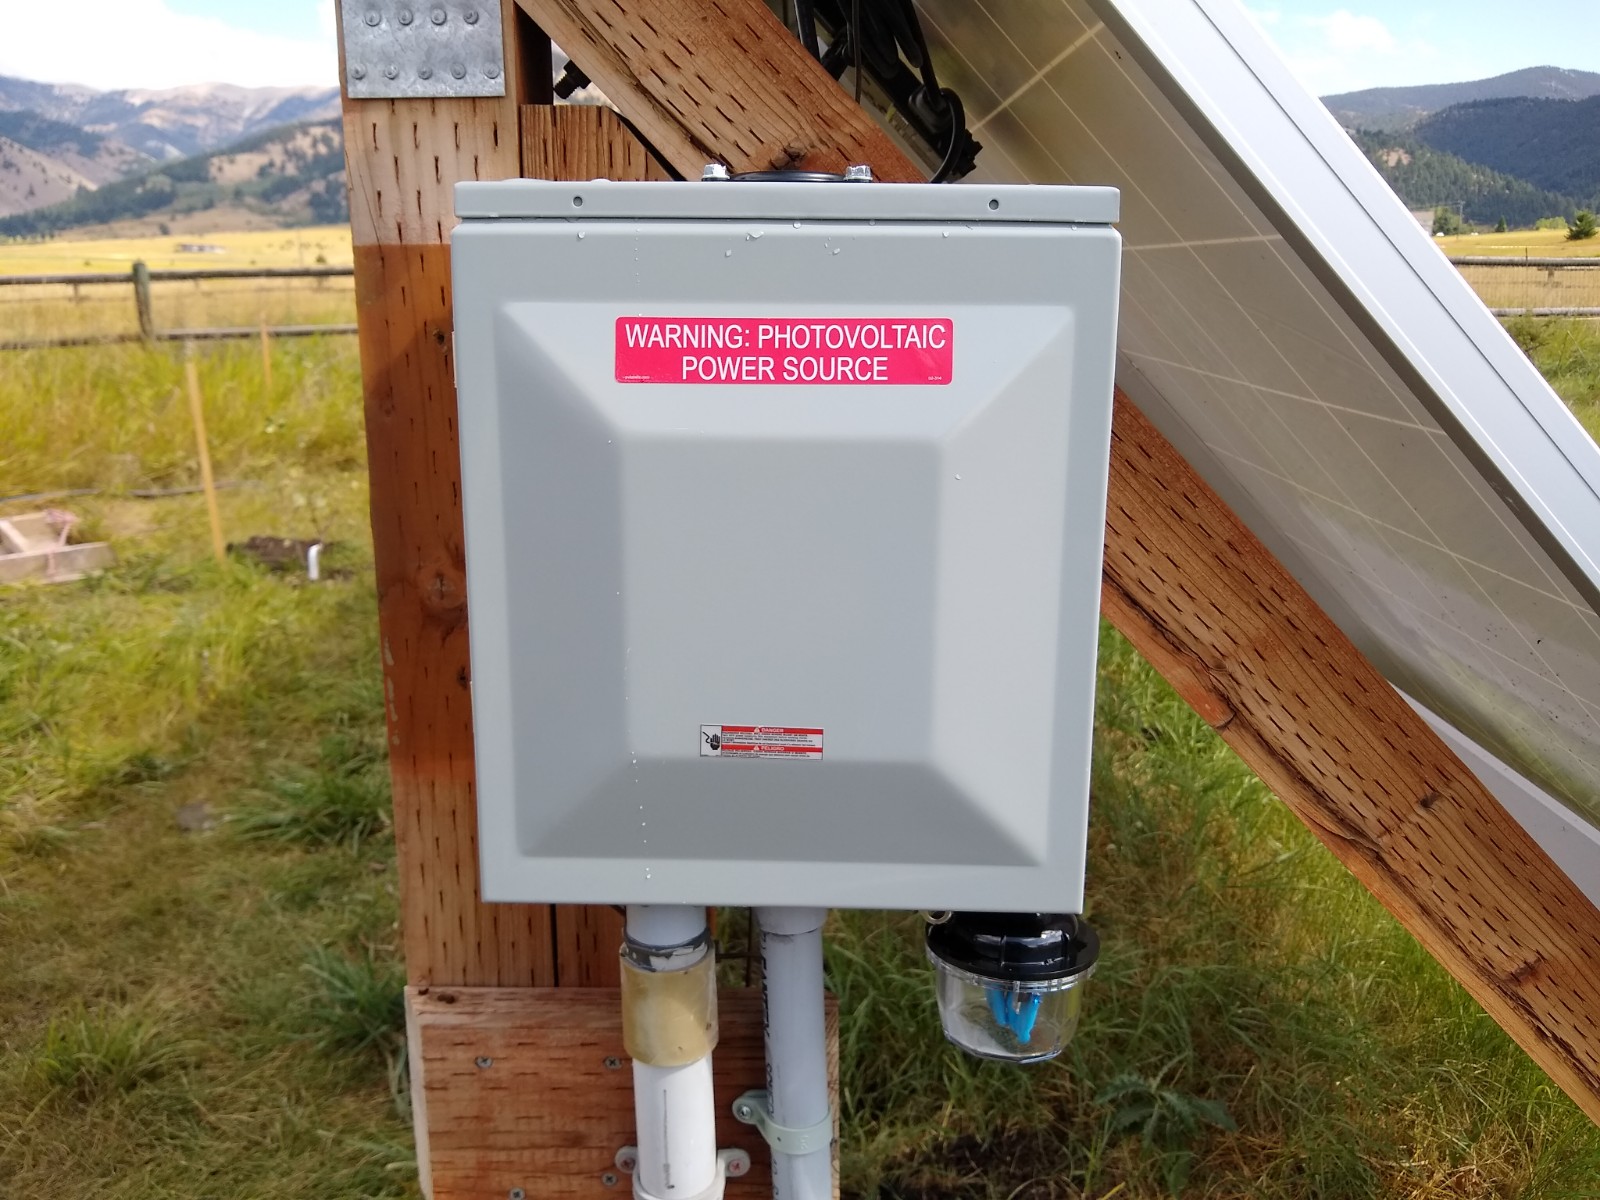
This is the new subbox mounted where the junction box used to be
on the original ten panel installation. The newly added lighting
surge protector is the clear dome mounted on the bottom of the
subpanel.
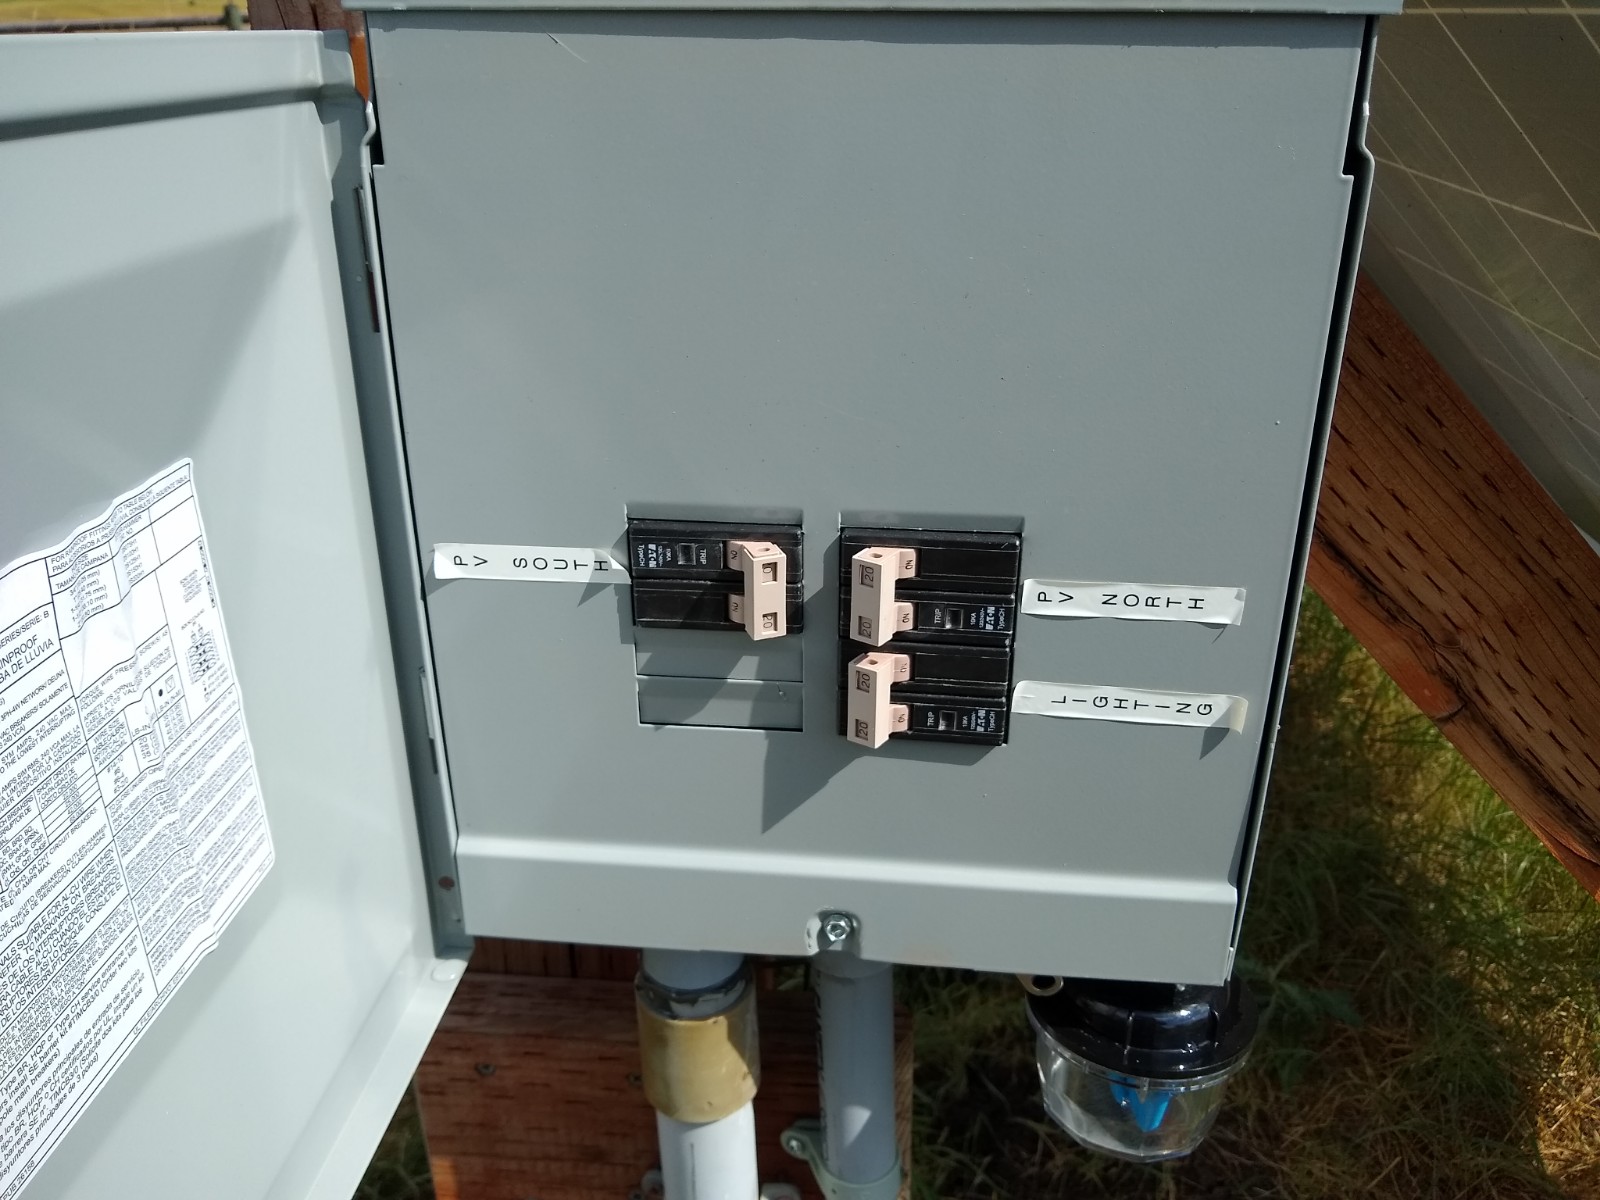
Inside the new subpanel. The two top 20 amp breakers are one each
for the two ten PV panel branches. The lower 20 amp breaker ties
the lightening protector into the system.
Envoy Communications
The Enphase Envoy unit takes care of reading data from each
micro-inverter to see if it is healthy and how much power it is
generating. It then sends this data over your INTERNET connection
to the Enphase Server. You can then look at the page on the
Enphase Server to see how your system is doing and how much power
you are generating. The Envoy also reports non-functioning micro
inverters to the Enphase Server, which then notifies you of the
problem. The Envoy also (I believe) plays a role in updating the
micro inverter software if needed.
The old Envoy unit was pretty simple -- about all you had to do
was plug it into a wall socket, and connect to your router with an
Ethernet cable. The Envoy communicated with the inverters over the
power line and communicated with Enphase by plugging into your
routers Ethernet socket. While it was simple, I gather there were
a lot of problems, especially with the power line communications.
The new Envoy is more involved. It has to be hardwired to 220VAC
close to where the PV system feeds into your breaker panel, and
you have to add a new 220 VAC breaker for it or piggyback in onto
an existing 220 VAC breaker. Another new feature of the new Envoy
is that it supports the use of current transformers to more
precisely measure both PV production and the home's power
consumption. This is a nice feature, but does add more complexity
to the Envoy installation.
This setup basically requires you to provide a new box near your
breaker box to house the Envoy unit and conduit connecting to the
breaker box for the power and Current Transformer wires. In our
case, this had to be a weatherproof box as the breaker panel is
mounted outside.
Enphase also provides an app for your phone called ToolKit that
is used set up the Envoy and to scan in the serial numbers of each
micro inverter, and several other setup related tasks.
After reading through the rather complex instructions to install
and setup the Envoy, I decided to just hook up all the micro
inverters and get the system working and producing power and then
come back and get the Envoy working. It ended up taking most of a
day to wade through all of the Envoy stuff, but it did come
together in the end, and all the reporting stuff is now working
and is nice.
I have to say that there were times during this day long Envoy
install where I longed for the old simple Envoy. But, the new
features of the new Envoy are impressive.
Something to be aware of for Enphase systems -- they draw a sharp
line between the system "owner" and the system "installer". In
order to do a DIY install of an Enphase system and get the
reporting working you have to be the "installer", so identify
yourself as such. Enphase does not appear to have any problem with
DIY installs, so, you won't catch any static from Enphase if you
tell them you are both the owner and installer.
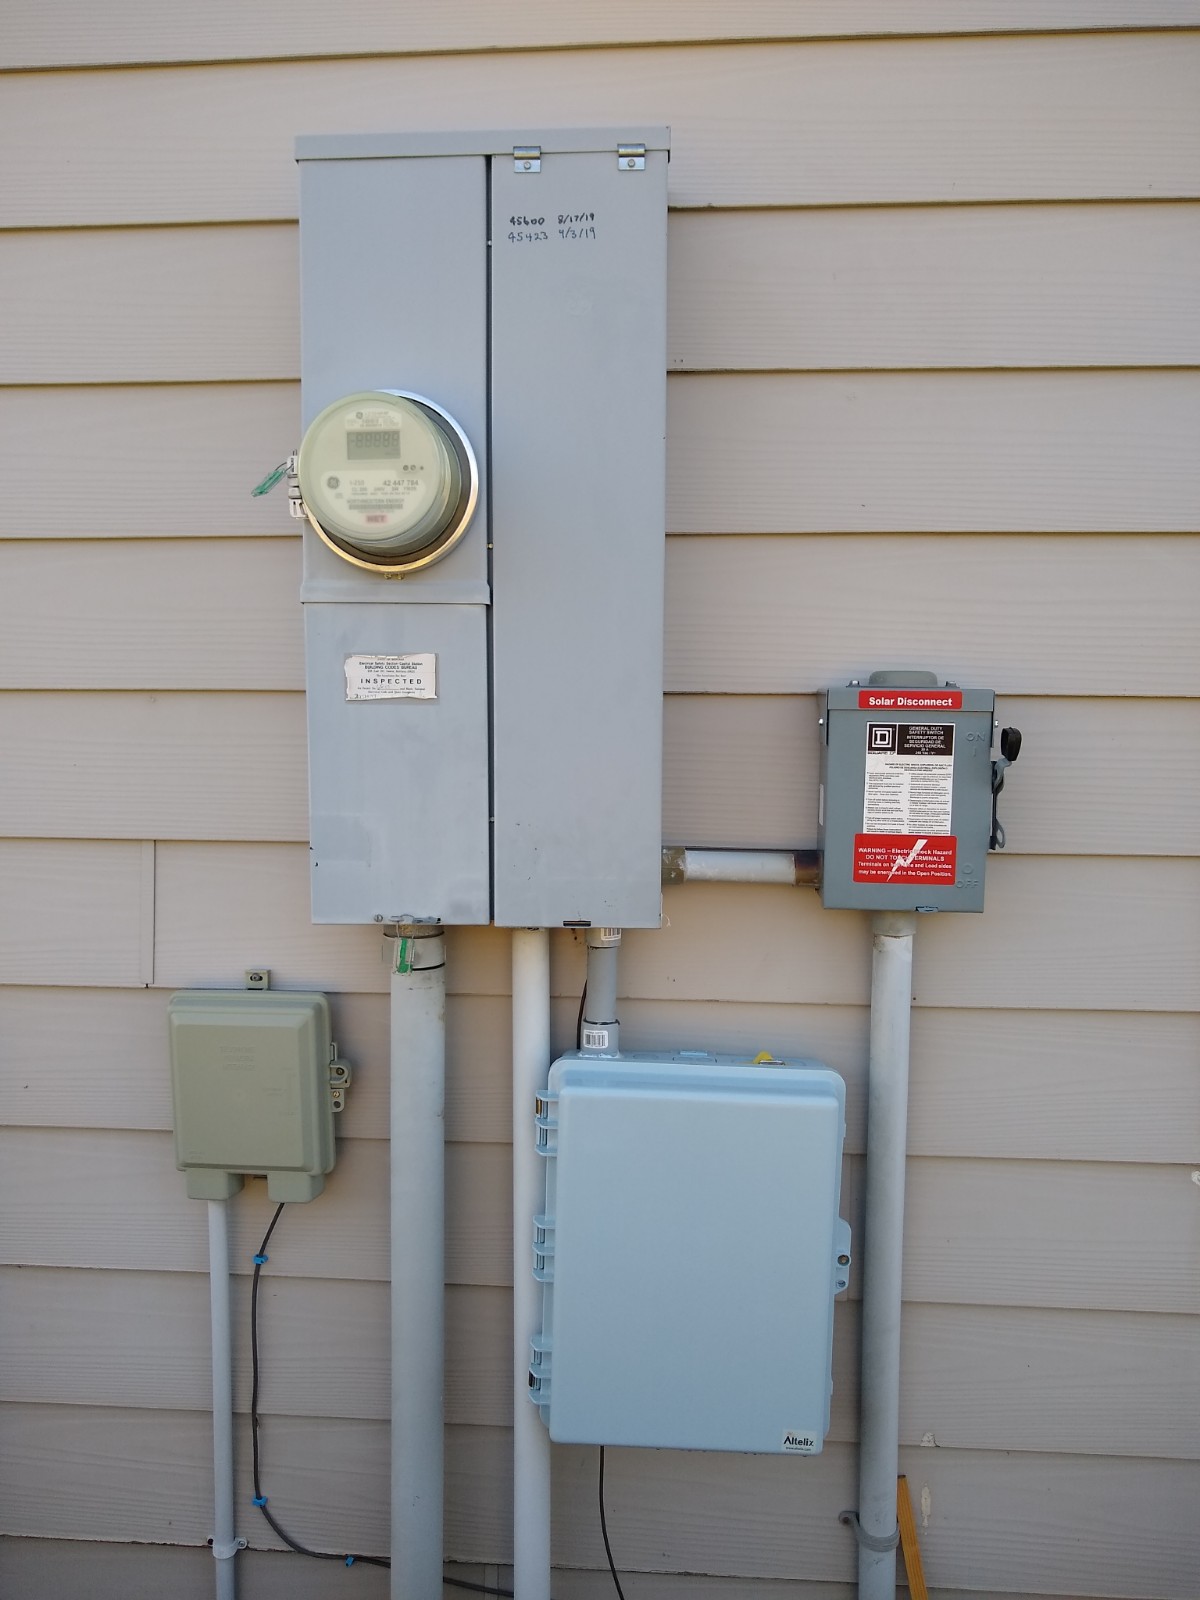
The new Envoy is mounted inside the lower right box, which is
weatherproof.
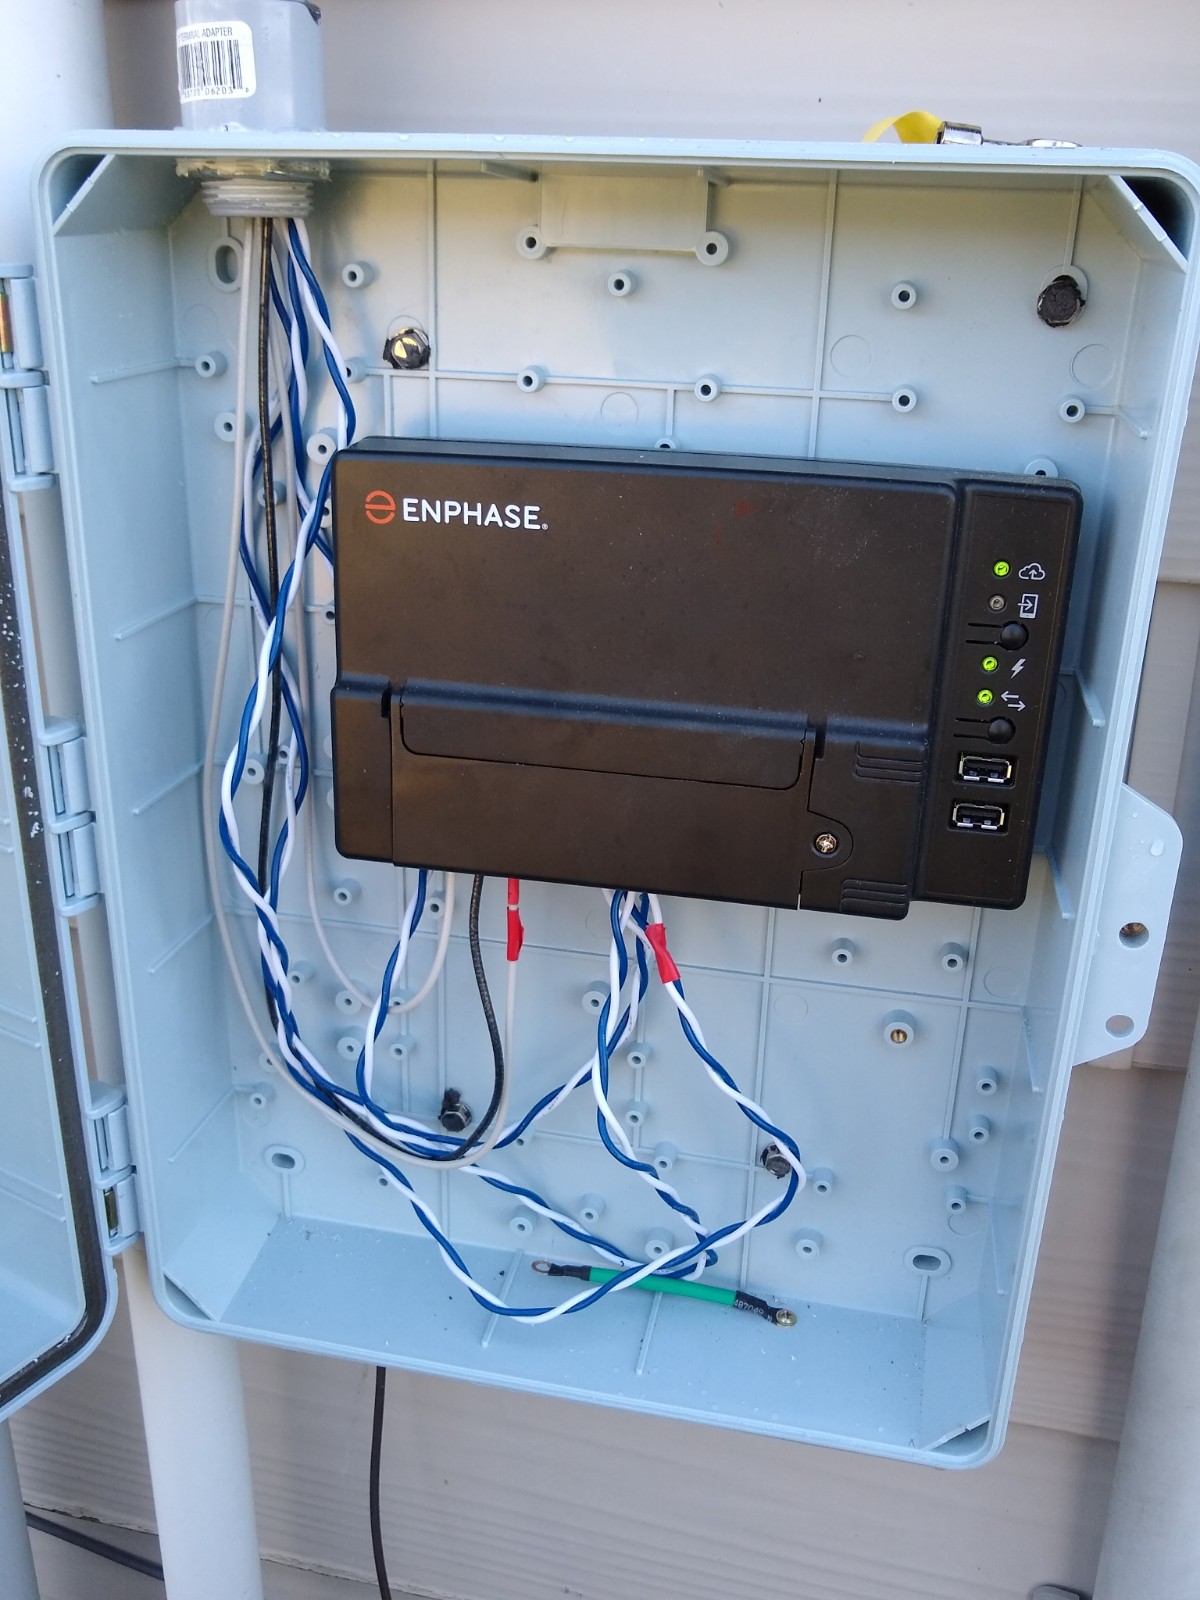
The Envoy mounted inside the box. The wires are for 220VAC power
to the Envoy and the wires from the current transformers that are
deployed inside the breaker box and provide both power production
and power consumption numbers to the Envoy.
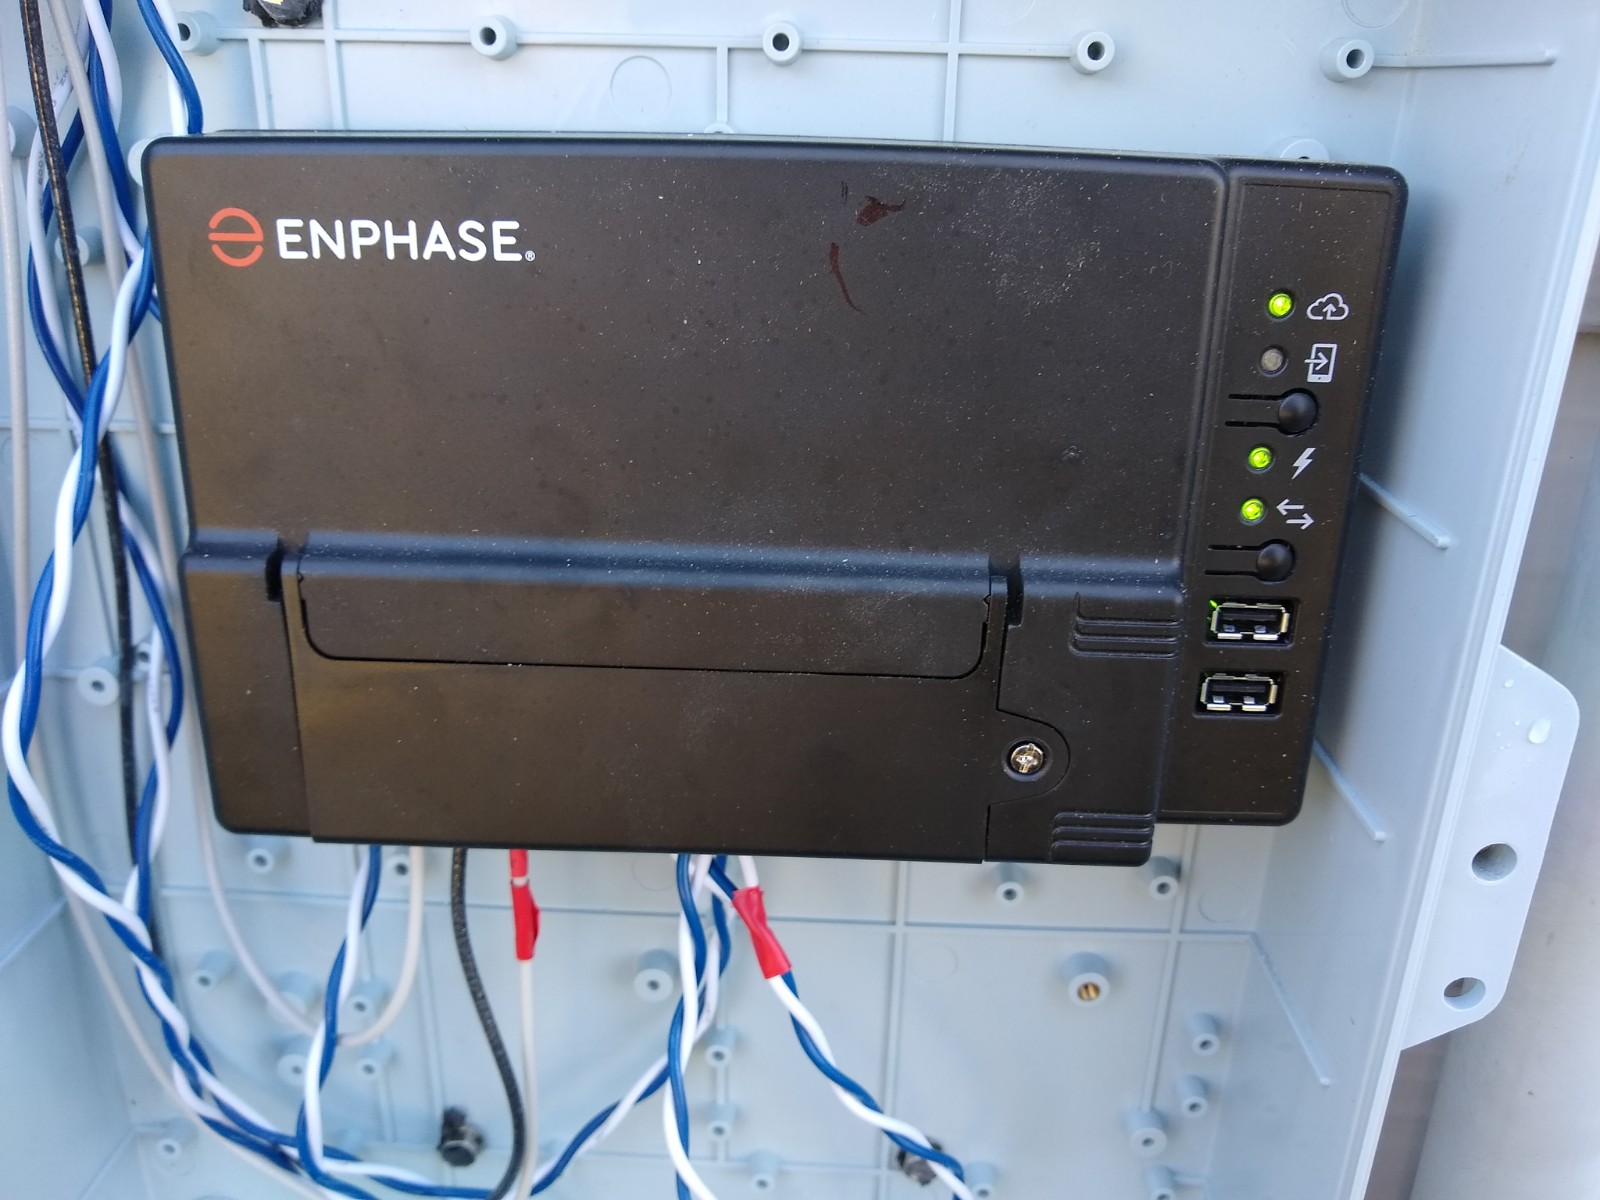
Closeup of the Envoy.
The Envoy reads data from the microinverters over the powerline
and then sends this info back to the Enphase mothership via your
internet connection. So, ideally, the Envoy should be in a
location within your wifi network coverage (but they do provide
some alternatives if you can't get wifi with your Envoy). The
Envoy should be installed in a plastic (not metal) box in order to
get good wifi.
A final thing to note is that the Enphase Tookkit software that
you use to setup the system with Enphase also provides instaneous
power production and consumption number -- this can be handy in
that the numbers that show up on the Enphase site are delayed a
few minutes. With the Tookit software, you can actually see the
effect of turning the TV off in real time.
Power Monitoring
Enphase has new software that not only shows power production (as
their old software did), but also shows power consumption. So, you
can see not only how much power you are generating, but also how
this compares to how much power you are consuming.
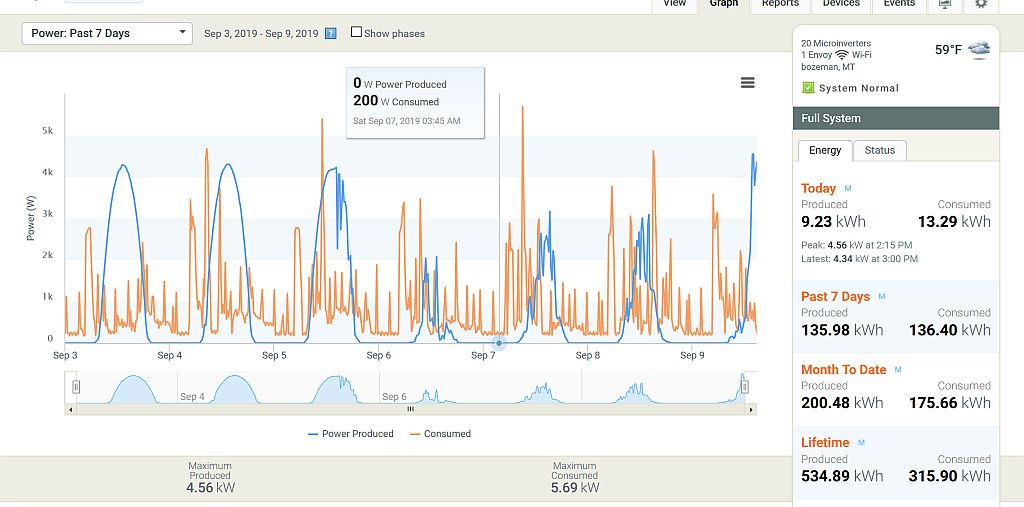
Based on a few days, it looks like on sunny September days, my
prouction exceeds consumption by a good margin, so I'm hopeful
that even with the lower winter production that we will come out
about even for the full year.
Retailers
As for the original system, I ordered the whole system from
Wholesale Solar. I have to say that it did not go as smoothly with
Wholesale Solar as the first system did.
When the order arrived, all of the clamps that hold the PV panels
to the Ironridge railing were missing. I contacted Wholesale Solar
about this, and they promised to get a bid out for the missing
parts right away, but after two weeks of emails and phone
messages, no bid. In reading some of the online reviews of
Wholesale Solar, I am not the only one experience poor customer
support. I ended up ordering the missing parts from Northern
Arizona Wind and Solar, and they were excellent and had the parts
in my hands in 3 days flat. I was quite impressed by their
customer support and speed. If I were doing another system, I'd
definitely get a bid from them.
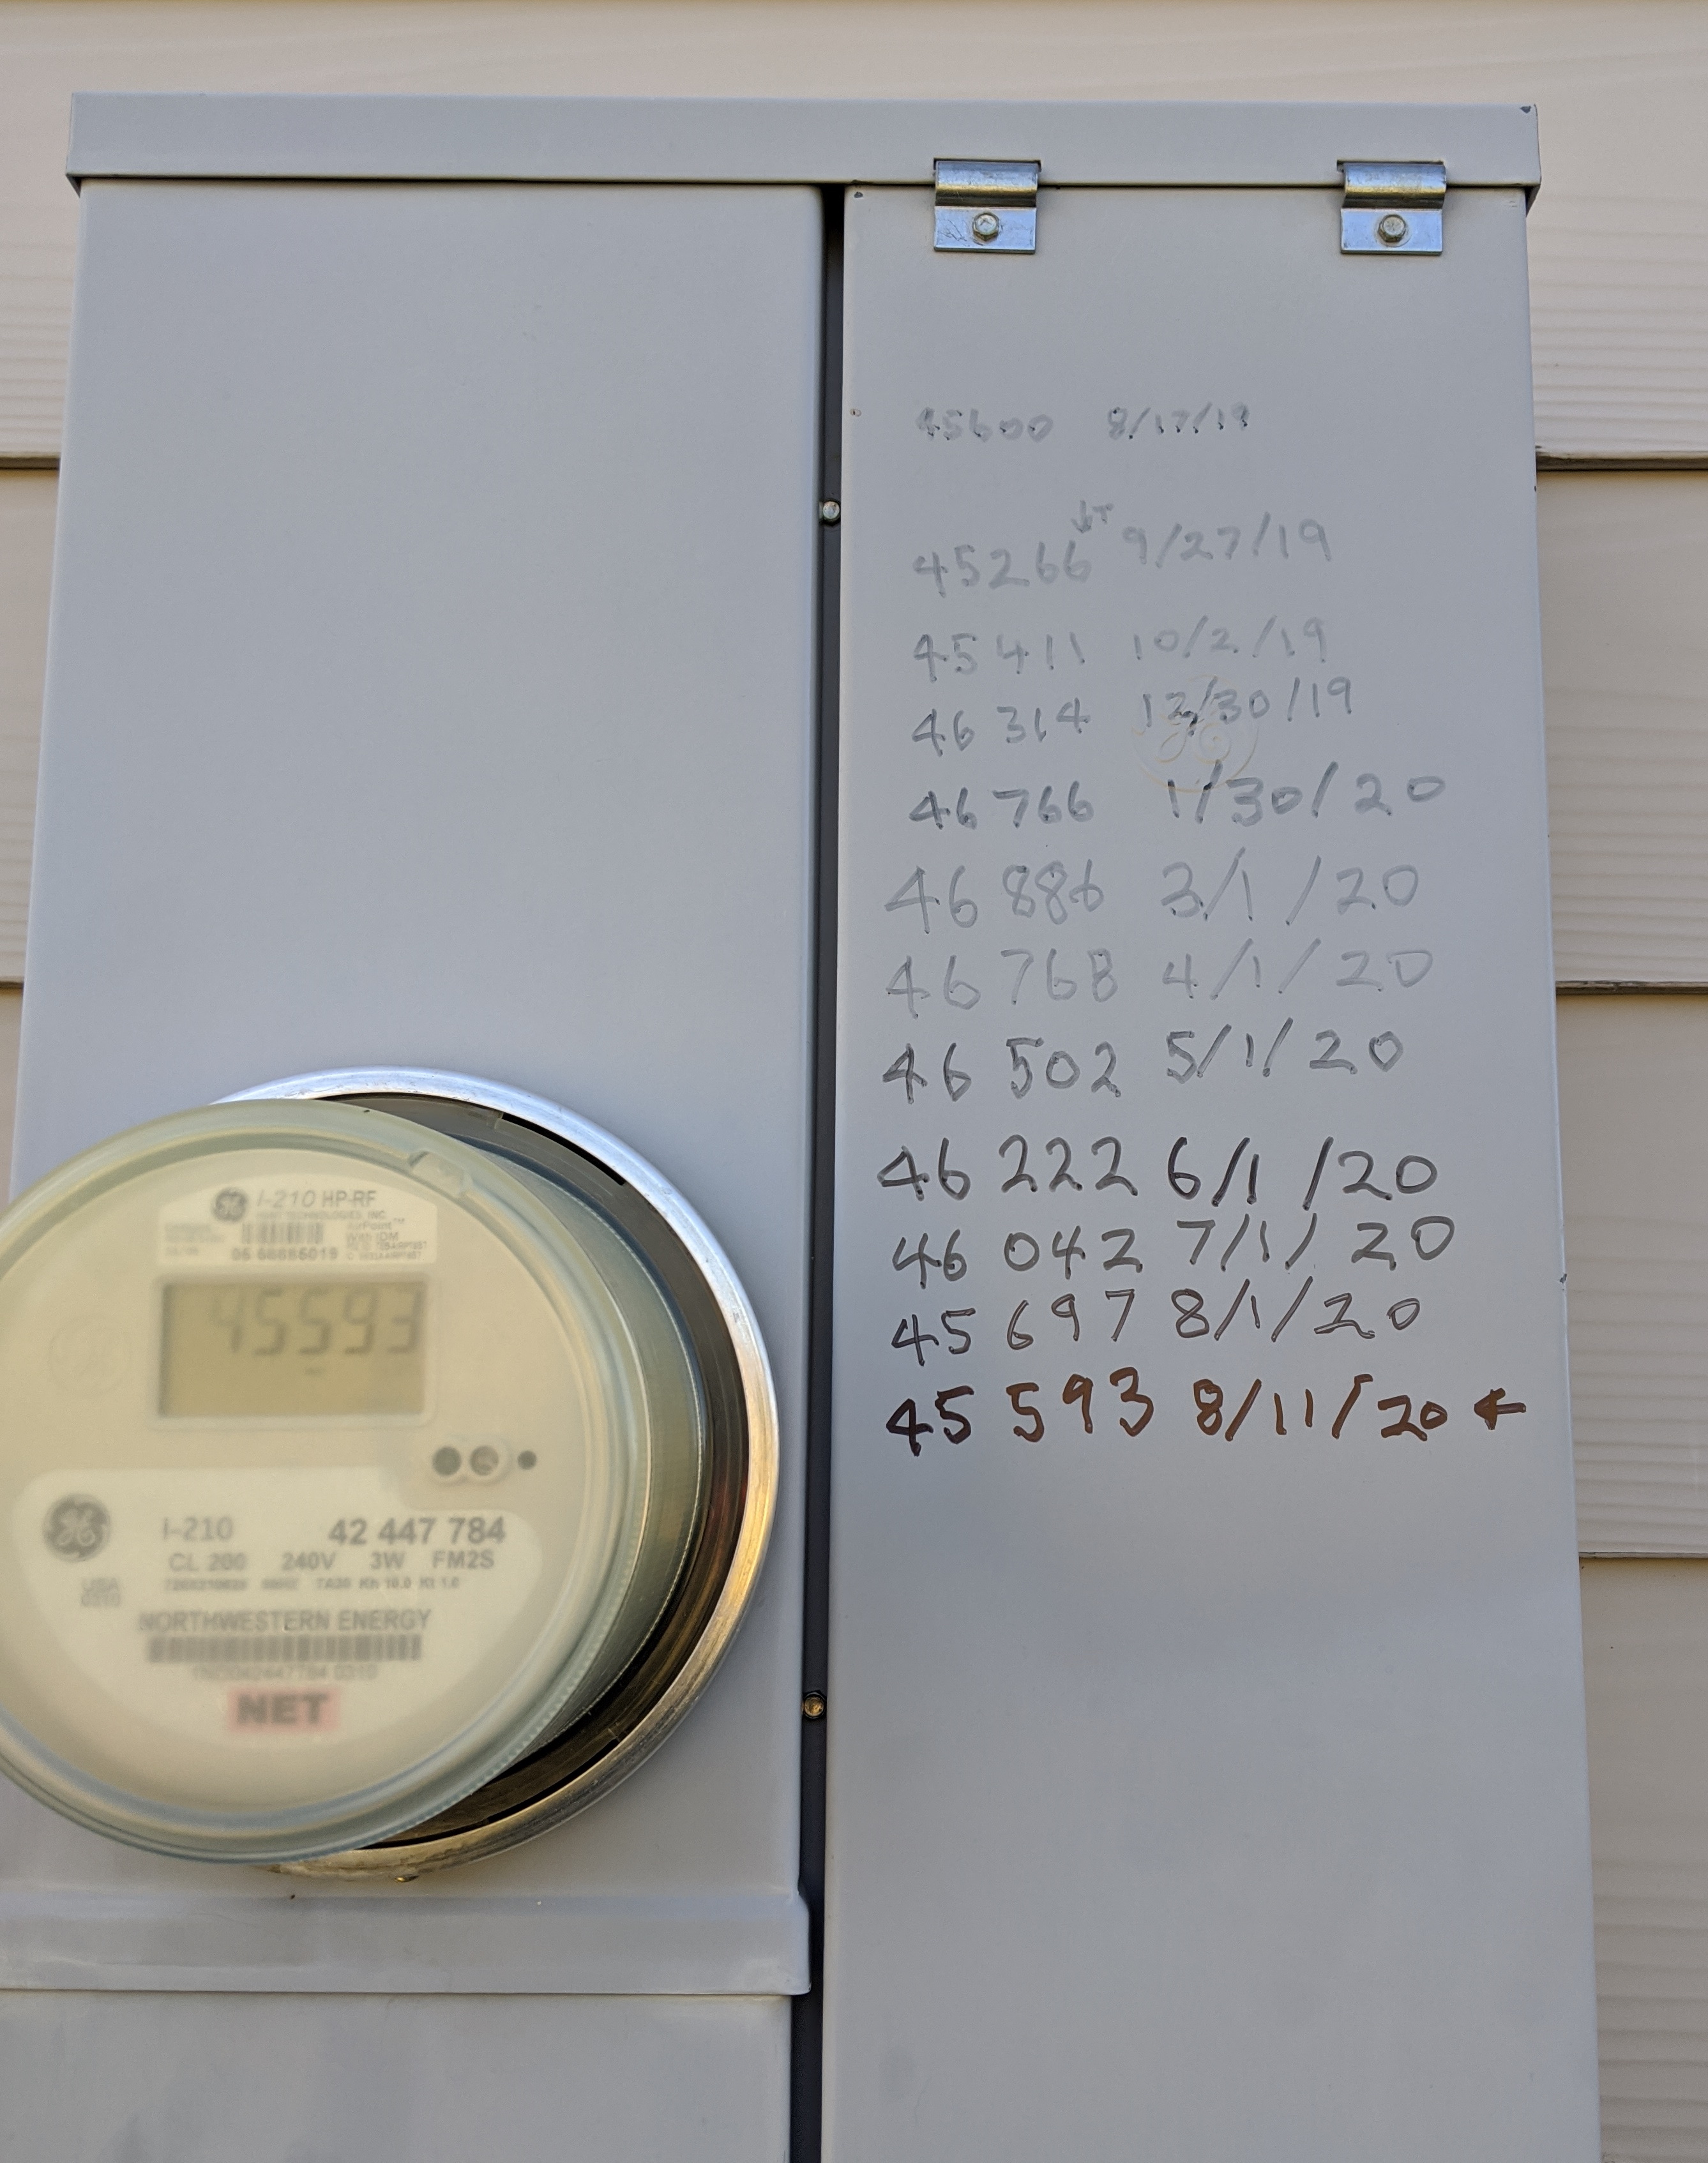
1 Year Performance Update August 11, 2020
So, its been almost a year since we upgraded the system to 5000
watts -- how has it done?
As of August 11, we are at net zero usage for the year -- so, we
are happy.
The Enphase system keeps track of energy generated and energy
used on a minute by minute basis, and around the one year
anniversary I'll put up some month by month plots showing the
details of how it performed. But, I have a less formal way of
keeping track of performance -- about once a month I just record
the current meter reading on the meter cabinet. The meter reading
when the upgrade went in on 8/17/20 was 45,600 KWH and the reading
yesterday (8/11/20) was 45,593 KWH. So, right now, we are 7 KWH
to the good, and will probably gain another 70 or so KWH by
8/17/20.
The picture below shows the (more or less) month by month
numbers. Not surprisingly, we are net positive on summer months
and net negative for winter months.
These numbers are also a reminder how much grid-tied systems are
dependent net metering from the utility -- not only on a daily
basis, but on a monthly and yearly basis. Having the grid there
to be our storage is a very valuable resource and we really should
be prepared to pay for this service.
For us, the monthly electrical bill has been $4.71, which is the
fixed part of the bill that does not depend on energy usage.
I have to say that being a bit better than net zero for the year
has changed my attitude about electricity usage a little. I still
believe in taking all reasonable steps possible to keep
electricity consumption down (LED lights, efficient appliances,
...), but I've stopped being quite so anal about it -- I now have
an internet router that is on 24/7 and is not as efficient as the
old router etc. My thinking is that if consumption grows a bit, I
can always add another panel.
I've thought about adding a couple more panels just to pump a few
more KWH of solar power out onto the grid -- I won't get paid for
it, but it will feel good.
September 23, 2020: Wildfire Smoke and Performance
This last week, we have had sunny weather, but also wildfire
smoke drifting in from California and Oregon wildfires. I would
call the smoke mild to moderate -- the visibility has been around
5 miles on average.
The smoke has had a dramatic effect on performance. I've not
taken any precise measurments, but the Enphase plot for the week
is showing about half of the production I would expect without the
smoke. A normal sunny day produces 30+KWH per day, and the actual
production has been anywhere from 10 to 20 KWH per day -- so,
about half normal production.
February 10, 2024: Update
So, about five years on the system since the 2019 upgrade - here
is how the system has done.
Not long after the 2019 upgrade, I decided to add two more 300
watt panels to the row of ten 300 watt panels. This was very
straight forward and only involved extending the supports another
80 inches and adding the two panels and the two IQ7+
microinverters.
The system has been providing all of our power since 2020. Our
electric bills have all just been the $5 administration fee. We
have added a couple of mini split heat pump units, and the PV is
now covering these as well.
NW Energy's net metering plan gives you full credit for any
electricity you send to the grid and lets you build up a balance
of this energy during the summer that can be used to offset some
of the winter months where the PV production is less than the
usage. There is an anniversary date where NW Energy wipes out any
balance you have and you start over. They let you change this
anniversary date once, and I changed ours to April. It seems to
me that its best to choose an anniversary that is at the start of
the months when your production will exceed your demand.
In 2023 switched to an electric car and installed an AC charger
for it. So, our electric usage has gone up substantially. To
cover this, I've changed the existing ten 200 watt panels to 300
watts and and two additional 300 watt panels. This adds about
1600 watts and I think this will cover the added load of the EV.
I will do a separate page on how this upgrade went. Its kind of
amazing how much the prices have dropped since the system first
went in around 2009.
One final comment is that in almost 15 years of service, not one
Enphase component or PV panel has failed.
Comments
Please leave any comments on the upgrade on the
orginal project page...
Gary
September 9, 2019
|