
Search
The Renewable Energy site for Do-It-Yourselfers
Slip FormWall
Construction
When I decided to build my first and last house, I knew I
would use alternative building methods. The problem was deciding which
alternative to chose. I knew I wanted earth sheltered passive solar, but
that still left many options. Choosing to go alternative is easy; finding
your way among the myriad methods is not. So, after much study, I chose to
use timber frame (post & beam), infill that with cedar stack wall, and
slipform stone and concrete foundation walls.
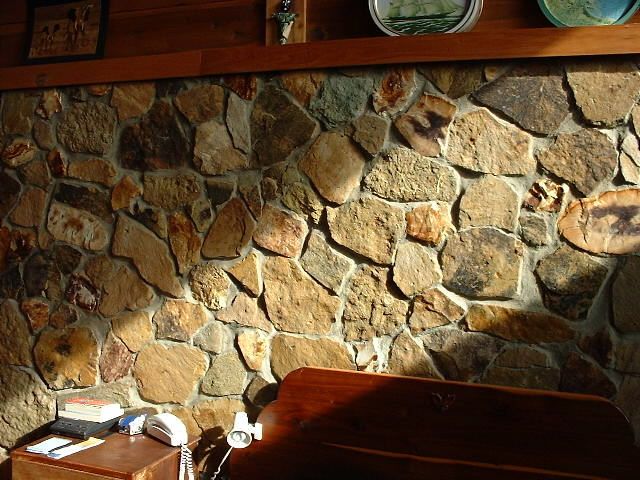
Slipformed local stone bedroom wall absorbing solar heat
Trying to conserve both money and planetary resources, I
cut the timber framing from my property, scrounged cedars where I could, and
gathered every stone I could find (and lift) within about five miles of my
place.
Slipforming is an old building method where wooden forms
are set up wall thickness apart. A flat-faced stone is placed against a
form, and concrete is poured in behind the stone, forming a wall with
embedded stones facing out. Once the concrete has set up, another layer of
forms is placed on top, and the process is repeated.
Now, with two (or more) layers of forms up and concrete
set up, you can remove the bottom forms and leapfrog them up the wall, thus
greatly conserving form lumber, as you work your way up and along the wall.
Most stones are not very large and heavy. Flat-faced
stones do not have to be very thick to cover a fair amount of wall. The
heaviest piece of wood in my house is easily heavier than the heaviest
stone.
In my search for stone, I found several old home sites
where the only evidence of a home having ever been there was a stone chimney
or pile of stones. This is a tribute to the enduring quality of stone. It
won't rot, burn, or get eaten by insects. After you have it mortared in
place, it will remain right there, looking exactly like it does, virtually
forever. An added benefit is that externally insulated stone is an excellent
heat sink, or thermal mass. It soaks up excess solar heat on cold sunny
days, and returns it at night. Conversely, it keeps indoor
temperatures cooler during hot days, acting as a thermal flywheel, evening
out temperature fluctuations in either direction. And we get all of these
benefits from a free resource!
We mixed our own concrete, which helped to keep costs
below the cost of a block wall, not counting labor. I feel I should mention
that the stonework is, in the opinion of many, the most attractive walls
they have ever seen. Another benefit is that unlike the typical
stick-framed wall, once you pull the forms and mortar, you're done: no sheet
rocking, painting, etc. Plus, there's no maintenance ever. Thick stone walls
do not transmit sound very well, either, making for a quiet, attractive,
evenly heated interior space. The walls can be insulated on the
outside by applying sheet insulation and stucco.
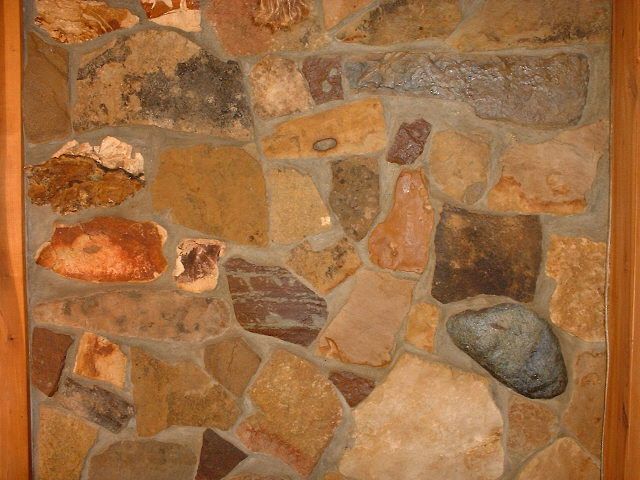
Dining area stone wall
Slipforming is an old method, but it is also still used in modern commercial
buildings as well. Basically it means using reusable forms, I built mine all
18" high, and either 4', 6' or 8' long, they were 2x4 frames with plywood or
boards on one side. The frames are drilled on the center of the 2x4 every
2', so they can be bolted together. The process of using them we called
"Space, Lace and Brace".
Space: We started on a poured concrete footer, and placed
two 8' forms 12" apart, facing each other, this is for a 12" thick wall. We
then took 12" sticks and placed them in a few spots between the two form
faces, to keep them 12 " apart.
Lace: We then wired thru the forms,
tightening the wires by twisting nails into the wire, to tension the forms
against the sticks.
Brace: Then we braced the forms by temporarily nailing a
2x4 to the top edge of each form and the other end to a stake in the ground
to keep the form plumb.
We had collected a large pile of stone, any
stone with a flat face on at least one side can be used, I just placed one
stone at a time against the inside face of the inner form, and then placed
concrete behind them, filling in the concrete with what we called "uglies",
or stones without a flat face, to use less concrete. Bolt more forms end to
end, and go along the wall, building up to the top of the 18" form. We would
do about 30-40' a day, mixing concrete in an old gas mixer. After the bottom
layer is set up, bolt another layer of forms above them repeat the process,
and then when the second layer is set up, you can remove the bottom layer of
forms, and use them for the third and successive layers, "leapfrogging" the
forms up and along the walls. This process is described in the Nearing's
books, which is where I got the idea from, except we put the stone face on
the interior, and insulated the exterior for thermal mass. BTW, excellent
concrete can be made with less Portland cement by using crushed limestone
base mix, it's what the state uses for the base of roadways. 7 parts base
mix to one part Portland.
After the walls were built, I troweled on a thin
coat of masonry cement to the exterior, called a parge coat, and then
painted on a thinned coating of Portland cement to fill pores in the parge
coat. After applying waterproofing, I used construction adhesive to adhere
two inches of foam board insulation all around the outside walls before
backfilling.
For further reading: Build Your Own Stone House by Karl
and Sue Swenke and
Our Home Made of Stone by Helen Nearing.
Stone House: A guide to self building with slipforms by Tom Stanley
Doug
Jan 4, 2008
You can reach Doug at:
dougkalmer AT gmail DOT com (replace AT with @, and DOT with a period)
More Information on Slipform
Construction:
A Mother Earth News Article on Slipforming ...
Doug's Other Projects
Doug has contributed a number of
projects to Build-It-Solar covering a wide range of solar and
renewable energy areas -- see them
all...
Thanks very much to Doug for
providing this material!