
Search
The Renewable Energy site for Do-It-Yourselfers
$2K Solar Space
+ Water: Overall Design and Sizing
This section covers the overall design of the DIY combined solar
space and water heating system.
| It gives an overview of how the system
works, and goes over the advantages and disadvantages of the
system. It also gives some design ground rules and methods
that will help you size the system to your specific needs,
including a method that will allow you to roughly estimate the
solar fraction a given size system will produce for your house
and climate.
Cost saving and payback information is also provided.
Back to Table of
Contents... |
 |
|
|
Overview of the system
This is a quick overview of how the
system works:
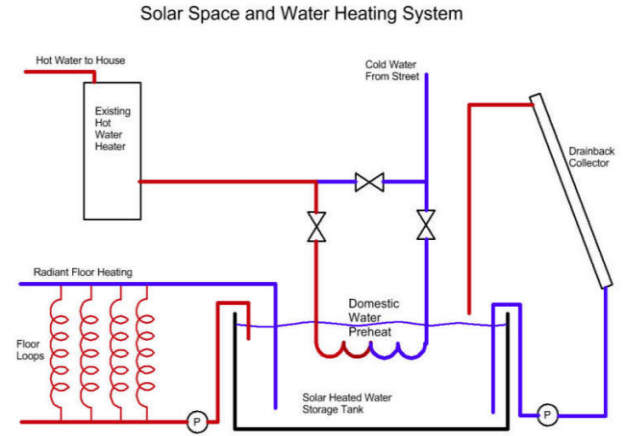
- Collection: Water from the tank is heated by
circulating it through the collector when the sun is out. Water
drains back to tank for freeze protection. No antifreeze, no
heat exchanger, no expansion tank.- Domestic Hot Water: Cold water from the street
is preheated via a single pass through a simple, efficient, and
cheap heat exchanger on its way to the regular hot water tank.
That's all there is to it.
- Space Heating: Hot water is taken directly from
the solar tank, circulated through the radiant floor loops, and back
to the tank. No antifreeze, no heat exchanger.
Really simple!
|
 |
Objectives of the Design
The design emphasis on this system is to:
- Keep it very simple
- Keep it easy to construct with ordinary tools, ordinary DIY skills, and
materials available from local stores.
- Strive for a long life with little maintenance.
- Achieve an aesthetically pleasing look from the street.
- Keep it cheap
Design Description
The system consists of three main parts:
Collector Loop:
The collector loop consists of the solar collectors, and of the pump and
plumbing that circulate water from the tank to the collectors.
The collector loop is very simple. Plain water from the solar
storage tank is circulated by the pump up through the collectors and back to
the tank. When the sun goes down, the controller senses that the
collector is cooler than the tank and shuts the pump down. All water
in the collectors and the supply and return plumbing drains back to the
tank. The fact that the water drains back provides the freeze
protection for the system -- no water in the collectors and plumbing means
nothing to freeze.
Drain back systems like this are well proven and very common. It is
important on the original installation to follow some simple rules about
maintaining drain back slopes in the plumbing, but once the initial build is
done correctly, these systems require essentially no maintenance -- this is
in contrast to closed loop systems that use antifreeze for freeze
protection, and that must be checked
and replaced on a regular basis.
In contrast to many drain back systems that have a small, non-pressurized
drain back tank for the collectors to drain back to, and then a larger
pressurized solar heated water storage tank, this system just has only one larger,
non-pressurized tank that both stores heat and acts as the drain back tank.
This eliminates the cost of one tank and plumbing connections associated with an extra
tank. It also means that no heat exchanger is required at all in the
collector loop -- this is a big plus because it eliminates both the cost and
inefficiency associated with a having a heat exchanger.
The collectors are homemade. The design has gone through several
iterations improving with each one. I believe that these collectors
will have a very long life with just a bit of maintenance to the exterior
case over the years.
The performance tests indicate performance equivalent to commercial
collectors.
The cost of these collectors range from about $6 per sqft up to $8 per
sqft depending mostly on the glazing used. This compares to commercial
collectors at over $30 per sqft plus expensive truck shipping.
The control for the collector loop is an off the shelf commercial
differential controller, and the circulation pump is an off the shelf HVAC circulation pump. Both of these are the same units as
are used on many commercial solar water heating systems, and are readily
available.
Domestic Water Preheat:
The domestic water preheat system uses a single pass of the incoming cold
water through a heat exchanger in immersed in the solar tank to preheat
water before it gets to your regular water heater. The preheat is
accomplished by running the cold water
from the mains through a very large coil of PEX pipe that is immersed in the
solar heat storage tank.
On our system the coil is 300 feet long and 1 inch in diameter.
While PEX is not a great conductor of heat, this coil has so much surface
area that it
does quite well as a heat exchanger. One advantage of
this approach is that the coil itself holds about 10 gallons of water, and
since this water will have been sitting in the coil and warmed up to full
tank temperature, the heat exchanger is 100% efficient for the first 10
gallons of any hot water draw.
This approach 1) allows the main storage tank to be non-pressurized,
which allows it to be large without getting expensive, 2) makes the
plumbing very simple, and 3) avoids the use of a circulation pump that is
used in many system.
The three valves shown in the diagram allow the solar water heating coil
to be bypassed if desired.
Radiant Floor Heat Distribution:
The final element is the distribution of the heat from the heat storage
tank to the house for space heating. In our system, we use a simple,
staple up, radiant floor heating loop. For us, this is a
single 200ft loop that heats only one area of the house. It is
certainly possible (if you have room) to add more collector area, and
additional heating loops to heat more of your house.
The system we use is very simple. The radiant floor circulation
pump picks up water from near the top of the heat storage tank, and
circulates it up through the half inch PEX radiant floor loop. After
completing its circuit around the floor loop and giving up some heat to the
floor, the cooler water is returned to the bottom of the tank. A check
valve built into the pump discourages any tendency the water might have to
drain out of the heating loop, and insures that the loop stays full and the
pump keeps its prime.
No heat exchanger is used -- basically all there is to the system is a
standard HVAC circulation pump and some plumbing.
The controls for the heating loop consist of a regular thermostat (as
would be used with a furnace) that senses when the room needs heat, and a
thermostat that senses the heat storage tank temperature to see if the tank
has heat available. These to are hooked in series so that when 1) the
room needs heat AND 2) the tank has heat, the pump is turned on to circulate
the heated water through the floor.
Tank
The tank is basically a plywood box that is framed (carefully) with 2 by
lumber. The inside of the tank is insulated with high temperature rigid foam
board insulation, and then lined with a single piece EPDM rubber membrane.
There is a tight fitting and well insulated lid to complete the tank.
This type of tank design has been used since at least back into the 70's, and has
a good track record. I have heard from people with tanks of this
type that date back to the 80's who are just now replacing the original
lining.
The advantages of this kind of tank are 1) it can provide large storage
volumes at a low cost, 2) it takes only simple tools and regular DIY skills
to build, 3) materials to build the tank are locally available, 4) it has a
good long life, 5) when the liner does wear out, it can be replaced at a low
cost, 6) it can be insulated to whatever level you like, 7) its dimensions
can be customized to the space you have available, and 8) for spaces with
limited access (eg crawl spaces) it can be passed in through the access
in parts and assembled in place.
Full construction detail is provided in the construction sections for all
pars of the system -- see the Table of Contents...
So, this system can't all be good news -- what are the negatives?
- While constructing this system is not difficult, it is not a small
project, and it will take more than a few hours of your time. I don't
recommend it as a first DIY project, but if you have done a few projects
already, you should be fine for this one.
- The system as constructed does not qualify for the 30% federal tax
rebate. The federal program is not friendly to DIY builders and
requires that the collectors be certified by the SRCC. This is not
really a problem, and there are a couple of good approaches that are
explained here...
- There are some situations in which a drain back system cannot be
installed, and in these cases, it is necessary to go to a closed loop
system. This is certainly not the end of the world, but it does make
the system a bit more complex and a bit more expensive. The
circumstances that will make it difficult or impossible to do a drain back
system are explained here...
- Compared to commercial collectors, which are largely maintenance free,
the wood cased collectors used in this project will require a repaint once
in a while -- this basically just like wood trim on your house. It is
also workable to build metal cased collectors, and this is covered in the
alternatives section on collectors.
- Some of the components of the system (e.g. the tank) don't have the
shiny stainless steel look -- if this bothers you, all I can say is "get over it" -- its
performance and reliability that matter :) There are actually some
people who have done the $1K system, have done very nice looking tanks.
On the other hand, I think the collector looks better than commercial
collectors -- I may be a bit prejudiced on this :)
Sizing the System for Water and Space Heating
This section provides some guidelines and methods for sizing the collectors
and heat storage for the system -- first for domestic water heating and then
adding solar space heating.
For Domestic Water Heating
For solar domestic water heating only (no space heating), the guidelines that
are used for most commercial systems are along these lines:
- Collector area of 15 to 20 sqft per person for the first 2 people, then
add 8 sqft for additional persons in warm climates, and add 14 sqft per
additional persons in colder climates.
This works out to:
About 30 to 40 sqft for a family of 2
About 50 sqft for a family of 4 -- maybe 60 sqft in a colder climate.
- Storage size that is about 2.0 gallons per sqft of collector in warm
climates to about 1.5 gallons per sqft of collector in colder climates.
About 50 to 70 gallons for a family of 2
About 80 to 120 gallons for a family of 4
- Tilt angle equal to the local latitude -- that if you live in Bozeman,
MT at 46 degrees north latitude, you would tilt the collector at 46 degrees
up from the ground. This is the tilt angle that gives maximum
year round energy harvest in most locations.
I believe that a system sized to these ground rules will likely provide
nearly all your hot water during the summer, and about 50% in the winter (probably
more in warmer climates), for an overall of about 80% of your hot water needs
over the year.
Part of the logic for not going to a larger system that would supply a
greater fraction of your needs is that the systems are expensive, and you reach
a point of diminishing returns.
For DIY systems I think that a solar water heating system designed to the
ground rules stated above will work fine, but I advise people to consider making these
changes:
- Increase the collector area so that the collector has enough area
that on a sunny day it can make hot water for more than one days use.
Maybe around 25 sqft per person.
- Increase the storage area so that you have enough storage for 2 or 3
days worth of hot water -- this way a sunny day can put away hot water for
that day plus a couple following cloudy days. I don't think that 50 to
80 gallons of storage per person is at all excessive as long as you have the
extra collector area to take advantage of it.
- Increase the tilt of the collectors to favor winter collection.
More tilt increases winter collection because the sun is lower in the sky
and is shining more directly on the high tilt collectors. Higher
tilt also favors winter space heating (see below).
The aim of all these recommendations is to improve the year long solar fraction
of the system by 1)
being able to weather more cloudy days without running out of solar hot water,
and 2) to increase winter production, which is the time when systems installed
to the conventional guidelines tend to fall short.
The changes listed above are a package of changes that tend to work together. For example,
the increased collector area could tend to cause overheating in the summer when
there is lots of sun, but more storage and higher tilt angle reduce any
tendency for summer overheat. And, having more storage volume to store
water for a cloudy day or two only makes sense if the collector area is large
enough to heat up more than one days worth of water on a sunny day.
You may ask, why do these bigger system recommendations make sense for a DIY
system and not for a commercial system? Its because with a DIY system the
extra cost is quite small. At $6 a sqft for
collector area, adding another 20 sqft of collector is only $120.
Adding some extra capacity to the tank with the kind of tank we use is very
inexpensive -- a few dollars. Commercial systems cost of the order of
$8000 when sized to the conventional ground rules --this is already borderline on
ever paying back, so adding more capacity is pretty painful. A
DIY
domestic water heating system can be done for $1000 even to the more
generous ground rules...
Adding Space Heating
The system is intended to supply both domestic water heating and space heating, so how
does adding space heating effect the system?
- Collector area should be increased significantly. I give some
methods below for making a fairly precise estimate of how much adding a
given amount of collector area will decrease fuel bills and for estimating
what kind of solar fraction a given collector area will provide for your
house. BUT, the simple answer is that for most homes you can add as
much collector as you can find room for and as your budget will stand and
not worry about overheating your house.
If you happen to live in a house that is very well insulated, or you live in
a mild climate, or you have a thick wallet, then you will want to go
through the more precise methods below to make sure you don't overdue it,
but for most of us, Bigger Is Better.
- Storage tank size wants to go up in proportion to the collector area
increase. A common rule of thumb that works well for most homes is
that you want to add 1.5 to 2 gallons of storage per sqft of added
collector. This basically works out so that the tank will store the
heat that the collectors can generate over one sunny day. That
is, warming up 1.7 gallons of water by about 50 to 60F takes about as much
heat as one sqft of collector will generate on a sunny winter day.
For most US homes, all of that stored heat will be used overnight, so the
storage will be back down to its depleted temperature the next morning and
ready to take another day of sun.
If you have a home that is very well insulated and sealed, or you have a
whole lot of
collector area, or you live in a mild climate, then you may want to consider
adding more than 2 gallons per sqft of collector storage so that you can
store heat for multiple days.
Again, the more detailed methods give below will allow you to make a better
estimate.
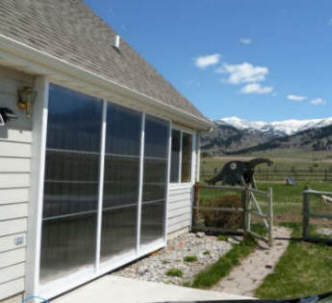
- Tilt angle for space heating systems should be steeper. I would
say local latitude + 15 degrees is a minimum, and that you can go all the
way to vertical. We did our system with
vertical collectors, which have some advantages:
- With the low winter sun, vertical collectors get the suns rays at
near perpendicular incidence.
- If you have a snow field in front of the collector, vertical
collectors get a boost from the sun reflected off the snow.
- They fit against walls nicely (but you can still build a steeply
tilted collector against a wall and have it fit in
well...)
A vertical collector on the wall can also use the wall for support and
for its back, saving some material.
For wall mounted collectors, its important evaluate the roof overhang and
make sure that not too much of the collector will be shaded when the sun is
high in the summer. These
overhang shadow tools will help you do this...
More Precise Sizing Methods for Space Heating Solar Systems
For those who want a more precise way to figure out how much a given size
collector array will do in solar fraction and in fuel saving, these tools will
help you figure this out.
Figuring out how much or your heating a solar system will provide is an
interplay among several factors:
- Your home heat loss -- basically how well its insulated and sealed.
- Your climate -- how sunny and how cold it is.
- The size of your solar collector array -- bigger collectors mean more
heat.
The tool listed below takes into account all of the factors above, and should
provide a reasonable estimate of the fraction or your heating a given size set
of solar collectors will provide for your particular house, climate, and
collector size.
Tool
to estimate solar fraction...
The method is fairly lengthy to go through, but not difficult. It will
give you a much better understanding of how your home heat loss relates to your
systems solar gains.
Example output from the Solar Fraction Tool
If you run into trouble using the method, drop me an
email...
Minimum Size for Combined Space and Water Heating
If you look at the collector area for a solar domestic water heating system
only (see above), and you are trying to decide if you want to add the space
heating feature, but you have only limited room to add more collector, what is
the minimum that its worthwhile to add?
I would say that its not worth incurring the cost of adding the extra
components for the heat distribution system unless you can add at least 50 sqft
of extra collector over the size needed for domestic water heating, and more is
better. Adding
the heat distribution system for space heating will likely add several hundred
dollars to the cost and some extra labor -- you want to be adding enough
collector area to make this extra cost and effort worthwhile.
An exception might be if you have a nice simple way to distribute the heat
-- some options for really simple/cheap heat distribution:
- A single hydronic baseboard unit just large enough to dump the
solar heat into the house.
One might even work out a way to to let water from the tank
thermosyphon through a hydronic radiator and avoid a circulation pump?
- A
PEX radiator....
- Just having a way to remove insulation from the tank and letting the
tank act as a radiator might also work for a very simple heat distribution
system (assuming the tank is in a conditioned area).
If you can do one of these very simple heat distribution systems, than
potentially it would be worth adding as little as 25 sqft of collector for space
heating -- in very rough terms, an extra 25 sqft of collector area will produce
about a $50 fuel saving per year -- you can compare that to the cost of the heat
distribution system and see how many years it takes to pay off.
Note that our system is right at the lower end of the range as we did not
have space for any larger a collector on the south wall. We have just a
bit over 50 sqft more collector area than we would have done for just domestic
water heating.
Balance Between Space and Water Heating
Since the space and water heating come out of the same tank, there is some
interplay between the two.
There are a couple of control strategies you can use to set the balance
between space heating and water heating:
Scheme 1: Set the space heating control so that the minimum tank
temperature is about 90F.
That is, if the house needs heat, and the tank is at or above 90F, the floor
loop will pull heat out of the tank.
With this arrangement, and depending on your collector area, home heat loss,
and climate, the tank is likely to spend a good deal of time through the
winter near the 90F mark. That is, the space heating demand will
likely pull the tank down to 90F fairly soon after the solar gain raises it
above 90F.
This means that the domestic water preheat will only get your water up to
about 90F. Depending on where you have your hot water tank
thermostat set and your ground water temperature, this will provide about
half of your hot water heating through the winter.
In the summer, the tank temperature will go up as the space heating need
goes down, and the system will provide nearly all of your hot water demand.
Scheme 2: Set the space heating control so that the minimum tank
temperature is about the same as your hot water tank temperature setting.
For us, this would be about 110F. With this arrangement, the
solar heater will provide most of your hot water demand through the winter,
but will provide less space heating.
There will still be times when the solar heater does not provide all of
your hot water -- for example, you get a sunny day, and the tank temperature
will go well above 110F, but the space heating demand will fairly quickly
lower it to 110F. Then you get a cloudy day or two. Under this
scenario, the tank temperature will continue to drop due to domestic hot
water demands over the cloudy days, so you will only get a partial solar
preheat. If space heating had been completely turned off for this
scenario, the tank would have gone well above 110F on the sunny day, and
would drift down toward 110F over the cloudy days while continuing to supply
100% of domestic water heating.
Either of these schemes will work. With the first scheme the tank is on
average at a lower temperature, and this will make the collectors more
efficient. For example, with 35 F outside temperature and full sun with a
tank temperature of 120F, the collector efficiency is about 44%, but if you
lower the tank temperature to 90F, the collector efficiency goes up to about 54%
-- this is actually a 23 % increase in heat output at the lower tank
temperature.
So, from the point of view of getting the most "free" heat out of your solar
system, first scheme is better. But, if there is some reason you want to
favor domestic water heating, you can just set the minimum tank temperature
higher and take a hit in total output. One reason you might want to do
this is if you use a fuel for water heating that is more expensive or more
polluting than what you use for space heating -- e.g. you might be using
electricity for water heating and natural gas or wood for space heating.
One design challenge you might want to take on is some way to stratify or
partition the tank in such a way that the the domestic water preheat coil can be
in a warmer part of the tank. I'd like to hear if you come up with a good
scheme.
A word on cost and Payback:
This system is derived from the
$1000 Solar Water heating system. It is basically the same system
with 1) an increase in collector area to allow for some space heating, 2) and
increase in tank size to go with the larger collector, and 3) a system to
distribute heat from the tank to the house for space heating.
These extra features raise the cost of the system to a bit over $2000 for a
system with a modest amount of space heating. The cost will, of
course, go up as more space heating capacity is added, but even adding an
additional 100 sqft of collector and corresponding tank size would not push
the total cost a lot above $3000.
The cost of a commercially installed solar domestic water heating system
(no space heating) typically runs about $8000. So, the cost saving is
pretty spectacular. Many
people have built the $1K solar water heating systems with good results.
Costs have generally run a bit above $1000, but not a lot. Performance
has been comparable to commercial water heating systems.
I've not attempted to determine the cost of commercially installed
systems that do both water and space heating, and this would of course
depend a lot on how much space heating. But, I'd venture a guess that
the prices would be North of $15,000.
So, I believe, you can save a ton of money building one of these systems.
The feedback I get from people who have built the $1K systems supports this
belief. Why the savings are so large
compared to other DIY projects is puzzling. Perhaps it has to do with
the relatively low volume of commercial installations. In addition, we have really
worked to make the system simple -- simple is always better and cheaper
whether you are designing airplanes or solar water heaters. The tank
design in particular is different than the typical commercial approach and
much less expensive. Whatever the reasons, the large cost saving is nice :)
I do want to make the point that the low cost is not due to cutting
corners, the materials used and figured in the cost are new and high in
quality -- in many cases they are exactly the same components used in
commercial systems.
The payback for the $1K
solar water heating system is discussed in detail here. It runs about
2.5 to 3.5 years depending on the fuel you use to heat water.
I have not tried (yet) to estimate the payback for the additions to the
system for space heating. I will do this, and add the numbers later, but
my guess would be that the payback for the space heating part might be a bit
longer than the water heating part.
Make or Buy and Rebates
See the Cost Page -- rebates section for the ins and
outs of buying your collectors instead of building them to collect the federal
rebate.
Basically you have to buy SRCC certified collectors in order for the system
to qualify for the federal rebate. Because commercial
collectors cost about $30 per square foot plus expensive shipping and even high
quality DIY collectors are only about $8 per sqft with no shipping costs, the
system with commercial collectors will cost quite a bit more even with the
rebate. But, you do save the labor of building the collector and you get a
high quality product -- so, its something to consider.
Disclaimer
I'm not a solar professional, not a plumber, not an electrician.
I do not take any responsibility whatever for the correctness of the design
or construction advice give in on this system. I do not take any
responsibility whatever for any damage or pain or inconvenience that errors
in this section may cause you. You have to take on all the risk involved in building this system yourself -- Do
Your Own Homework!
References:
Full description
of the $1K Solar Water Heating system that the new system is based on...
For those interested in the $1K Solar Water heating system (which is the
basis for this system), all of the pages covering design, component testing,
performance testing and logging, cost, design issue, and example systems are
here...
The Solar Water Heating
page... (many alternative approaches to solar water heating)
The Solar Space Heating page... (many
alternative approaches to solar space heating)
Gary February 17, 2011