Search
The Renewable Energy site for Do-It-Yourselfers
Doug's Simple
Thermosyphon Solar Water Heater
|
Doug's simple
thermosyphon solar water heater. Collector to the lower left,
and storage tank
with wrap around heat exchanger on shelf in shop. No pumps! |
|
Low Cost Passive Solar Hot Water
It's been over 17 years since I
installed a PV pumped solar hot water system on my
house, and that success made me want to design a system for my shop/studio
outbuilding. Because people saw the panel on the roof of my home word got out
that I knew something about solar, I was called to remove a system from a
neighbors house. It was an example of the systems from the early eighty's --
overly complex, used grid electricity to run two pumps, and this system was
aluminum. I was paid to remove two 4x8' aluminum panels, and the pumps, heat
exchanger (HE) and water tank. One panel has a leak, but the other checked out
fine.
While the system on my house works
well, I did have to invest in a 10 watt solar electric panel to run a small
circulating pump, and have a stainless steel heat exchanger tank built. The
total for the house solar system was $1100. The pump was necessary because the
HE tank is in the attic below the roof mounted panel. Hot liquid will rise on
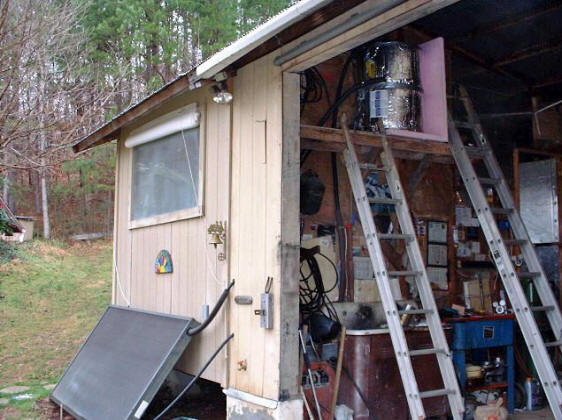
it's own, but must be pumped downward. However in the shop, I could have the
panel down low, and the Heat Exchanger tank up high, so I hoped to not need the
expensive pump and PV panel.
Fortunately for my purposes, the
aluminum hot water panel had a serpentine pattern, so the liquid enters on one
end down low, goes the length of the panel, rises a few inches, and comes back,
repeating the pattern. This works well for a thermosyphon system, as the heated
liquid naturally rises, pulling cooler liquid in below. Technically, the cooler
denser liquid is heavier, so it is pulled down by gravity, displacing the
lighter, hotter liquid, but for simplification, heat rises.
Now I just needed to figure out how
to build a low cost Heat Exchanger. I bought a new 38 gallon electric water
heater, the shorter style. I removed the metal ends and shell, promptly voiding
the warranty, I'm sure. I used a wood chisel to remove two strips of foam
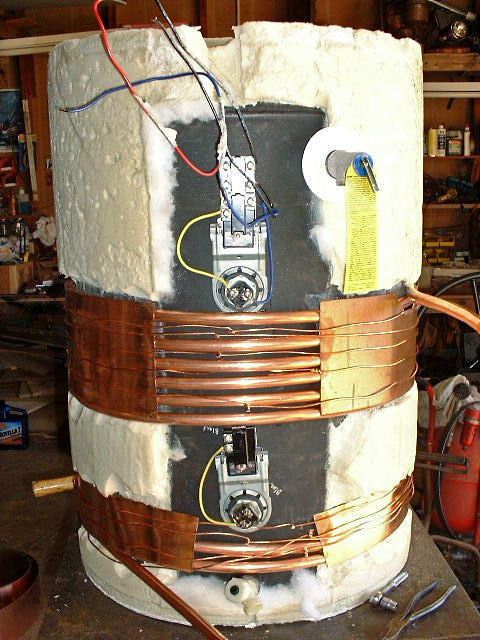
insulation, below and above the thermostat. I bought a 50' coil of 5/8" copper
tubing, and wound it around the tank as tightly as I could, using strap clamps
to pull it into direct contact with the metal tank walls. The idea is to keep
the coils as low on the tank and in close contact with the exposed steel. I
wrapped the coils in copper flashing and twisted copper wire around the flashing
to hold the coils in as tightly as I could. Leaving the two tubing ends sticking
out, I insulated the tank with radiant barrier, which is reinforced aluminum
foil, then a layer of Reflectix, which is double bubble pack covered with Mylar.
Both are available at building supplies, I just had some around.
|
Wrap around heat exchanger |
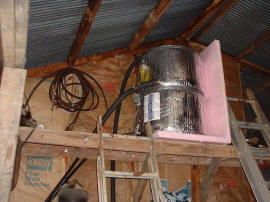
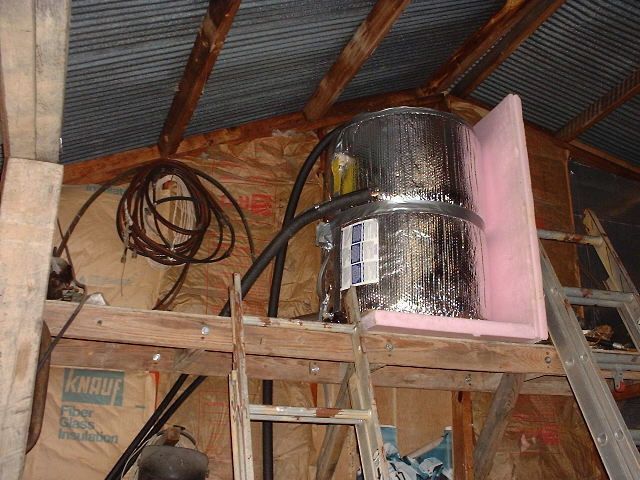
Tank installed on shelf with insulation.Click on pictures to enlarge |
I reinforced a heavy duty shelf in my shop, and used the front end loader to put
the tank on it. The bottom of the tank is about 6' above the top of the
collector panel. I then used 5/8" automotive heater hose to connect the top of
the panel (Hot out) with the top of the HE coil around the tank, and the bottom
of the coil to the bottom of the panel. This way, whenever the sun shines, the
non toxic antifreeze (propylene glycol), heats up, rises to the top of the HE
coil, gives up it's heat to the water tank, cools, and descends back down to the
bottom of the panel.
I then super insulated the tank with
2" thick foam panels built to surround it. I used about 20' of heater hose, and
at first I thought I'd have to use an expansion tank to accommodate the
expansion and contraction of the fluid with temperature swings, but I so far the
heater hose allows enough movement to prevent too much pressure rise.
It has been thru several long, hot summers, and has not had any problems with
expansion or contraction of the working fluid. I have changed to cheaper, more
readily available automotive type ethylene glycol, as the double walled HE
eliminates any contamination concerns.
I put a tire valve at the highest
point of the HE tubing, so I could bleed air from the system, and check
pressure. I have about $60 in the solar end of the system, I would of spent the
$160 for the electric heater anyway,. The electric heater is wired up as
back-up. The system works, but the weakness is the smaller size of the tubing
(5/8") and the lack of a pump means the temperature difference has to be fairly
great to circulate much heat. I am considering going back in to add cement
around the HE coils, in direct contact with the tank, to improve the heat flow
thru the HE and tank wall.
Doug
Jan 4, 2008
You can reach Doug at:
dougkalmer AT gmail DOT com (replace AT with @, and DOT with a period)
Doug's Other Projects
Doug has contributed a number of
projects to Build-It-Solar covering a wide range of solar and
renewable energy areas --
see them all...
Thanks very much to Doug for
providing this material!