Search
The Renewable Energy site for Do-It-Yourselfers
Improving the
Efficiency of an Older Wood Burner
This is a project to increase the efficiency of an older but still very
serviceable wood burning stove.
Scott added an air supply for secondary combustion and retrofitted a
catalytic combustor.
Scott also goes through a method for actually measuring the
efficiency of a wood stove using just a wind meter and a thermometer.
Thanks very much to Scott for sending this in!
|
|
From Scott:
I have a 1981 pre-epa wood stove that has been heating our house faithfully
since then. I'm not alone, apparently, because I've read somewhere that
about 70% of the stoves in use are pre-epa stoves. A couple of years ago, I
was looking into whether a newer epa stove would save us any wood over the 6
1/2 full cords we normally use. I cut my own wood, so, other than wear and
tear on my body, there was no real financial incentive. I had read where
some people had tried retrofitting their older stoves with some of the new
burn technology, so I thought I'd give it a try.
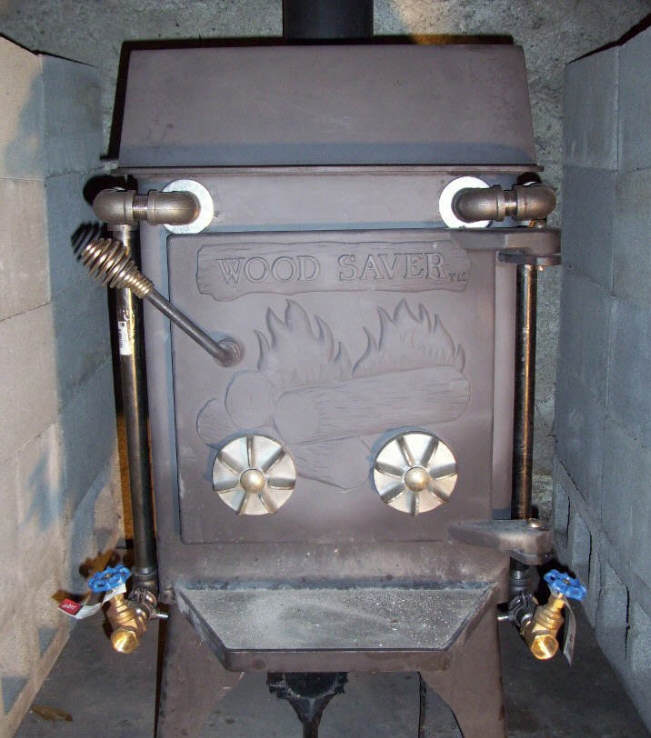
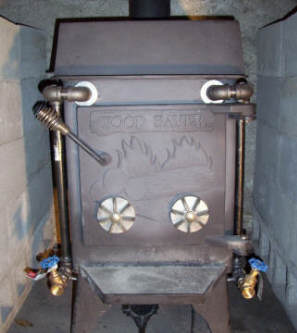
Adding Air Supply for a Secondary Burn Area
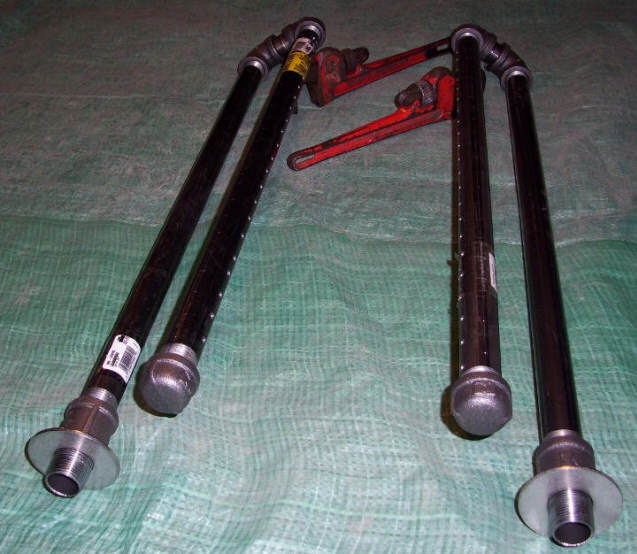
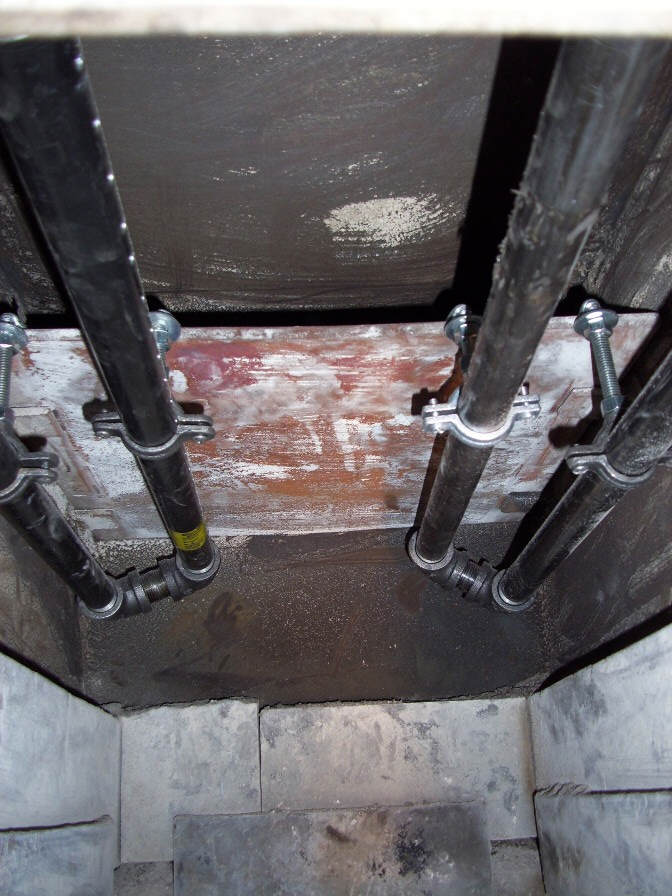
I added a secondary burn system (see pictures just below) that consists of
3/4 black pipe, which superheats the air and feeds it in over the fire below
the baffle in the stove. I originally thought I'd be using the gate valves
to control the air, but found they work best fully open. the gate valves
are important, though, as a way to shut the air down in case of a chimney
fire. The secondary air allowed the stove to burn a little hotter, cleaned
up the exhaust gasses a lot, and reduced our wood use by about 11% (when I
compared 2 back to back years and compensated for differences in heating
degree days between the 2). Not bad for the price of some black pipe and a
little labor.

Wood burner with the air supply pipes
for the secondary burn system. |

The secondary burn air supply
pipes that fit inside the |
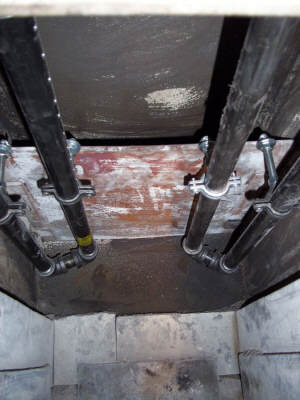
Secondary burn air supply pipes
mounted inside the fire box. |
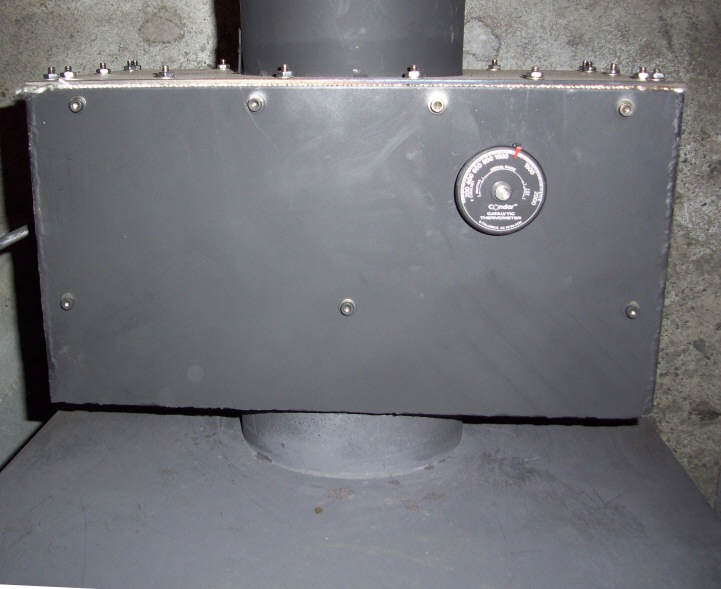
Retrofitting a Catalytic Combustor
I noticed that even though the secondaries cleaned the burn up a lot, that
there were times that I could see noticeable smoke. I thought that a
catalytic combustor add-on might be able to turn that into some usable heat,
as well as clean up the exhaust some more. The cost of the catalyst
initially stopped me, but curiosity, coupled with the trend toward
increasing wood stove emission regulations, caused me to try the idea this
year. There are
only 1 or 2 companies that make a retrofit cat assembly these days. It
consists of a pregnant looking stove pipe section, where the cat is a damper
that can be rotated vertically, out of the way. What I didn't like about
these, was that the cat was pretty high up in the pipe away from the stove.
I have a very short stove pipe, before it goes into an insulated chimney
section, and wanted to get as much heat out of the cat as possible, and not
just send it up the flu. Also, they had to use a smaller, 1" high ceramic
cat. Originally, I toyed with the idea of putting the cat in the stove, but
didn't want problems of an air leak where I would have to drill the stove
for a bypass damper control.
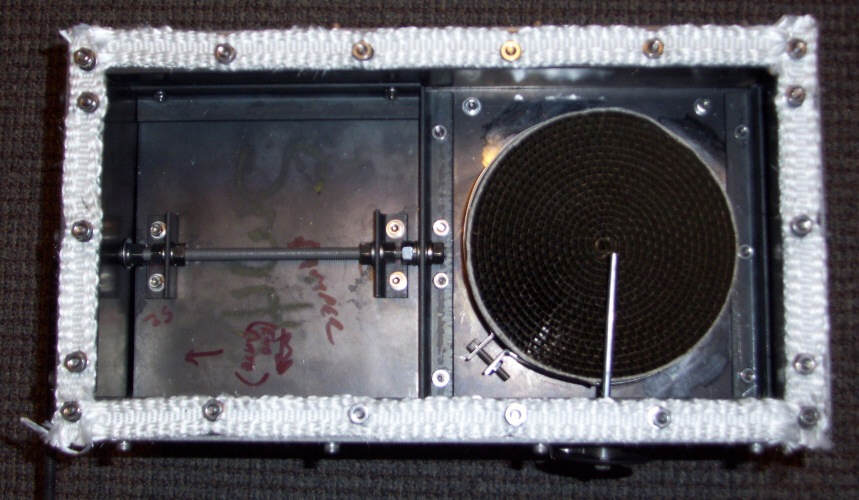
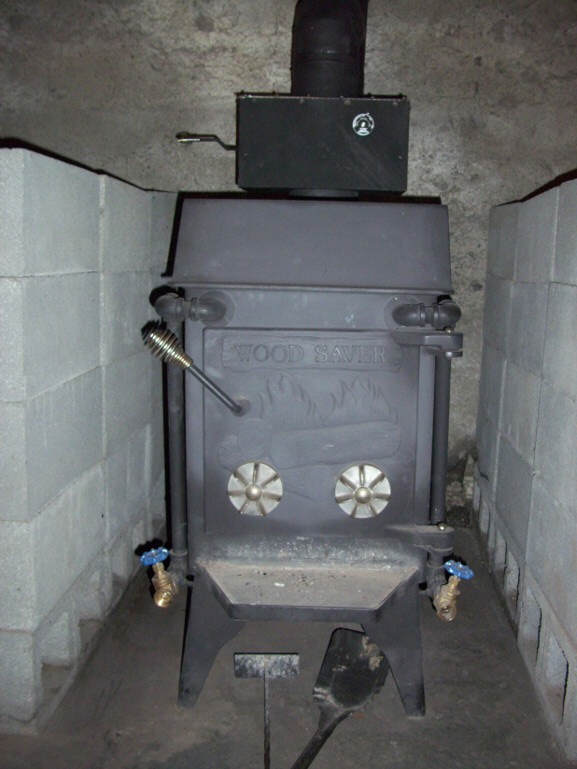
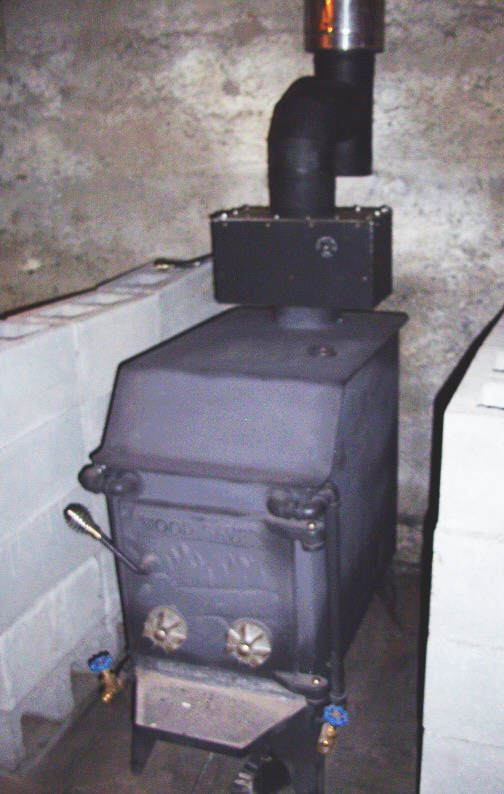
I decided to fabricate a "cat box" to be mounted directly above the stove.
It would have a bypass damper, and a slight offset to it to extract as much
heat as possible without causing problems with the draft of the flu (see
pictures just below). I spent a little more money for a 2" high stainless
steel cat. These are less susceptible to thermal cracking and crumbling and
light off at about 100 degrees lower than the ceramic catalysts. The box is
fabricated from 1/8" sheet steel and the heavier 22 gage single wall stove
pipe. Luckily, I have a friend who can tig weld as I am
welding-incompetent.
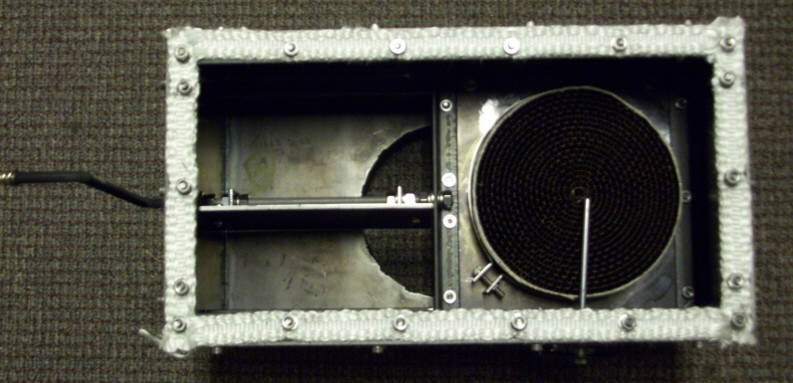
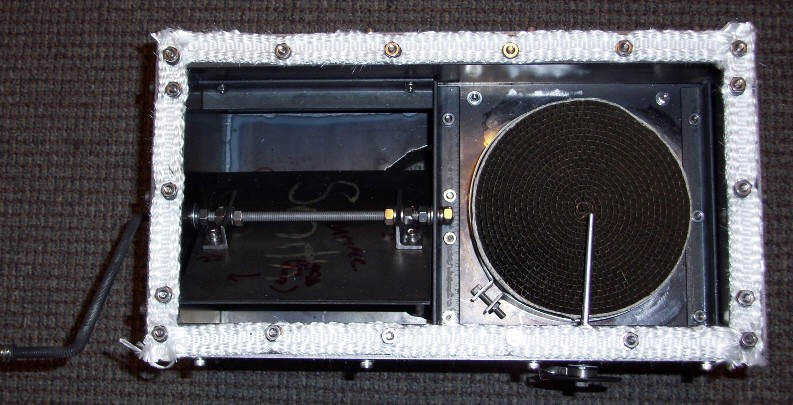
Close ups of the Catalytic Combustor
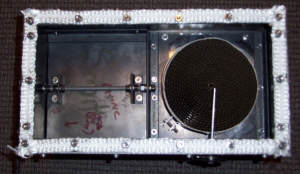
Catalytic combustor with the bypass
damper fully closed. |
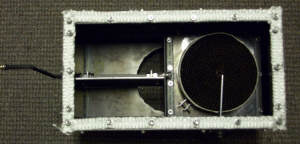
With the bypass damper fully open |
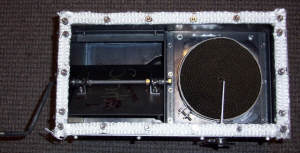 |
Pictures of the Catalytic Combustor mounted on the stove
I've only had it in place since this weekend, but am impressed with how well
it works.
Measuring Efficiency
Prior to installing the cat box, I checked the stove's efficiency using
the method
detailed in this article...
This is basically a stack loss method of measuring efficiency, where you
measure the heat lost up the chimney, and assume you get everything else
delivered to the house. I used a conservative estimate (as the article
suggested) of 6900 BTU per pound of wood for my 2-year seasoned beech that
I'm burning. The initial test showed 72.3 % efficiency. Now, this test
makes the assumption that there is 100% combustion efficiency, which just
isn't true, but I thought it would serve as a good bench mark for the cat
install. I was hoping that the cat would slow down the exhaust gas flow
somewhat, and possibly reduce the flue gas temp some, as well as increase
the combustion efficiency. So I repeated the test yesterday, during a snow
fall (my neighbors must think I've really lost it). Both tests were done
with 40 lb wood loads. With the cat box installed, I noticed immediately
that flue temps were lower even though the cat was cranking out temps in
excess of 1200 degrees at times. For most of the burn it ran 1000-1200F.
The cat box surface temp was 400-600 degrees. Efficiency with the cat
installed jumped up to 82.8 %. Now if you can believe the manufacturers
spec on the cat of 93% combustion efficiency, if I'm getting the correct
flow through it, the stove could theoretically have an overall efficiency of
around 77%. Nothing short of amazing for an old air tight "smoke dragon".
I also noticed the only thing coming out of the chimney was water
vapor...you could practically breathe the exhaust, though I wouldn't
recommend it. My clothes also didn't smell like wood smoke after the 6
hours of testing as they did with the previous (test with secondaries only).
My only issue with the setup, so far, is that on a cold stove start, when
there's more smoke, it's easy to get the cat temps up to 1700-1800 degrees,
which is too hot (easily controlled by opening the bypass damper half way).
So, at least until I get the hang of things, it's not a just set it and
forget it kind of thing early in the burn. No problems with light off of
the cat or the cat staying lit throughout the burn.
Sources and Costs
Here's a
link to the catalytic combustor that I used...
I believe it's actually
manufactured by this company...
This is a link to one of the
premade add-on units...
If you are thinking about retrofitting a catalytic combustor, one thing to
bear in mind, is that a catalyst needs a supply of oxygen to work. One of
the problems with these older stoves is that they had poor secondary air
flow, so I'm thinking that to get the most from an add on catalyst you need
a source of preheated secondary air. Having done the secondary burn tubes
first, made this easy to accomplish in my case.
Price wise, I had less than $100 into the secondary tubes. The catalyst was
$176 plus shipping, the steel (precut by our local supplier) was $17 and
misc fasteners were less than $15. I also had about $100 in stove pipe
fittings, but only because I had to change my stove pipe configuration to
fit the cat box in.
Disclaimer
Lastly, the disclaimer...One thing that I should mention is that the box
gets as hot as a wood stove, so 36" clearances apply to it as if it were a
wood stove. Also, I'm making no claims that what I'm doing with my stove
is safe for other people to do, and am definitely not "recommending" that
anyone make modifications to their stoves. This is still a relatively
untested work in progress.
Scott Smith
NEW
Here is a thread on Hearth.com discussing Scott's project....
Some follow-on information from Scott:
One thing I noticed yesterday is that the stove can be run for very
long times at a low rate. Yesterday, I made a fire at 6:30 am. My
solar air heater was running so the house was still toasty at 6pm.
Usually I would have to make another fire about that time or a little
earlier to keep things warm even on a good solar day. At 6:30 I went to
rake what I thought would be just a few coals forward to start a fire.
I found wood chunks still in there! Raked them forward and opened up
the draft some, and the cat went active again, stove top warmed up to
around 300 degrees. Didn't actually reload the stove until 8:30 pm.
That's a 14 hr burn out of a stove that's usually good for 7-8. (BTW,
this is a fairly big stove...about 3.6 cu ft firebox...takes 24"wood.)
Now that's a relatively low burn...400ish stove top temps. When it's
really cold, I may actually have to open the damper part way to avoid
overheating the cat, and run the stove hotter, using the secondary
system mostly. Maybe not though, because the lower burn actually gets
more heat into the house instead of sending it up the chimney. The
beauty of this setup is that everything's controllable and you can see
the direct effect of all the various tweaks. There will be a learning
curve as I re-learn how best to burn this thing. I found out this am
that the overheating cat on startup can easily be controlled by cutting
the secondary flow down some.
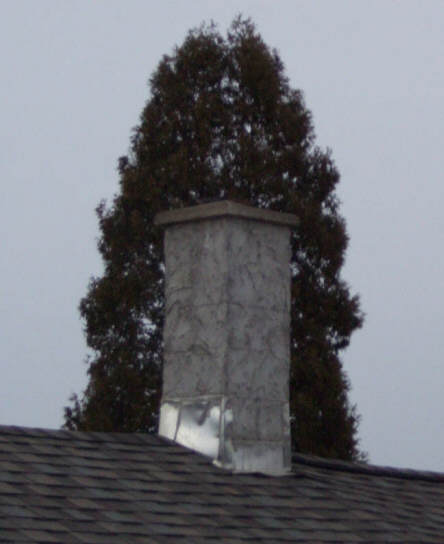
One more picture to add. This is a typical picture of the chimney
with a fire in the stove and the catalytic combustor engaged. As you
can see, there's really nothing to see. I looked up at mine this
afternoon after I noticed one of my neighbor's stoves smoking away.
Scott Also included spreadsheets he used to estimate efficiency after
installing the secondary air supply and the catalytic combustor:
Spreadsheet for estimating
efficiency after secondary air .... (Excel)
Spreadsheet for
estimating efficiency after catalytic combustor ... (Excel)
Back to the
main page on wood burners and biofuels...
Gary March 9, 2011